Showing posts with label Challenge Entry. Show all posts

Sunday, April 1, 2012

Sew Special

Inspiration

Happy April Fool's Day! The only joke here is that this card is the closest I ever get to sewing (My friend, Helen, can attest...). I made this card for the March birthday of my cousin who is a wonderful seamstress, and such a very special person.
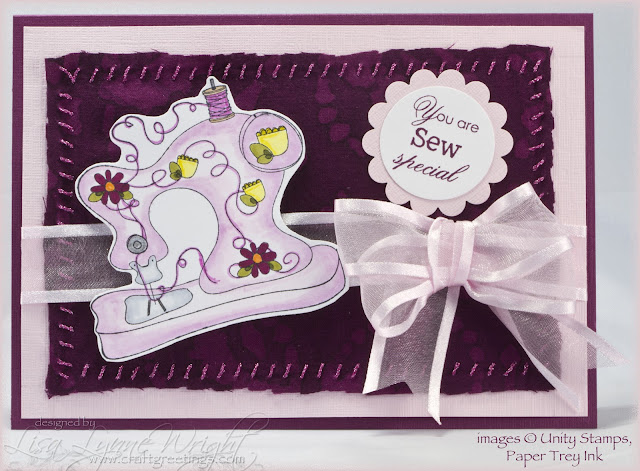
SewSpecial

Ingredients

Note: Finished card size: 5" x 7"

Paper

Rich Razzleberry (SU!)7" x 10", scored at 5"
Pink Pirouette textured (SU!)4 7/8" x 6 7/8", and
2" x 2"
Stamper's Select White (Paper Trey Ink)4" x 4", and
2" x 2"

Ink

Memento Tuxedo Black (Tsukineko)
Rich Razzleberry (SU!)

Stamps

Sew Cute (Unity)
Heartfelt Basics (Paper Trey Ink)

Accessories

COPIC markers (Imagination International)
SPICA (Imagination International)
Fabric (Joann)
SewEasy (We R Memory Keepers)
Sew Easy Fancy Floss (We R Memory Keepers)
Ribbon (Hobby Lobby)
Peg Bow Maker (UNITY)
1 3/8" Circle Punch (SU!)
Scalloped Circle Punch (SU!)
3-D Foam Squares (Scrapbook Adhesives)
Clear tape (3M)
ATG (3M)
Rotary Trimmer (Fiskars)

Ingredients

BASE CARD

Cut a piece of dark purple card stock measuring 7" x 10", score it at 5", and fold.

MATS

Cut a piece of pink card stock measuring 4 7/8" x 6 7/8". Cut a piece of fabric about 4 1/4" x 6 1/4". Use the Sew Easy tool to punch holes through the paper about a 1/2" from the edge. Attach the fabric to the pink mat stitching through the holes in the pink mat, and using tape to anchor the thread to the back of the mat. Tie a double-loop bow onto a strip of ribbon, and mount it around the mat. Mount the mat onto the front of the card.

IMAGE

Stamp the sewing machine using black ink on white paper. Color with COPICS and SPICA pens. I used these colors:

  • Sewing Machine: RV0000, RV63, RV66
  • Presser Foot: C00, C3
  • Spool: E33
  • Thread: SPICA Pink
  • Daisies: RV69, SPICA Orange
  • Tulips: Y02
  • Leaves: YG95, 99

Mount on the front of the card using foam squares.

SENTIMENT

Stamp the sentiment on white paper using dark purple ink. Punch out with a 1 3/8" circle punch. Punch a scalloped circle from pink card stock. Glue the sentiment onto the scalloped circle. Mount on the front of the card using foam squares.

Thanks for stopping by!

Orange_Green

Friday, March 9, 2012

Making History

Inspiration

I picked up this stylish lady image at one of the stamp shows in Dallas earlier this year. It really is fun! I immediately thought it would be perfect for a friend's birthday this week, and thought how versatile it would be if I used paper piecing - a new patterned paper equals a new dress!

After I made it, I found that the Corrosive Challenge Blog has a paper piecing challenge this week called "Give Piece a Chance" - how cute!

I'm entering this one in the Craft Your Passion challenge, too - it's an "anything goes" week.

MakingHistory

Ingredients

Note: Finished card size: 5" x 7"

Stamps

Belle (Rubbernecker Stamps)
Favorite Thoughts (SU!)

Paper

So Saffron (SU!)7" x 10", scored at 5"
Certainly Celery (SU!)3 1/2" x 6 7/8"
Cameo Coral (SU!)4 1/2" x 5 1/2"
Classic K Designer Paper (K & Co)4 1/2" x 5 1/2"
Lost & Found Designer Paper (My Mind's Eye)4 1/2" x 5 1/2"
Stamper's Select White (Paper Trey Ink)4 1/2" x 5 1/2", and
2 1/2" x 3 1/2"

Ink

Memento Rich Cocoa (Tsukineko)

Accessories

Grand Ovals (Spellbinders)
Grand Big Scalloped Ovals (Spellbinders)
Ribbon Banners (Spellbinders)
Grand Calibur (Spellbinders)
Ribbon (Hobby Lobby)
Peg Bow Maker (Unity Stamps)
COPIC Markers (Imagination International)
SPICA Glitter Pen (Imagination International)
Diamond Destress Stickles (Ranger)
Zip Dry
Double sided Sticky Tape (PK Glitz)
ATG (3M)
Scor-Pal
Rotary Trimmer (Fiskars)

Instructions

BASE CARD

Make the base card using a piece of yellow card stock cut to 7" x 10". Score it at 5", and fold.

MAT LAYER

Cut a piece of light green card stock to measure 3 1/2" x 6 7/8". Using double sided tape, mount a strip of ribbon vertically on the left side of this mat layer. Mount the mat on the left side of the card front. Tie a matching bow, and adhere to the ribbon strip.

IMAGE

Stamp the image 3 times: once on the dress fabric patterned paper, once on the pink designer paper, and once on a piece of white card stock measuring 4 1/2" x 5 1/2". Cut/emboss the image on white card stock using the Grand Ovals die that leaves a small border around the image. On the white image using COPIC markers, color the face, arms, legs using E000 and E02, and hair using Y21. Color the bracelets with a green SPICA glitter pen.

Cut the dress and hat band out carefully. Cut the hat, dress belt and collar, drape, and shoes from the pink paper image. Carefully glue the trimmed images onto the white image.

Cut/emboss a Grand Scalloped Oval from the pink card stock. Mount on the card fron to the right of the bow. Adhere the image oval onto the scalloped oval mat. Use Diamond Stickles to cover the embossed edge of the pink scalloped oval.

SENTIMENT

Cut/emboss a ribbon banner from white card stock. Stamp the sentiment in brown ink on the white ribbon die cut. Mount below the image on the card front. Use Diamond Stickles to cover the embossed edges of the ribbon banner.

Thanks for stopping by!

Orange_Green

LinkWithin

Blog Widget by LinkWithin