Showing posts with label Chalks. Show all posts

Friday, May 4, 2012

Hang In There

Inspiration

My last creation for the Heartfelt Creations blog this week is a card for someone who needs a little helping hand - just a nature-themed card with a simple sentiment of "hang in there"!

HangInThere

Ingredients

Note: finished card size is 5" x 7"

Heartfelt Creations Products

Paper

Green #3 (Die Cuts With a View)7" x 10", score at 5"
Green Stripes (Colorbok)1 1/2" x 4 3/4" (4 pieces)
Always Artichoke (SU!)4 5/8" x 4 7/8", and
2" x 4 1/4"
Light Green paper (unknown)3 7/8" x 4 3/4"
Vintage Cream (PTI) 5" x 5", and
2" x 4"

Ink

Sepia Archival Ink (Ranger)
Distress Inks (Ranger): Forest Moss

Accessories

Fancy Tags 2 Shapeabilities (Spellbinders)
Grand Calibur (Spellbinders)
Ink Blending Tool (Ranger)
Ribbon (Hobby Lobby)
Cream Chalks (Pebbles): Earth Tones and Precious Metals
Chalk applicator & cotton pom-poms (Pebbles)
Art Masking Tape (Eclipse)
1/8" Sticky Tape (PK Glitz)
3-D Foam Squares (Scrapbook Adhesives)
Cutter Bee craft knife (EK Success)
ATG (3M)
Scor-Pal
Rotary Trimmer (Fiskars)

Instructions

BASE CARD

Start with a piece of light green card stock measuring 7" x 10", score at 5" and fold. Add 4 pieces of striped paper each measuring 1 1/2" x 4 3/4".

IMAGE MAT

Cut a piece of dark green card stock measuring 4 5/8" x 4 7/8". Adhere a double strip of ribbon with a single knot around the middle of the green mat. Add a smaller piece of lighter green patterned paper measuring 3 7/8" x 4 3/4".

IMAGE

Stamp the tree image on ivory card stock using Sepia ink. Use the masking tape to mask the tree trunks, and stamp the curly fern on the left of the trees. Stamp the open fern to the right of the tree trunks. Trim closely, including the space between the trees. Stamp another open fern and trim. Stamp the tree leaves again and cut out. Color the trees and ferns with chalks. Mount the tree on the front of the card with foam squares. Add the extra tree leaves and fern using foam squares.

SENTIMENT

Cut/emboss dark green card stock with a Fancy Tag die. Use the ink blending tool to add green ink around the edges of the tag. Stamp the sentiment in Sepia ink on ivory card stock, and trim closely. Glue the sentiment to the tag, and mount the tag onto the front of the card with foam squares.

Thanks for stopping by!

Orange_Green

Thursday, November 10, 2011

Nature Laughs

Inspiration

We're right in the middle of autumn - the clocks have "fallen back" and the northeast has already seen snow! And I'm trying to come up with a masculine card for fall birthdays... Trees are always good for masculine cards... Here's the Heartfelt Creations' All Seasons Tree - a beautiful tree that can be colored to fit any season, and today my season is autumn - perfect!!! And, you know, this would work for a feminine autumn birthday, too!

Nature Laughs

Ingredients

Note: Finished card size is 5" x 7"

Paper

Really Rust (SU!)7" x 10"; scored at 5"
More Mustard (SU!)3" x 6 1/2"
2009 Specialty (SU!)3 1/2" x 3 1/2"
Kraft (SU!)4 1/2" x 4 1/2"
Vintage Ivory (Papertrey Ink)2 1/2" x 3"

Ink

Timber Brown (StazOn)
Early Espresso (SU!)
More Mustard (SU!)
Really Rust (SU!)

Stamps

HCPC 3331 All Seasons Tree PreCut Set (Heartfelt Creations)

Accessories

Fleur De Lis Square Nestabilities (Spellbinders)
Labels 18 Nestabilities (Spellbinders)
Cuttlebug (Provo Craft)
Chalks (Koss)
Prong pick-up tool (Excel)
Cotton Pom-poms
Sponges
3-D Foam Squares (Scrapbook Adhesives)
ATG (Scotch)
Scor-Pal
Scissors (Cutter Bee)
Rotary trimmer (Fiskars)

Instructions

BASE CARD

Start with a piece of rust-colored card stock measuring 7" x 10", and score it at 5", and fold. Using a sponge, apply rust-colored ink around all four edges of the card front. Cut a piece of yellow card stock measuring 3" x 6 1/2". Using a sponge, apply yellow ink around all four edges of the yellow card stock. Mount the yellow card strip centered on the front of the card. Cut a square from the brown glittering paper measuring 3 1/2" x 3 1/2". Mount this on the card, so that one point is touching the left edge of the card and one point is touching the top edge of the card.

IMAGE

Cut/emboss the largest Fleur de Lis square from the Kraft card stock. Using a sponge, apply brown ink around all four edges of the die cut to enhance the embossed pattern. Stamp the tree image using StazOn brown ink in the center of the die cut. Apply fall-colored chalks to the tree leaves. Mount the image on the card front, leaving some of the yellow strip showing on the right of the image.

SENTIMENT

Stamp the sentiment in brown ink on ivory paper. Cut/emboss the sentiment using the Label 18 Nestabilities die. Mount to the left of the tree image using foam squares.

HC Blog

Head over to the Heartfelt Creations blog for all the beautiful creations the talented design team members!

Thanks for stopping by!

Blue_Orange

Thursday, June 16, 2011

Anniversary Bell

Inspiration

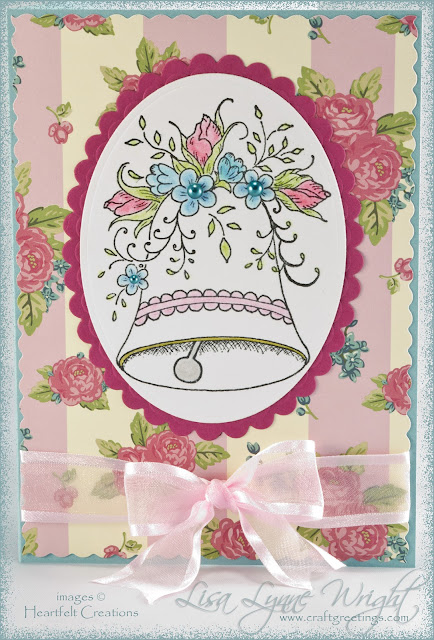
I'm working on cards for June anniversaries, and here's one that features the Wedding Bell from the HCPC 3398 Bella Rose Wedding set, one of the beautiful images from June release - the Heartfelt Wedding Collection. Visit the HC blog to see all of this week’s beautiful creations by the design team.

Wedding Bell

Ingredients

Note: Finished card size is 5" x 7"

Paper

Baja Breeze (SU!) 7" x 10", score at 5"
Springtime Vintage DSP (SU!) 5" x 7"
Rose Red (SU!) 3" x 4"
Whisper White (SU!) 3" x 4"

Inks

Brilliance Archival Black (Tsukineko)
Not Quite Navy (SU!)

Stamps

HCPC 3398 Bella Rose Wedding PreCut Set
HCPC 3404 Wedding Sentiment PreCut Set

Accessories

Grand Calibur (Spellbinders)
Petite Scallop Oval Large (Spellbinders)
Petite Oval Small (Spellbinders)
Fancy Tags 3 Shapeabilities (Spellbinders)
Labels 10 (Spellbinders)
Clear embossing powder (Stampendous)
Heat gun
Chalk Pastels (Koss)
Gold metallic pen (Uniball)
Bow-Easy
Ribbon (Michaels)
Adhesive blue pearls (Recollections)
Scor-Pal
ATG 714
Scissors
Rotary Trimmer with straight and scalloped blades

Instructions

Image

Stamp the bell image on white cardstock with black pigment ink, and heat emboss with clear powder. Lightly color the flowers and trim using chalks - I used small sponge applicators. Use the gold metallic pen to color the rim of the bell. Use the plain oval Nestabilities die to cut out the bell image.

Cut and emboss a scalloped oval from the dark pink cardstock, and mount the bell image onto it.

Assembly

Use a scalloped blade on your paper trimmer to cut the patterned paper to 4 7/8" x 6 7/8". Tie a bow and thread a straight ribbon through the bow, and mount this on the lower part of the patterned panel. Mount the image oval centered above the bow.Wedding Bell inside

Inside

Cut and emboss dark pink cardstock, using the fancy tag Nestabilities die. Stamp the sentiment on white cardstock, and cut and emboss it, using the Label 10 Nestabilities die. Mount the white sentiment on the tag, and mount it on the inside.

Thanks for stopping by!

Blue_Orange

LinkWithin

Blog Widget by LinkWithin