Showing posts with label Penny Black. Show all posts

Sunday, February 26, 2012

Get Well Wishes

Inspiration

Here's a card I made for a friend who had a serious surgery last week - I thought it was a cheery image perfect to send to make her feel better.

GetWellWishes

Ingredients

Note: Finished card size: 5 1/2" x 5 1/2"

Stamps

You Are the Bestest (Penny Black)

Paper

Daffodil Delight (SU!)5 1/2" x 11", scored at 5 1/2"
Certainly Celery (SU!)5" x 5"
Delicate Dots DSP (SU!)4" x 4 1/2
Stamper's Select White (Paper Trey Ink)3 1/2" x 3 3/4"

Ink

StazOn Jet Black (Tsukineko)

Accessories

Ribbon (SU!)
Peg Bow Maker (Unity Stamps)
Colored Pencils (Prisma Color)
Glue dots
Zip-Dry Glue
1/4" Double-sided tape (PK Glitz)
ATG (3M)
Scor-Pal
Rotary Trimmer (Fiskars)

Instructions

BASE CARD

Cut a piece of yellow card stock measuring 5 /12" x 11", score it at 5 1/2", and fold.

MAT LAYER

Cut a piece of green card stock measuring 5" x 5", and a piece of patterned paper measuring 4 1/2" x 4". Mount the patterned paper on the green mat so that when you place it on the card, the green mat will be centered, and the patterned mat will reach the left side of the card. Mount a strip of ribbon vertically along the left side of the mat using double-sided tape, with a twist in the ribbon where you will adhere the bow. Tie a bow of matching ribbon, and use glue dots and Zip Dry glue to mount it on the twist in the ribbon.

IMAGE

Using StazOn ink, stamp the image on white card stock measuring 3 1/2" x 3 3/4". Color with colored pencils. Mount on the card front so that the image panel is centered over the patterned paper, and reaches the right side of the card.

Thanks for stopping by!

Orange_Green

Thursday, December 23, 2010

Holiday Thanks

Inspiration

Good morning!  I’m late posting my mid-week card – yesterday was my last day at work for 2010(yea!!!) and I had lots to do to make sure I don’t have to worry much about work for the next 10 days.  So I’m starting my holiday week with my blog post.

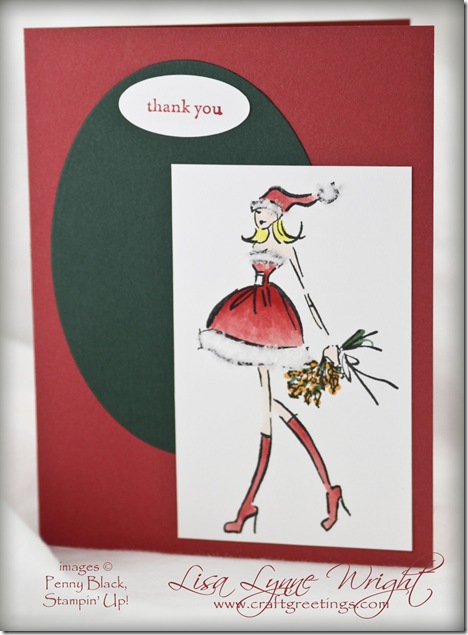
Unfortunately, I’ve been late on all sorts of things this season – I only sent my birthday thank you cards this week with my late Christmas cards.  So my birthday thank you’s have a Christmas-y feel:

Blog_20101223_HolidayThanks

Ingredients

Paper

Note: finished card size is 4 1/4” x 5 1/2”

Ruby Red (SU!)

5 1/2” x 8.25”, score at 4 1/4”

Hunter Green (SU!)

3 1/2” x 4 1/2”

Stampers Select White (Paper Trey)

a) 2 1/2” x 4”
b) small scrap

Ink

Ruby Red (SU!), Tuxedo Black (Memento)

Stamps

Mademoiselle Noel (Penny Black); Teeny Tiny Wishes (SU!) 

Accessories

COPIC Markers (Imagination International); Plain Oval Nestabilities die (Spellbinders); Cuttlebug (Provo Craft); Oval punch (SU!); Polar White Flower Soft (flower-soft.com); Flower Soft glue (flower-soft.com); Scor-Pal; Adhesive Transfer Gun 714 (Scotch); Rotary trimmer with straight blade (Fiskars); Scissors

Instructions

Images

Stamp the sentiment on a small scrap of white paper in red, and punch it out using the oval punch.

Stamp the image on the white panel in black, and color with COPICs.  Here’s the colors I used:

  • Hat/Dress/Boots: R21, R24, R27
  • Skin: E000, E00
  • Hair: Y02, Y08
  • Flowers: YR15, G28

Spread glue on the trim areas of the skirt and hat, and sprinkle on the Flower Soft, and press to set.  Let dry.

Assembly

Run the green panel through the die cutter with the Oval Nestabilities die.

Mount the green oval positioned to the upper left on the front panel of the base red card. Add the sentiment at the top of the oval.

Mount the image panel positioned in the lower left of the card.

Final Notes

Grateful

I want to express my thanks to all who have left comments on my work over the past few months – I really enjoy hearing from you all.  Blogging is a funny thing – you spend time writing and send your creation out in the web, and hope someone will respond.  It is so nice when you get a comment on your efforts.

I wish you all a very Merry Christmas!

Thanks for stopping by.
BlueSignature

Sunday, April 26, 2009

Graduation!

MarquetteGrad Inspiration

A friend has niece graduating from Marquette in May, and asked me to make a card.  Graduation cards are one of my favorite – they are easy to personalize by finding the colors or mascot or other fun information about the school.  For this card, I found the Marquette blue and yellow logo, and borrowed the colors.  I think the stamp from Penny Black captures the joy of the accomplishment and the event perfectly.

Ingredients

CARDSTOCK (all SU!): Summer Sun, Brilliant Blue, Whisper White

STAMPS: Graduates (Penny Black), Tassel Time(SU!), Cap (Ducks in a Row)

INK (all SU): Basic Black

ACCESSORIES:  Summer Sun and Brilliant Blue Markers (SU!); Uni-ball Gel Impact Gold Pen (Sanford); Scor-Pal; Scissors; Adhesive Transfer Gun 714 (Scotch); Rotary trimmer with straight (Fiskars)

Instructions

BASE CARD: Cut a piece of yellow cardstock measuring 10” x 7”, and score it in the middle at 5”.

MAT: Cut a piece of blue cardstock measuring 4 7/8” x 6 7/8”, and mount it on the front of the base card.

IMAGES: Graduates: Stamp the graduates image on a white cardstock piece measuring 4” x 2 3/4”.  Mount it on a yellow cardstock piece measuring 4 1/8” x 2 7/8”.

Congratulations: Stamp the sentiment on white cardstock, and color the cap and diploma using the markers.  Trim around the image closely, and then mount it on yellow cardstock, and trim it again.

Cap / Diploma: Stamp the cap and diploma on white cardstock and trim closely.

ASSEMBLY: Mount the graduates image at an angle in the center of the blue mat on the base card.  Add the sentiment in the lower right corner, and the cap and diploma in the upper left corner.

INSIDE: For the inside, choose an appropriate sentiment.  I used a stamp from Cornish Heritage Farms that quote Thoreau:  “Go confidently in the direction of your dreams!  Live the life you have imagined.”

Thanks for stopping by!

LinkWithin

Blog Widget by LinkWithin