Showing posts with label Tim Holtz. Show all posts

Sunday, June 10, 2012

In Sympathy

Inspiration

This card was made for a co-worker who lost his father to cancer recently. It's based on sketch challenge 193 at Splitcoast Stampers, using Tim Holtz techniques for coloring the tag.

InSympathy

Ingredients

Note: finished card size is 5" x 7"

Stamps

Tim Holtz - Flutter (Stamper's Anonymous)
Tim Holtz - Papillion (Stamper's Anonymous)
Sympathy Sentiment (Heartfelt Creations)

Paper

Soft Suede (SU!)7" x 10", scored at 5", and
2 1/2" x 3"
Crushed Curry (SU!)1 1/2" x 7"
Bermuda Bay (SU!)1" x 4 1/4" (3 pieces)
Alla Prima (Prima)3/4" x 4 1/4" (3 pieces), and
2 1/2" x 3"
#5 Manilla Tag (Ranger)

Ink

Distress Ink (Ranger)
Jet Black Archival (Ranger)
Bermuda Bay (SU!)

Accessories

Lacy Oval Nestabilities (Spellbinders)
Classic Oval - Large Nestabilities (Spellbinders)
Grand Calibur (Spellbinders)
Ink Blending Tool (Ranger)
Fiber (unknown)
3-D Foam Squares (Scrapbook Adhesives)
ATG (3M)
Scor-Pal
Cutter Bee Scissors (EK Success)
Rotary Trimmer (Fiskars)

Instructions

BASE CARD

Start with a piece of brown card stock measuring 7" x 10", score at 5" and fold. Using black ink, and holding the butterfly stamp in your hand instead of on an acrylic block, randomly stamp various butterflies over the card front.

BACKGROUND LAYERS

Cut a strip of yellow card stock to 1 1/2" x 7", and mount vertically on the card front 3/4" from the left edge. Cut 3 strips of blue paper to 1" x 4 1/4", and 3 strips of patterned paper to 3/4" x 4 1/4". Mount each strip of patterned paper onto a blue strip, then mount horizontally on the front of the card.

TAG

I made this tag using the "Spritz & Flick" technique from Tim Holtz. First, using the blending tool cover the tag with colors. I used Tumbled Glass, Peeled Paint, and Wild Honey. When you have those blended the way you like them, add Brushed Corduroy around the edges of the tag. Now, spritz some water into your cupped hand, and flick droplets across the tag off your fingers. You can do a little or a lot.

When the tag is dry (you can dry them with a heat tool if you want to), stamp the image on both tags using black archival ink. Dry the image with a heat tool.

Tie fibers through the hole in the tag, then mount it on the front of the card using foam squares.

SENTIMENT

Stamp the sentiment in blue ink on patterned paper, and cut it out using a classic oval die. Cut/emboss a brown lacy oval. Mount the sentiment oval onto the brown oval, and mount on the card using foam squares.

Thanks for stopping by!

Orange_Green

Wednesday, May 30, 2012

Special Tea

Inspiration

Happy Heartfelt Creations' Wednesday! I have another card created with this month's Old English Garden Collection. The tea cup images are wonderful for creating a vintage, tattered look. I found a pack of doilies I'd bought long ago just knowing they'd come in handy someday, and thought they went beautifully with the teacups.

The Heartfelt Creations blog has beautiful creations from the design team this week - be sure to go visit!

SpecialTea

Ingredients

Note: finished card size is 5" x 7"

Heartfelt Creations Products

Paper

Marina Mist (SU!)7" x 10", scored at 5"
Wild Wasabi (SU!)4 7/8" x 6 7/8"
Soft Suede (SU!)4 3/4" x 6 3/4", and
4 1/2" x 4 1/2"v
Soft Sky (SU!)4 5/8" x 6 5/8"
Watercolor Paper (Canson)4 1/2" x 4 1/2", and
2" x 4 1/2"

Ink

Sepia Archival (Ranger)

Accessories

Other Products Available at Heartfelt Creations
Additional Accessories
Ribbon (Michaels)
Becca's Peg Bow Maker (ODBD)
4" Medallion Doilie (Royal Lace)
Tim Holtz Distress Markers (Ranger)
Tim Holtz Detail Water Brush (Ranger)
Stamp-A-Ma-Jig
Double-sided Sticky Tape (PK Glitz)
Rotary Trimmer (Fiskars)

Instructions

BASE CARD

Cut a piece of blue card stock measuring 7" x 10", score at 5", and fold.

MATS

Cut green card stock to 4 7/8" x 6 7/8", brown card stock to 4 3/4" x 6 3/4", and light blue card stock to 4 5/8" x 6 5/8". Stamp the small cup in brown ink randomly over the light blue mat. Use the stamp positioner to stamp the small handle on each image. Mount brown onto green, and light blue onto brown. Attach a strip of ribbon about an inch and a half above one edge, then mount the mats to the front of the card.

IMAGE

Stamp the largest tea cup and handle using brown ink onto water color paper, and cut them out using the matching dies. Color using the water brush and distress markers. Cut/emboss brown card stock using the smalled Grand Circle die. Mount onto the card front on the left side. Glue the doily onto the brown circle, then glue the cup and handle onto the doily.

SENTIMENT

Cut/emboss the tag from watercolor paper. Use the water brush and distress marker to shade the tag. Stamp the sentiment in brown ink in the center of the tag, and mount it in the upper right corner of the card front using foam squares. Finish by tying a double bow and glue it on the visible ribbon strip to the right of the image.

Thanks for stopping by!

Orange_Green

Wednesday, May 16, 2012

Beautiful Day Wall Hanging

Inspiration

Welcome to another Heartfelt Creations' Wednesday. We're in the second week of the May release, so be sure to head over to the Heartfelt Creations blog. You'll see all the beautiful creations from the design team, and find out the lucky person who wins the new collection this month!

The May release, the Old English Garden Collection, is one of my favorite all time sets. I love the flower images, and all the ragged background images fit perfectly with the style I'm currently learning - distress and vintage. The style makes the monthly DT requirement of one "altered" project much easier!

Today, I'm showing you a wall hanging I made in just a couple of hours. I used to stare at blank wood and have no idea where to go. The Distress Stains make it all a breeze! And in concert with the new HC images, I think it came out very nicely!

BeautifulDayWallHanging

Ingredients

Heartfelt Creations Products


Paper

Vintage Cream (PTI) 8 1/2" x 11"

Ink

Sepia Archival (Ranger)
Distress Stains (Ranger): Brushed Corduroy, Vintage Photo
Distress Inks (Ranger): Squeezed Lemonade, Wild Honey, Spiced Marmalade, Ripe Persimmon, Antique Linen, Frayed Burlap, Shabby Shutters

Accessories

Other Products Available at Heartfelt Creations
Additional Accessories
Petite Scalloped Oval - Small (Spellbinders)
Ink Blending Tool and Foam (Ranger)
Mod Podge Glue
3-D foam squares (Scrapbook Adhesives)
Stapler
Plain wood "Corner" plaque (PLAID)
Ribbon (Michaels)
Jewel swirls (Paper Studio)
chalk applicator tool with cotton pom poms
scrap cardboard

Instructions

PLAQUE

Sand any rough edges of the plain plaque. Stain the plaque with Brushed Corduroy and Vintage Photo stains.

IMAGES

Cut a piece of cream card stock measuring 5" x 5 1/2". Color this piece of card stock using yellow, brown, and orange shades and the ink blending tool with foam. Stamp the collage image in sepia ink on the colored card stock. Then trim the collage out and darken the edges with a brown shade of ink. Use the chalk applicator to color the smallest flowers and leaves.

Using the collage stamp, stamp the flower images 2 more times in sepia ink on cream card stock. Trim out the leaves from one of the images, and blend with green ink, again darkening the edges.

Trim the flower trio and the single flower from the other collage image. Blend these with yellows and oranges, darkening the edges with a brown shade of ink.

Using the 2 smallest individual blossom stamps, stamp 2 of each size in sepia ink on cream card stock. Color these with yellows and oranges. Use the matching dies to cut these out, then darken the edges with the brown shade of ink.

SENTIMENT

Stamp the sentiment on cream card stock with sepia ink. Cut/emboss it using a scalloped oval die. Add light yellow ink with the blending tool, then darken the edges with the brown shade of ink.

ASSEMBLY

Staple ribbon to the back of the plaque to crate the hanger.

Using ModPodge glue, mount the sentiment and the jewel swirls to the bottom of the plaque front. Cut 2 pieces of scrap cardboard measuring about 2" x 3", and glue them in a stack in the middle of the plaque above the sentiment. Glue the collage to the cardboard stack, creating a 3-D effect.

WallHangingCloseUp

Use foam squares to mount the leaf layer over the matching image on the collage. Mount the flower trio and single flower onto the collage using foam squares. Using glue that dries clear, mount the individual flowers (1 large, 2 small) onto the 3 matching blooms on the collage.

Gather the ribbon just below the mid-point, and staple the remaining bloom onto the ribbon, forming a loop in the top of the ribbon. Finish by gluing dark elements into the center of the 4 mounted blooms.

Thanks for stopping by!

Orange_Green

Sunday, May 13, 2012

Happy Mother's Day

Inspiration

Happy Mother's Day! I hope all the mothers out there are being pampered and spoiled as they so richly deserve! My husband is at home in Tennessee this morning taking care of his mom, like the very good son that he is. Happy Mother's Day, Caroline! And Happy Mother's Day to my Mom, too! I showed you the card for my mother yesterday - Today's card is the one I made for my mother-in-law.

MothersDay2

Ingredients

Note: finished card size is 5" x 7"

Stamps

Poppies (A Stamp In the Hand)
Happy Mother's Day (Stampendous)

Paper

Perfect Plum (SU!)7" x 10", scored at 5"
Old Olive (SU!)4 3/4" x 6 3/4"
Cottage Wall DSP (SU!)4 1/2" x 5"
Elegant Eggplant (SU!)4 1/4" x 4 1/4"
90lb Watercolor Paper (Canson)4 1/4" x 4 1/4"

Ink

Distress Inks (Ranger): Milled Lavender, Dusty Concord, Old Paper, Crushed Olive
Elegant Eggplant (SU!)

Accessories

Fleur De Lis Square Nestabilities (Spellbinders)
Grand Calibur (Spellbinders)
Ink Blending Tool (Ranger)
Mister (Ranger)
Corner Rounder Punch (SU!)
White Ribbon (Hobby Lobby)
Becca's Peg Bow Maker (ODBD)
3-D Foam Squares (Scrapbook Adhesives)
ATG (3M)
Scor-Pal
Rotary Trimmer (Fiskars)

Instructions

BASE CARD and MAT

Start with a piece of light purple card stock measuring 7" x 10", score at 5" and fold.

Cut a mat of dark green card stock 4 3/4" x 6 3/4", and round the corners with a punch. Cut a piece of patterned paper measuring 4 1/2" x 5", round the top two corners with a punch and mount onto the green mat. Stamp the sentiment in dark green ink in the lower right corner of the green mat.

Tie a double bow of white ribbon, with a ribbon strip through the bow, and mount onto the mat across the seam between the patterned paper and the sentiment, with the bow on the far left side of the mat.

Mount the mat with the bow onto the front of the card.

IMAGE

This card uses the "Brushless Watercolor" technique that I learned in the Creative Chemistry 101 course a few weeks ago. Start by tapping the Distress ink pads directly on the stamp. I used mostly the light purple and green pads, then touched the edges of the blossoms with the darker purple shade. Now, mist the stamp with water and stamp it onto the watercolor paper.

Cut/emboss the image using the largest Fleur De Lis square die, and remove it from the die. Use the ink blending tool to add purple shading to the embossed edges of the die cut.

Cut a dark purple mat measuring 4 1/4" x 4 1/4", and round all 4 corners of the mat. Mount this onto the card front above the ribbon, using foam squares. Finally, mount the image onto the mat using foam squares.

Another Version

It's a very versatile design - here's another one I made to use for a special birthday - Same ink and method, but slightly different paper.

MothersDay2Birthday

Thanks for stopping by, and again, Happy Mother's Day!

Orange_Green

Saturday, May 12, 2012

Early Mother's Day

Inspiration

I'm very fortunate to be in my 50's with both my mother and my husband's mother alive and healthy. So I make 2 special cards every May to send off to East Tennessee, where they both live. Today's card is the one I made for my own mother - she loves gardens and butterflies, especially in the spring.

MothersDay1

Ingredients

Note: finished card size is 5" x 7"

Stamps

Fabulous Flourishes (Tim Holtz Collection by Stampers Anonymous)
Floral Wreath (Gina K Designs)
Butterfly and Lilies (Heartfelt Creations)
Mother's Day Centers (Cornish Heritage Farms)

Paper

Pink Pirouette7" x 10"; scored at 5", and
4 1/4" x 5 1/2"
X-Press It Blending Card (Imagination International)3" x 5 1/2"

Ink

Distress Embossing Ink (Ranger)
Distress Inks and Re-Inkers (Ranger): Spun Sugar, Worn Lipstick, and Weathered Wood

Accessories

Butterflight On the Edge Die (Tim Holtz Alterations by Sizzix)
Big Shot Pro (Sizzix)
Fine Detail White Embossing Powder (Sweet Stamps)
Heat Gun
Ink Blending Tool (Ranger)
Tim Holtz Detail Water Brush (Ranger)
Stamp-A-Ma-Jig (EK Success)
Zip Dry Glue
3-D Foam Squares (Scrapbook Adhesives)
Scor-Pal
Cutter Bee Scissors (EK Success)
Rotary Trimmer (Fiskars)

Instructions

BASE CARD

Start with a piece of pink card stock measuring 7" x 10", score at 5" and fold. Stamp the flourish diagonally across the card front using embossing ink, and heat emboss with fine detail white embossing powder.

Use the ink blending tool to shade all 4 edges of the card. If you get ink on the white flourish, simply wipe it off with a paper towel.

BORDER

Use the Butterflight die to cut a border of butterflies using white card stock. Using the ink blending tool, apply Distress inks to color the butterflies. Glue the border to the bottom edge of the card front.

IMAGES

Stamp the butterfly and wreath images on pink card stock using embossing ink, and heat emboss with detail white embossing powder. Carefully cut out both images. Color the images using a brush, and Distress Re-Inkers. Use dark pink ink to stamp the sentiment in the center of the wreath. I use my Stamp-A-Ma-Jig to position the sentiment just where I want it.

Finish by mounting the wreath in the open curve of the flourish and the butterfly in the right upper corner of the card, using foam squares.

Thanks for stopping by!

Orange_Green

Friday, May 11, 2012

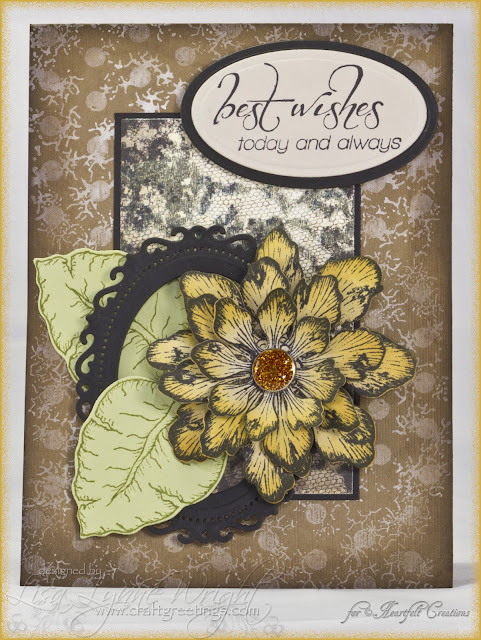
Today and Always

Inspiration

Here's my last card this week for the Heartfelt Creations' May release - the Old English Garden Collection. These are the type of Heartfelt Creations designs that I originally fell in love with - beautiful floral images to easily create 3-D effects! On this card, I incorporated a frame using the new Spellbinders' Floral Oval die with an oval die inside it.

Remember to head over to the HC blog to see all the beautiful DT creations - they are gorgeous!! Leave a comment there by May 15th and you will be eligible to win the entire release valued at $141.99.

TodayAndAlways

Ingredients

Note: finished card size is 4 1/2" x 6"

Heartfelt Creations Products

Paper

Soft Suede (SU!)4 1/2" x 12", scored at 6"
Basic Black (SU!)2 5/8" x 4 1/8", and
3" x 4", and
2" x 3"
Certainly Celery (SU!)2 1/2" x 4 1/4"
Sahara Sand (SU!)4" x 8 1/2"
Classic Black Lace DSP (FabScraps)2 1/2" x 4"

Ink

Jet Black Archival Ink (Ranger)
Distress Inks (Ranger): Peeled Paint, Scattered Straw, Wild Honey, Walnut Stain
Distress Stains (Ranger): Picket Fence

Accessories

Other Products Available at Heartfelt Creations
Additional Accessories
Floral Ovals Nestabilities (Spellbinders)
Petite Oval Nestabilities - Small (Spellbinders)
Petite Oval Nestabilities - Large (Spellbinders)
Ink Blending Tool (Ranger)
Brad (Paper Studio)
3-D Foam Squares (Scrapbook Adhesives)
Rotary Trimmer (Fiskars)

Instructions

BASE CARD

Start with a piece of brown card stock measuring 4 1/2" x 6". Score it at 6", and fold. Ink the background stamp with Picket Fence stain, and stamp the card front. Repeat until the entire front is covered. Set aside to let it dry (if you dry with a heat gun, the white will be more intense than in my sample). When dry, use an ink blending tool and Walnut Stain ink to distress the edges of the card.

MAT

Cut black card stock to measure 2 5/8" x 4 1/8", and patterned paper to measure 2 1/2" x 4". Mount in the center of the card front.

SENTIMENT

Stamp the sentiment in black ink on sand card stock. Cut/emboss with the 2 1/2" petite oval die. Cut/emboss black card stock using the 2 3/4" petite oval die. Adhere the sentiment to the black oval mat.

IMAGE

Stamp the 3 largest blossom images on sand card stock in waterproof black ink, and cut out using the matching dies. Blend yellow inks onto the petals. Stack the flowers, and punch a small hole through the center. Fasten the images together with a brad. Stamp the leaf twice using green ink on green card stock, and cut out using the matching die.

ASSEMBLY

Place a plain oval die inside the 4-inch Floral Oval die, and cut/emboss black card stock to create the oval frame. Adhere one leaf image to the card front, then mount the oval frame using foam squares. Add the next leaf using foam squares over the edge of the frame. Then use a foam square to mount the flower, positioning it to cover part of both leaves. Finish my mounting the sentiment with foam squares on the upper right corner of the mat.

Thanks for stopping by!

Orange_Green

Wednesday, May 9, 2012

Shaped Note Card

Inspiration

Today, Heartfelt Creations is releasing the Old English Garden Collection . If you love HC flowers, this is the release for you! With flower blooms as fresh as the morning dew and cracked walls as old as the dirt beneath it, this set offers a rustic flavor. Be sure to grab the custom die for maximum creative versatility and fun 3D depth! There are 6 new PreCut Stamp Sets and one beautiful new exclusive Spellbinders die designed for Heartfelt Creations. Plus the teacup stamp designs coordinate with the Spellbinders' Nested Teacup die set!

Leave a comment on the HC blog by May 15th and you will be eligible to win the entire release valued at $141.99

I have 3 cards on the HC blog this week, and today I'm presenting a shaped card. The other two cards will be posted on Thursday and Friday this week. Flowers are my favorite stamping/coloring subject, so I had to dive right in with the tattered blossoms. These images are wonderful for working with a "distress" theme. I used watercolor paper, and Distress Re-Inkers to shade the blossoms.

ShapedNoteCard

Ingredients

Note: finished card size is 3 1/2" x 4 1/2"

Heartfelt Creations Products

Paper

90lb Watercolor Paper (Canson)9" x 11 (1 sheet)

Ink

Jet Black Archival Ink (Ranger)
Distress Reinkers (Ranger): Spun Sugar, Tattered Rose, Peeled Paint

Accessories

Other Products Available at Heartfelt Creations
Additional Accessories
Label 18 Nestabilities (Spellbinders)
Tim Holtz Detail Water Brush (Ranger)
Ribbon (Hobby Lobby)
Becca's Peg Bow Maker (ODBD)
Biscotti Perfect Pearl Mist (Ranger)
Zip Dry Glue
Double-sided Sticky Tape (PK Glizt)
3-D Foam Squares (Scrapbook Adhesive)
Cutter Bee Scissors (EK Success)

Instructions

BASE CARD

Cut/emboss 2 Label 18 die cuts from watercolor paper using the largest die. Score across one of the die cuts from point to point at the longest point of the die cut. Fold along the score line, then adhere to the back of the other die cut to form the card.

Mount a strip of ribbon across the middle of the front of the card. To cover up the ribbon ends on the back of the card front, die cut watercolor paper using the next smallest label 18 die and mount over the ribbon ends on the back of the card front.

IMAGE

Cut/emboss the next smallest Label 18 die cut from watercolor paper. Using waterproof black ink, stamp the 3-flower image across the middle of the die cut. Note that the 2 end leaves won't fit - they will be added in another layer.

On the remaining watercolor paper, stamp another 3-flower image, and 2 small individual blossoms, and 1 medium blossom. Use the matching blossom dies, cut out the 3 individual blossoms. Using scissors, "fussy cut" out the second 3-flower image. When you cut this out, trim off the 4 center leaves.

Now watercolor all the images, including the one on the die cut, using distress inks and a water brush.

ASSEMBLY

Using foam squares mount the painted die cut on the center of the card front. Add the trimmed 3-flower image onto the card front using foam squares. Glue the individual blossoms onto the matching flowers on the front of the card. Use the dries clear glue to add Black Gala Glitz in the center of the flowers. Lightly spray the whole card with the Perfect Pearl Mist.

Tie a bow using the same ribbon, and adhere to the base card at the left of the image.

Thanks for stopping by!

Orange_Green

LinkWithin

Blog Widget by LinkWithin