Thursday, June 30, 2011

Antique Linen Bride and Groom

Inspiration

Here's the other wedding card posted on yesterday's Heartfelt Creations blog. It's a little more elegant - using gold metallics and antique linen colors, and June's Heartfelt Wedding Collection release.

Antique Linen Bride

Ingredients

Note: Finished card size is 5" x 7"

Paper

Very Vanilla (SU!) 7" x 10", scored at 5"; and
3" x 4"; and
2" x 3" (2 pieces)
Gold Metallics (Wausau) 2 1/8" x 7" (2 pieces); and
3" x 4"
Gold Wedding Stripe (Paper Studio) 2" x 7"

Inks

Antique Linen Distress (Tim Holtz)

Stamps

HCPC 3404 Wedding Sentiment PreCut Set
HCPC 3394 Classic Bella Rose PreCut Set
HCPC 3391 Bold Bella Rose PreCut Set

Accessories

HCD 712: Bella Rose Die
Grand Calibur (Spellbinders)
Labels 4 Nestabilities (Spellbinders)
Labels 4 SMALL Nestabilities (Spellbinders)
Shell White Superfine Microglitter
Sticky Tape Sheets
Bangle Chain Deep Double Edge Punch (Martha Stewart)
Ribbon (Michaels)
Bow-Easy
Adhesive Gold Pearls (Recollections)
Glue dots
Zip Dry glue
ATG
Scor-Pal
Rotary trimmer

Instructions

Card

Start with a piece of vanilla measuring 7" x 10", and score it at 5". Use the single rose bud stamp from the Bold Bella Rose set to stamp randomly around the front of the card using the distress ink.

Vertical Decoration

Mount a 2" x 7" piece of patterned paper on a strip of gold metallic paper measuring 2 1/4" x 7". Use the double-edged punch to create a strip 7" long from the gold metallic paper. Mount the punched strip to back of one long side of the vertical decoration. Mount a strip of ribbon at the opposite side of the vertical decoration. Mount the entire stack to the right side of the card front.

Sentiment

Cut and emboss a gold label, and a vanilla paper, using the Label 4 dies. Stamp the sentiment on the vanilla label using distress ink. Mount the vanilla label on the gold label, and mount it on the front over the card.

Roses

Stamp one rose on vanilla cardstock using the distress ink. Cut it out using the matching Bella Rose die. For the second rose, mount a piece of Sticky Paper on vanilla cardstock, and cover in microfine glitter. The stamp the rose again on the glittered paper, using the distress ink, and cut it out with the matching die. Mount the plain rose above the sentiment on the card, and the glittered rose just to the left, over the plain rose.

Final Touches

Tie a triple loop bow in matching ribbon, and mount it over the rose stems and above the sentiment. Add 3 gold pearls in the lower right corner of the card.

Thanks for stopping by!

Blue_Orange

Wednesday, June 29, 2011

Vellum Wedding Wishes

Inspiration

It's Heartfelt Wednesday, and I have a couple of wedding cards on the Heartfelt Creations blog. June's Heartfelt Wedding Collection release is so pretty, and gives me lots of ideas for wedding wishes, even though I don't have any weddings coming up!

This one is made from vellum, a perfect medium for wedding greetings. And I used Spellbinders' dies to create a shaped card - really fun.

Vellum Wedding

Ingredients

Note: Finished card size is 5" x 5"

Paper

Vellum5 1/2" x 11", scored at 5 1/2"
Pink "Handmade" Flowers (Paper Studio)5" x 5"; and
2" x 3"
Stamper's Select White (Paper Trey)4" x 4"

Inks

Versamark (Tsukineko)
Rose Red (SU!)

Stamps

HCPC 3398 Bella Rose Wedding PreCut Set
HCPC 3404 Wedding Sentiment PreCut Set

Accessories

Grand Calibur (Spellbinders)
Grand Labels 1 Nestabilities (Spellbinders)
Labels 1 Nestabilities (Spellbinders)
Petite Ovals Large Nestabilities (Spellbinders)
COPIC Markers (Imagination International)
White Embossing Powder (Sweet Stamps)
Heat Gun
Stamp-A-Ma-Jig
Rotary trimmer

Instructions

Image

Stamp the image in embossing ink, and heat emboss with white embossing powder. Use the Labels 1 Nestabilities die to cut out the image. Color the image with COPIC markers. The colors I used were R81, R83, and G82.

Sentiment

Stamp the sentiment in dark pink on the small piece of pink paper, and cut and emboss it using the Oval Nestabilities die.

Card

Vellum Wedding Inside

After folding the scored vellum, position the Grand Labels 1 Nestabilities die just over the folded edge, so that the entire fold is not cut. Cut and emboss to form the shaped card.

Inside

For the inside card, cut and emboss pink paper using the largest Lable 1 Nestabilities dies, so that it fits inside the overall size of the card. Mount it on the inside of the vellum card.

Final Assembly

For the front of the card, mount the oval sentiment in the lower right corner. Add the rosebud image just overlapping the edge of the oval.

Thanks for stopping by!

Blue_Orange

Sunday, June 26, 2011

Look Up at the Stars

Just a Note

I missed last Sunday's post, AND I'm a little late today. I've been transitioning to a new computer over the last two weeks, and it is a BIG transition - I'm moving to an iMAC! My dear husband surprised me with a beautiful new iMAC for our anniversary. So, after 20+ years as a Windows devotee, I'm making the switch and I love it!! However, the transition is a little painful - for things I do by rote on my Windows machine, I now have to do a little research to figure out how to make it work! Like... how to right click the mouse or select text one word at a time! LOL! Anyway, it has somewhat slowed me down. Today is the first post I've done entirely from the iMAC, including the pictures and text. I'll get caught up on my Splitcoast, Technique Junkies, and Facebook galleries soon.

Inspiration

This card is one I made as part of a group of "inspirational" cards. My customer asked for 5 "girly" cards with inspirational sayings. I'll show them all to you over the next few weeks.

Look Up at the Stars

Ingredients

Note: Finished card size is 5" x 7"

Paper

Pixie Pink (SU!)7" x 10"", scored at 5"
Whisper White (SU!)4 3/4" x 6 3/4"

Inks

Pixie Pink (SU!)

Stamps

Beautiful Fairies (Inkadinkado)
Birdie Inspirations (Unity)
Star Background (Rubber Stampede)

Accessories

SPICA Markers (Imagination International)
Sheer Shimmer Spritz - "Sparkle" (Tuskineko)
Pixie Pink and Basic Black markers (SU!)
Sponge
Scor-Pal
ATG 714
Rotary trimmer with straight & deckled blades

Instructions

Cut a white panel using the deckled blade on your rotary trimmer. Ink the fairy with the markers - color the fairy in black and the stars in pink. Stamp the image in the middle of the white panel. Color the image with SPICA markers. The colors I used were Pink, Sand, Baby Blue, Lemon, and Clear.

The sentiment from Unity is all one stamp, so I inked the upper portion of the saying with the black pen and stamped it above the fairy, and the "stars" portion below. I used the Gold SPICA to fill in some of the letters for a little more glitz.

To finish up the the image, I used a sponge and the pink ink to color the deckled edge of the panel, then stamped the star background around the edges. I filled in the largest stars in the background using the Clear SPICA pen.

Finally, mount the white panel onto the front of the card, and spritz the whole card front with the Shimmer Spritz.

Thanks for stopping by!

Blue_Orange

Friday, June 24, 2011

Burgundy Wedding Wishes

Inspiration

Here's my other Heartfelt Creations card posted on the HC blog this week. It's a wedding card, but kind of a winter wedding color theme, I think! This one uses the Bella Rosebuds set, which are just really pretty flowers - they could be used for lots more than just wedding greetings!


Burgundy Wedding Wishes

Ingredients

Note: Finished card size is 4 1/4" x 5 1/2"

Paper

Textured Burgundy (Core'dinations)5 1/2" x 8 1/2", scored at 4 1/4"; and
4" x 4"
Stamper's Select White (Paper Trey)4" x 5 1/4"; and
4" x 4"

Inks

Tuxedo Black (Memento)
Bravo Burgundy (SU!)

Stamps

HCPC 3400 Bella Rosebuds PreCut Set
HCPC 3404 Wedding Sentiment PreCut Set

Accessories

Grand Calibur (Spellbinders)
Lacy Oval Nestabilities
Classic Oval Large Nestabilities
Textile texture embossing folder (Cuttlebug)
SPICA Glitter Markers (Imagination International)
Adhesive gems (Paper Studio)
ATG
Scissors
Rotary trimmer

Instructions

Image

Stamp the rosebut image on white paper in black ink, and cut it out using the largest classic oval Nestabilities die. Color the image with SPICA markers. I used these colors: Garnet, Olive, Blossom. Finish with adhesive gems in the middle of the small flowers. Cut the largest lacy oval Nestabilities die from the burgundy paper, and mount the image oval onto the lacy oval.

Burgundy Wedding Wishes Inside

Assembly

Emboss a piece of white paper using the embossing folder. Use the burgundy ink pad to color the embossed pattern. Trim the edges to end up with a rectangle measuring 3 3/4" x 5". Mount this onto the base card, then add the image in the center of the card.

Inside

Mount a white panel measuring 3 3/4" x 5", and stamp the sentiment in burgundy ink.

Thanks for stopping by!

Blue_Orange

Thursday, June 23, 2011

Lacy Lavender Heart

Inspiration

Since we did shoes yesterday, my weekly Heartfelt Creations cards will be posted today and tomorrow. If you want to check out the Shoe Blog Hop, or to see all the other weekly creations by the design team, be sure to jump over to the Heartfelt Creations blog!

The June release from Heartfelt Creations is the Heartfelt Wedding Collection and it has such pretty images! This card uses the versatile Decorative Lace Border Die, which I trimmed to give it a totally different look. This die presents so many possibilities for ways to use it!

Lacy Lavender Heart

Ingredients

Note: Finished card size is 6" x 6"

Paper

Textured Purple (Core'dinations)6" x 12", scored at 6"; and
4" x 4"; and
1" x 6"; and
4 1/2" x 4 1/2"
Shimmer Glitter Designer paper (Heidi Grace)5 7/8" x 5 7/8" (2 pieces)
Silver white metallic (Wassau)4" x 6"; and
3 3/4" x 3 3/4"
Stamper's Select White (Paper Trey)4" x 4"; and
4 1/4" x 4 1/4"

Inks

Tuxedo Black (Memento)
Elegant Eggplant (SU!)

Stamps

HCPC 3402 Bella Rose Heart PreCut Set

Accessories

HCD 713: Decorative Lace Border Die
Grand Calibur (Spellbinders)
Classic Scalloped Heart Nestabilities (Spellbinders)
COPIC Markers (Imagination International)
Burgundy Embossing Glitter (PK Glitz)
heat gun
embossing marker (Versamark)
Ribbon (Hobby Lobby)
Adhesive gems (Paper Studio)
Foam Tape
Zip Dry
Scissors
Rotary trimmer with straight and scalloped blades.

Instructions

Image

Stamp the heart image on the 4" x 4" white paper with black ink. Cut out the scalloped heart with the matching Nestabilities die. Color the leaves, stems, and roses with COPIC markers. The colors I used are: G21, G24, V91, V93, V95. Color over the background flowers with the clear Versamark marker. Sprinkle the embossing glitter on the embossing ink, and emboss with the heat gun. Add a purple adhesive gem in each scallop of the heart.

Lace Layer

Using the Decorative Lace die, cut a border from the metallic white paper, then trim the border around the round edges to create a more narrow lace trim. Adhere this to the 1" x 6" strip of purple card stock. Wrap a strip of ribbon around the layer, and create a bow and adhere it to the right edge of the layer.

Assembly

Lacy Lavender Heart

After scoring and folding your base card, run the bottom, open edge through the rotary trimmer using a scalloped blade. Do the same for both pieces of the designer paper - trimming only one edge with the scalloped blade. Adhere one piece of the designer paper to the base card. Mount the lace layer across the middle of the card. Mount the 4" square of purple card stock over the lace, centering it on the card. Add the metallic white square on the purple one, and add the scalloped heart using foam tape.

Inside

For the sentiment, mount the other designer paper square, with one scalloped edge. For the sentiment, mount the 4 1/2" purple square, followed by the remaining white square, and stamp the sentiment in dark purple.

Thanks for stopping by!

Blue_Orange

Wednesday, June 22, 2011

Shoe Hop!!!

Vintage Shoe Party ShoeBright Floral Shoe

Welcome to the Heartfelt Creations Shoe Hop!

The Heartfelt Creations design team has been SOOOO busy! We are making projects for the July CHA with all sorts of beautiful fall colors with a vintage feel. And today, we're showing off Heartfelt Creations' images with a Shoe Hop - we've become paper cobblers - making designer paper shoes - SO MUCH FUN!

To make sure you see all the beautiful shoe creations, the hop started on the Heartfelt Creations blog, and if you're following the links, you came from the lovely creations of Giovana Smith. If you're starting here, you're "in the middle"! You can head to the HC Blog to start at the beginning, or simply follow the link at the bottom of the post to the next shoe creation, then work your way around.

I have a couple of cards on the HC blog today, too - so I will post them tomorrow and Friday - be sure to stop back to see the details. I made 3 shoes, two of which are on the HC blog. Only one has a "vintage" feel to it - once I made one, I was in party mood and created a couple of bright shoes. I made the orange one as a gift, so it's a little "extra" for today's hop.

Designing the Shoes

For creating these shoes, I started with a template from Ellen Hutson. As much as I'd like to call myself a "paper engineer", I haven't quite gotten to the point that I can create a 3-d replica of an object without assistance. Using a template let me concentrate on colors and textures, instead of obsessing about how the paper would shape up. Of course, I still did a fair amount of that, too... I altered the template slightly for the pink and orange shoes, to create a criss-cross toe instead of a single piece. And for the orange one, I used created a separate heel, using some corregated card stock.

Here's some hints for using templates:

  • Create your first shoe out of scrap paper - I went through several attempts before I got one I actually liked. I would have learned a lot by doing a scrap one first.
  • Instead of tracing the template onto the paper, use repositionable adhesive to attach the template to the paper and trim around the shapes.
  • Cut two at once - my shoes came out much better when I cut both sides at the same time; For the pink shoe, I actually folded the paper, and lined up the back of the shoe on the fold so that the shoe upper was a single piece.
  • Be sure to score the folds you will make, and make them wide enough to hold the tape you use. The bone folder is essential for getting the crisp creases you need.


Vintage Shoe

Vintage Shoe

Paper

Ancestor.com Designer Paper (K & Company)
Stamper's Select White (Paper Trey)

Inks

Tea Dye Distress Ink (Tim Holtz)

Stamps

HCPC 2274: Graceful Pansy 2 PreCut Set
HCPC 2273: Graceful Pansy 1 PreCut Set

Accessories

Grand Calibur (Spellbinders)
Peony Nestabilities (Spellbinders)
Shell White Microfine Glitter
Sticky Tape Sheets
Double-sided tape (PK Glitz>
COPIC markers (Imagination International)
Rose shaped bead (CTMH)
Pleated lace fringe (Offray)
Bone folder
Zip Dry
Scissors

Shoe Decoration

For the flower on the toe of the shoe, I applied a piece of the sticky tape sheet to white cardstock, then covered it in the microfine glitter. Then I stamped two pansy images in the tea dye ink onto the glitter, and colored with COPIC markers (B70). It produces a very pretty effect!


Party Shoe

Orange Party Shoe

Paper

Designer paper (American Crafts)
Orange corregated cardstock (unknown)

Inks

Pumpkin Pie (SU!)

Stamps

HCPC 2241: Innoscents Flowers 1 PreCut Set
HCPC 2242: Innoscents Flowers 2 PreCut Set

Accessories

Grand Calibur (Spellbinders)
Blossom 2 Nestabilities (Spellbinders)
Paper Blossoms Toolkit (McGill)
Double loop edge punch (Martha Stewart)
Blue gem brad (Paper Studio)
Bone folder
Zip Dry
Scissors

Shoe Decoration

For the paper loop edge, I punched a long edge from the same paper, and adhered it to the inside of the top edge of the shoe before I started the shoe assembly. For the flower, I stamped the larger flower on the orange side of the paper, and the small flower on the dotted side of the paper, and cut them out using the matching Blossom 2 Nestabilities dies. Then I clipped the flower petals, and distressed them using the paper petals tool kit. I punched a hole through the center of the stacked flowers and the toe of the shoe, and mounted the flower with the brad. For the heel, I simply cut the shoe straight across the back, eliminating the heel that was part of the template. Then I folded the corregated cardstock into a triangle and stuck it up into the heel area of the shoe, then cut it off and the right height. I mounted it with Zip Dry.


Bright Floral Shoe

Bright Floral Shoe

Paper

TheGoods designer paper (American Crafts)
Stamper's Select White (Paper Trey)

Inks

Rose Red (SU!)

Stamps

HCPC 3370 Easter Lilies PreCut Set

Accessories

Crystal lacquer in pink and clear
Double-sided tape (PK Glitz>
Small adhesive gems (Recollections)
Bone folder
Zip Dry
Scissors

Shoe Decoration

For the flower spray on the side of the shoe, I stamped the flowers in pink ink on white paper and trimmed it closely. Then I added pink crystal lacquer on the flowers and buds, and clear crystal lacquer on the leaves. While the lacquer was still wet, I placed a small pink adhesive gem on each stamen in the center of the flowers. After it was completely dry, I used Zip Dry to adhere it to the shoe.

Following the Hop!

Thanks for checking out our shoe hop! Your next stop is "down under" with the beautiful works by Sue Walsh. Enjoy the journey!!!

Blue_Orange

Thursday, June 16, 2011

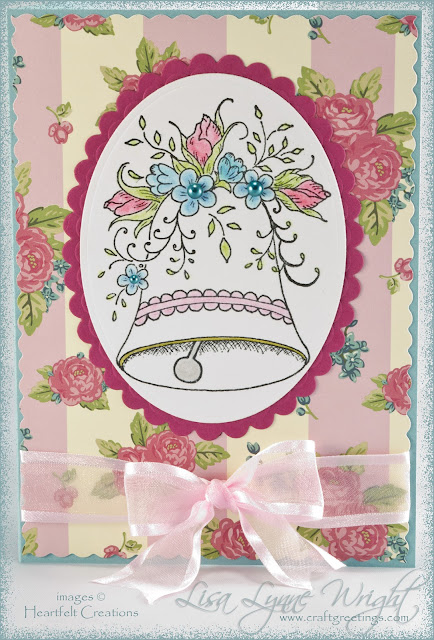
Anniversary Bell

Inspiration

I'm working on cards for June anniversaries, and here's one that features the Wedding Bell from the HCPC 3398 Bella Rose Wedding set, one of the beautiful images from June release - the Heartfelt Wedding Collection. Visit the HC blog to see all of this week’s beautiful creations by the design team.

Wedding Bell

Ingredients

Note: Finished card size is 5" x 7"

Paper

Baja Breeze (SU!) 7" x 10", score at 5"
Springtime Vintage DSP (SU!) 5" x 7"
Rose Red (SU!) 3" x 4"
Whisper White (SU!) 3" x 4"

Inks

Brilliance Archival Black (Tsukineko)
Not Quite Navy (SU!)

Stamps

HCPC 3398 Bella Rose Wedding PreCut Set
HCPC 3404 Wedding Sentiment PreCut Set

Accessories

Grand Calibur (Spellbinders)
Petite Scallop Oval Large (Spellbinders)
Petite Oval Small (Spellbinders)
Fancy Tags 3 Shapeabilities (Spellbinders)
Labels 10 (Spellbinders)
Clear embossing powder (Stampendous)
Heat gun
Chalk Pastels (Koss)
Gold metallic pen (Uniball)
Bow-Easy
Ribbon (Michaels)
Adhesive blue pearls (Recollections)
Scor-Pal
ATG 714
Scissors
Rotary Trimmer with straight and scalloped blades

Instructions

Image

Stamp the bell image on white cardstock with black pigment ink, and heat emboss with clear powder. Lightly color the flowers and trim using chalks - I used small sponge applicators. Use the gold metallic pen to color the rim of the bell. Use the plain oval Nestabilities die to cut out the bell image.

Cut and emboss a scalloped oval from the dark pink cardstock, and mount the bell image onto it.

Assembly

Use a scalloped blade on your paper trimmer to cut the patterned paper to 4 7/8" x 6 7/8". Tie a bow and thread a straight ribbon through the bow, and mount this on the lower part of the patterned panel. Mount the image oval centered above the bow.Wedding Bell inside

Inside

Cut and emboss dark pink cardstock, using the fancy tag Nestabilities die. Stamp the sentiment on white cardstock, and cut and emboss it, using the Label 10 Nestabilities die. Mount the white sentiment on the tag, and mount it on the inside.

Thanks for stopping by!

Blue_Orange

Wednesday, June 15, 2011

Happy Anniversary

Inspiration

As I told you on Sunday, I just celebrated my 31st anniversary. Here's the card I made for my DH. When I saw the background stamp in the Heartfelt Creations booth at the scrapbook convention, I knew it would be perfect for our anniversary - we had 1 Corinthians 13 read at our wedding and has always meant so much to us both.

The main images are from Heartfelt Creation's new release - the Heartfelt Wedding Collection. Today's HC blog features all the beautiful creations by the design team, and the winner of the full release is announced - be sure to check it out.

Happy Anniversary

Ingredients

Note: Finished card size is 4 1/4" x 4 1/4"

Paper

Basic Black (SU!) 5" x 10"
Very Vanilla (SU!) 4" x 4" (2 pieces)

Inks

Versamark (Tsukineko)

Stamps

HCPC 3398 Bella Rose Wedding PreCut Set
HCPC 3402 Bella Rose Heart PreCut Set
HCPC 3323 Large Elegant Word Background PreCut Set

Accessories

Grand Calibur (Spellbinders)
Labels 3 (Spellbinders)
Scalloped Square Grand Nestabilities (Spellbinders)
Lacy Squares Nestabilities (Spellbinders)
Ultrafine gold embossing powder (Stampendous)
Heat gun
Pen-Touch Calligrapher 5mm Gold metallic pen (Sakura)
Zip Dry
Scor-Pal
ATG 714
Scissors
Rotary Trimmer

Instructions

Base Card

Start by stamping the word background in embossing ink at one end of a piece of black card stock measuring 5" x 10". Heat emboss with gold powder. Score the card at 5" and fold. Position the Scalloped Square Grand Nestabilities die so the fold of the card is just below the row of scallops and secure in place with tape. Cut and emboss - this gives the card scallops on three sides.

Image

Cut and emboss a Label 3 from vanilla cardstock. Stamp the rose/ring image in embossing ink on the Label 3, and heat emboss with gold powder.

Sentiment

Cut and emboss a Lacy Square from vanilla cardstock. Use a black marker to ink the single word "Together" on the sentiment stamp, and stamp on the Lacy Square.

Final Assembly

Use the metallic pen to paint the embossed edge in gold on each shape; Do both the outside and inside edges of the base card, the rose/ring label, and the sentiment Lacy Square. Mount the rose/ring image on the front of the card, and the sentiment label inside.

Thanks for stopping by!

Blue_Orange

Sunday, June 12, 2011

Unhurried Time

Today

31 years ago today, I married my very best friend in the world and over the years our love and friendship have grown beyond anything I could have ever imagined. Happy Annivesary, sweetheart!

A Birthday Card

Here's the birthday card I made for Joe this week - I'm posting his cards after I give them to him, so our anniversary card will be posted later this week.
Unhurried Time

Ingredients


Note: Finished card size is 4 1/2" x 7"


Paper

Kraft (SU!)7" x 9"; scored at 4 1/2
Manchester DSP (SU!)4 1/8" x 4 7/8"
Early Espresso (SU!)4 1/4" x 5", and
3 3/4" x 3 3/4", and
2 1/2" x 4 1/2"
Very Vanilla (SU!)3 3/4" x 3 3/4", and
2 1/2" x 4 1/2"

Inks

Early Espresso (SU!)

Stamps

Sense of Time (SU!)

Accessories

Grand Calibur (Spellbinders)
Fancy Tags 2 Shapeabilities (Spellbinders)
Classic Circle Large Nestabilities (Spellbinders)
Classic Circle Small Nestabilities (Spellbinders)
Circle Cutter (EK Success)
Scor-Pal
ATG 714
Scissors
Rotary Trimmer

Instructions

Images

Stamp the clock on vanilla card stock using brown ink. Cut it out using a small circle Nestabilities die. Cut a brown circle using the next larger Nestabilities die. Mount the clock onto the brown circle.
Cut and emboss a Fancy Tag from brown card stock. Stamp the sentiment on vanilla card stock using brown ink. Cut it out using a the same Fancy Tag Shapeabilities die. Trim the sentiment die cut so that just the center remains, and mount it on the brown tag

Assembly

Fold the card along the score line. Using the circle cutter, cut through both layers forming the top of the card into an arch. Mount the brown rectangle on the lower part of the card, followed by the patterned paper. Add the image centered in the arch, and the sentiment below the clock.

Thanks for stopping by!
Blue_Orange

Thursday, June 9, 2011

Wedding Dove

Inspiration

I love this new image from the Heartfelt Wedding Collection by Heartfelt Creations, just released yesterday. It's the Wedding Dove PreCut Set, and it has really pretty, intricate detail. And be sure to check out designs by the team on the HC blog - they've really outdone themselves!

Here's another easel card - I'm on a theme this week, I guess - LOL!

Wedding Dove Easel

Ingredients

Note: Finished card size is 6" x 6"

Paper

Lavender Lace Textured (SU!) 12" x 12"
Vellum (Sweet Stamps) 6" x6" (2 pieces)

Inks

Versamark (Tsukineko)

Stamps

HCPC 3399 Wedding Dove PreCut Set (Heartfelt Creations)

Accessories

Grand Calibur (Spellbinders)
Scallop Circle Grand Nestabilities (Spellbinders)
Classic Scallop Circle Large Nestabilities (Spellbinders)
Standard Circle Large Nestabilities (Spellbinders)
White embossing powder (Sweet Stamps)
Heat gun
Markers (SU!)
Pleated lace fringe (Offray)
Holiday ribbon (Michaels)
Bow-Easy
Scor-Pal
Zip Dry
Glue dots
Vellum tape
Clear Scotch tape
Scissors
Rotary Trimmer

Instructions

Base Card

To create the easel card, start with a piece of cardstock measuring 6" x 12". Score this piece at 6" and fold on the score line. Position the Grand Scallop Circle die just above the fold, and run it through the Grand Calibur to cut out the shaped card. Score one of the sides of the card again through the middle of the circle, and fold it to create the base of the easel.

Card Face

Cut another single scallop circle of the same side from matching cardstock. This will be the base for the upright face of the card. Cut another piece of matching cardstock using the largest plain circle Nestability. Stamp the dove image using embossing ink on the vellum, and heat emboss with white embossing powder. Cut this out in a circle slightly smaller than the main card face. Color the flowers in the image on REVERSE side of the image, using markers in coordinating colors. I used Lavender Lace, Regal Rose, and Pear Pizzazz. Mount the vellum circle with the image on the plain circle.

Sentiment

Cut a scallop circle from vellum using the classic scallop Nestabilities, and stamp the sentiment in the lower portion of the circle using embossing ink on the vellum, and heat emboss with white embossing powder.

Assembly

The pleated lace is going to be slightly curved already, so it is fairly easy to shape into a circle. Arrange the lace around the single large scallop circle that is the base for the face of the card. I used a generous amount of Zip Dry under the lace, and clear tape on the inner edges of the lace to secure it. The mount the dove image panel onto the lace. Adhere the card face to the front of the folded card base. Finish the card by mounting the sentiment vellum on the bottom panel, and attaching a matching bow to act as a stop to hold the front of the card upright.

Reminder

Remember, one lucky person will win the entire new release - the Heartfelt Wedding Collection! To be entered in the drawing for the Wedding Collection give away, leave a comment by June 14 midnight on my post yesterday, or on the Heartfelt Creations blog to see the all the beautiful creations by the design team.

Thanks for stopping by!

Blue_Orange

Wednesday, June 8, 2011

All The Best

Happy Birthday to Joe!

Before the fun of the new Heartfelt Creations release, I have to say HAPPY HAPPY BIRTHDAY to my dear husband Joe! Today’s YOUR day! I love you.

New Release from Heartfelt Creations

Now, the second Wednesday of the month brings a brand new release from Heartfelt Creations, and June’s release is the Heartfelt Wedding Collection featuring 7 new pre-cut sets and a new exclusive Heartfelt Creations die, manufactured by Spellbinders. This collection is perfect for weddings, anniversaries, as well as sweethearts, friends, and all occasion cards, especially with the new vintage lace die and stamp in this collection! In addition, some of the images in this collection coordinate with last month's Bella Rose Collection and die, giving you more creative outlets for products you may already own.

***Give Away!***

As part of the release, one lucky person will win the entire release valued at $129.99. All you need to do is to leave a comment on this post, or on the Heartfelt Creations blog by midnight June 14. The winner will be announced on the Heartfelt Creations blog on June 15.

Inspiration

June is a big month for card-making for me: I have 7 anniversaries, 7 birthdays, Father's Day for 2 dads, plus assorted weddings and graduations that come up every year! So I really love this new collection from Heartfelt Creations! My head is bubbling with ideas for beautiful projects! Be sure to see all the creative beauties created by the design team on the HC blog. Here's my first sample - it's an easel card - a really easy card to make that always makes a great impression. I have instructions below, or hop over to Splitcoast resources, where they have a really good tutorial.

Pink and Gold Wedding

Ingredients

Note: Finished card size is 4 1/4" x 5 1/2"

Paper

Blushing Bride (SU!) 4 1/4" x 11", scored at 5 1/2" and 8 1/4"; and
4 1/4" x 5 1/2", and
2 1/2" x 3 1/2"
Translucent White (the Paper Company) 4 1/8" x 5 3/8" (2 pieces)
Ivory Pure Luxury (Gina K) 4 1/4" x 5 1/2"

Inks

Versamark (Tsukineko)
Blushing Bride (SU!)

Stamps

Wedding Dove (Heartfelt Creations)
Bella Rose Scroll (Heartfelt Creations)

Accessories

Grand Calibur (Spellbinders)
Labels 4 Nestabilities (Spellbinders)
Labels 4 Small Nestabilities (Spellbinders)
Ultrafine gold embossing powder (Stampendous)
Heat gun
Swirl pink adhesive pearls (Prima)
Brides Mother Trim lace (Offray)
Stamp-A-Ma-Jig
Zip Dry
Scor-Pal
ATG 714
Scissors
Rotary Trimmer

Instructions

Card Face

The main card face is made using the single piece of cardstock measuring 4 1/4" x 5 1/2". This makes it easy to decorate before attaching it to the base card. Start by stamping the scroll image using embossing ink on the ivory cardstock, and heat emboss with gold embossing powder. Trim the image closely. Using the Stamp-A-Ma-Jig, position the sentiment in the middle of the scroll, then stamp on the scroll in pink ink.

Mount one of the translucent paper rectangles onto the cardstock, then mount the scroll in the lower part of the card. Finish by adding the pink pearl swirls around the top of the scroll.

Assembly

Cut and emboss a label 4 die cut from ivory paper, and use the next largest die from the Labels 4 small set to cut and emboss a pink label. Use the Stamp-A-Ma-Jig to stamp the sentiment the middle of the ivory die, using embossing ink. Then emboss the sentiment with gold embossing powder. Mount the ivory label on the pink one.

Score the base card at 5 1/2" and 8 1/4", then fold both score lines in the same direction, forming a base with a tent folded over it at one end. To create the inside, mount the other piece of translucent paper on the base. Mount the sentiment on the left lower portion of the base. Add pink pearl swirls around the sentiment. Glue a strip of lace above the sentiment.

The final step is to mount the card face onto the front of the folded tent on the base of the card. The lace acts as a stop to hold the front of the card upright.

Reminder

To be entered in the drawing for the Wedding Collection give away, leave a comment on this post, and for lots of inspiration using this new release, be sure to visit the Heartfelt Creations blog to see the all the beautiful creations by the design team.

Thanks for stopping by!

Blue_Orange

Sunday, June 5, 2011

Saying Goodbye

Inspiration

I play Bunco once a month with a group of 12 women, and we talk and laugh and have a great time. One of our members is moving away (not far, but we won't see her every month). I made this card we could all sign and wish her well.

It’s a very simple design – no fancy cuts or color, just sincere expressions to let her know she’ll always have a place in our hearts.

Saying Goodbye

Ingredients

Note: Finished card size is 5" x 7"

Paper

Basic Black (SU!) 7" x 10", scored at 5"; and
4 1/4" x 6 1/4", and
3 1/2" x 5/8"
Bordering Blue (SU!) 5 7/8" x 6 7/8" (3 pieces); and
4 1/8" x 6 1/8" (3 pieces)
Whisper White (SU!) 4 1/8" x 6 1/8"; and
4" x 6" (2 pieces); and
3 3/8" x 1/2"
Bella Birds DSP (SU!) 4" x 6"

Inks

Bordering Blue (SU!)

Stamps

Inspired by Nature (SU!)
Sentiment (Stamps Happen)

Accessories

ATG 714
Rotary Trimmer

Instructions

Image

Ink the flower silhouette stamp with blue ink and stamp on the lower 2/3 of the patterned paper panel.

Stamp the first line of the sentiment in blue on the small white strip, and the last 2 lines of the sentiment in blue on one of the large white panels.

Assembly

This is a very simple card to make! CARD FRONT: Alternate the layers on the Saying Goodbye Insidefront of the card: mount a blue panel, followed by black, then blue, then patterned paper. Adhere the sentiment strip to a black strip, and mount it centered above the flower image.

Inside, Layer a blue panel, followed by black, followed by the white panel with the sentiment. For my card, we had 11 signatures to collect, so I added another set of blue/black/white on the left side of the inside card.


Thanks for stopping by!

Blue_Orange

Thursday, June 2, 2011

Springtime Memories

A quick note before today's post: The Great American Scrapbook Convention is in Arlington, TX today through Saturday - I'm working at the Heartfelt Creations booth - if you're at the show, stop by and say "hi" - I'd love to meet you!

Inspiration

I'm finding that being a member of a design team is stretching my creative efforts. Accordingly, you know you've may have only seen one scrapbook page on my blog in 3 years! Even though I do a lot of photography, I'm not a scrapbooker. I don't take a lot of people pictures, so I seldom print and mount my photos. I'm a nature photography nut - just like the flowers on my cards, I really prefer taking pictures of flowers.

My mother has the most beautiful wild flower garden in her backyard in east Tennessee, and I was fortunate enough to visit in mid April. This is a picture of one of her beauties!

Springtime Memories

Ingredients

Note: Finished page size is 12" x 12"

Paper

Old Olive textured (SU!) 12" x 12"
Cottage Wall DSP (SU!) 12" x 12"
Stamper's Select White(PTI) 4 1/4" x 5 1/2"

Inks

Memento Tuxedo Black (Tsukineko)

Stamps

HCPC 3392 Bella Rose House PreCut Set

Accessories

HCD 704: Perfect Petals Die
Grand Calibur (Spellbinders)
COPIC Markers (Imagination Iternational)
Adhesive gems (Recollections)
Corner rounder punch (SU!)
Foam dots
ATG 714
Scissors
Rotary Trimmer

Instructions

Stamped Images

Stamp the three images from the stamp set on white paper, using black ink. Cut them out closely. Color with COPIC markers:

  • Roses: RV00, RV63, RV66
  • Leaves: YG91, YG93, YG95
  • Birdhouse: E33, E37, E66, Y35
  • Butterfly: RV00, RV63
  • Bumblebee: Y35, RV00

Mount small pink gems on the body of the butterfly.

Assemble the Page

Cut a piece of green patterned paper to 8" x 11", and round two corners. Cut a piece of lavender patterned paper to 3 3/4" x 11", and round two corners. Mount these to the center of the base green scrapbook page, overlapping them to form the mat sizing 11" x 11". Round the 4 corners of the base page. Cut and emboss the corner flourish from olive paper, using the die from the Perfect Petals set. Trim the picture to a 7 1/2" square. Mount the picture and corner flourish in the center os the page. Cut the adhesive crystal flourish into 2 pieces to resemble the flight of the bee and butterfly. Adhere them across the top corners of the picture, and glue the bee at the end of one, and the butterfly at the end of the other. Finish by mounting the birdhouse in the lower right corner of the picture, using foam tape adhesive.

Remember, next Wednesday is a new release day at Heartfelt Creations, and there's a sneak peak of the June release on their blog. Be sure to check it out, along with the weekly serving of beautiful design team creations.

Thanks for stopping by!

Blue_Orange

Wednesday, June 1, 2011

Special Thoughts

Inspiration

Heartfelt Wednesday! Here's a special "thinking of you" card that uses the Bella Rose Vintage Background PreCut Set. AND there's a sneak peak of the June release on today's Heartfelt Creations blog! Hop over to see more beautiful creations from the design team - they have really outdone themselves.

Special Thoughts

Ingredients

Note: Finished card size is 6" x 6"

Paper

Basic Black (SU!) 7" x 10"; scored at 5", and
4 5/8" x 5 5/8"
Classic K McKenna designer paper (K & Company) 4 7/8" x 6 7/8" - 2 pieces
Stamper's Select White (PTI) 8 1/2" x 11

Inks

Memento Tuxedo Black (Tsukineko)
Groovy Guava (SU!)
Cameo Coral (SU!)

Stamps

HCPC 3397 Bella Rose Vintage Background PreCut Set (Heartfelt Creations)
HCPC 3394 Classic Bella Rose PreCut Set (Heartfelt Creations)
HCPC 3303 Posy Patch Flowers PreCut Set (Heartfelt Creations)
HCPC 1494 Mini Message 4 Precut Set (Heartfelt Creations)

Accessories

HCD 712: Bella Rose Die (Heartfelt Creations)
HCD 701: Posy Patch Die (Heartfelt Creations)
Grand Calibur (Spellbinders)
COPIC Markers (Imagination International)
SPICA pens (Imagination International)
Chipboard frame (SU!)
glossy black acrylic paint (Anita's)
foam brush
ribbon
adhesive pearls (Recollections)
sponge
Foam dots
Scor-Pal
Black Gala Glitz
Art Glitter Glue
Zip Dry
ATG 714
Scissors
Rotary Trimmer

Instructions

Base Card

Score the black cardstock, and fold it to form the base card. Cut two rectangles of patterned paper diagonally. Use a resulting triangle of each pattern to create a mat on the front of the black card. Glue a strip of coordinating ribbon across the diagonal, to cover the seam.

Sentiment

Paint the chipboard frame with the black acrylic paint and let it dry. Cut a square of white cardstock that fits the opening of the chipboard frame. Stamp the sentiment in coral ink in the center of the white square. Mount the frame on the white square with clear drying glue, and set it aside to dry.

Background Image

Stamp the vintage background stamp twice on white paper using black ink. Trim one image closely around the outer edge, and lightly sponge the guava ink on the word area. From other background image, cut out the butterfly, and the leaves from the edges of the image. Stamp 3 of the smaller posy flowers in black and cut them out with the Posy Patch die. Stamp the single rose from the Classic Bella Rose set in black, and cut it out with the Bella Rose die. Using COPIC markers, color the roses (E04, R37), leaves (YG91, YG93), and posies (YR00, YR02, E04). Color the butterfly with SPICA pens (blossom, peach, pitch black).

Final Assembly

Mount the full background image on a piece of black cardstock, and center it on the front of the card. Mount the sentiment in the upper right corner. Mount the butterfly on the edge of the chipboard. Using foam dots, add the leaves and main rose over the matching images on the background. Glue the posies onto the background. Add a pearl in the center of the posies that are not layers. Lastly, using glitter glue and the gala glitz add a generous center to the stacked posies.

Thanks for stopping by!

Blue_Orange

LinkWithin

Blog Widget by LinkWithin