Showing posts with label Anniversary. Show all posts

Wednesday, June 13, 2012

On Your Wedding Day

Inspiration

Welcome to the debut of the NEW RELEASE from Heartfelt Creations! The Garden Romance Collection is teeming with birdies, butterflies and blooming peonies. Fun bird houses, mailboxes, and trellises dot the landscape of this new set. There are 7 new PreCut Stamp Sets and one beautiful new exclusive Spellbinders die designed for Heartfelt Creations. Be sure to visit the HC blog - the design team has outdone themselves!

As always with a new release, leave a comment on the HC blog by June 19 to be eligible to win the entire release valued at $141.99. The winner will be announced on June 20 on the HC Blog.

OnYourWeddingDay

Ingredients

Note: finished card size is 5" x 7"

Heartfelt Creations Products

HCDT 3479 Wings of Hope PreCut Set
HCDT 3481 Add-on Sentiments PreCut Set

Paper

Pink Pirouette (SU!)7" x 10", scored at 5", and
3 5/8"" x 3 3/4"
Basic Gray (SU!)4 7/8" x 6 7/8", and
3 1/2" x 3 5/8"
Essentials Paper Pad (Martha Stewart)4 3/4" x 6 3/4"
Stamper's Select White (PTI)3 3/8" x 3 1/2"

Ink

Versamark (Tsukineko)

Accessories

Other Products Available at Heartfelt Creations
Additional Accessories
Silver Embossing Powder (Sweet Stamps)
Heat gun
Double Heart Charm (Michaels)
Ribbons (Michaels)
Becca's Peg Bow Maker (ODBD)
Double-sided Sticky Tape (PK Glitz)
Liquid Pearls (Ranger)
Glue Dots
Cutter Bee Scissors (EK Success)
Rotary Trimmer (Fiskars)

Instructions

BASE CARD and MATS

Cut pink card stock to 7" x 10", score at 5", and fold. Cut dark gray card stock to 4 7/8" x 6 7/8". Cut patterned paper to 4 3/4" x 6 3/4". Mount the patterned paper mat on the gray mat. Adhere a strip of pink ribbon around the mats, and a strip of woven ribbon on top of the pink ribbon. Mount the stack of mats onto the card front.

IMAGE

Using embossing ink, stamp the dove swirl and sentiments on white card stock measuring 3 3/8" x 3 1/2", and heat emboss with silver powder. Adhere a pink ribbon above the sentiment. Mount this onto gray card stock cut to 3 1/2" x 3 5/8", then mount this stack onto pink card stock cut to 3 5/8"" x 3 3/4". Mount the image stack above the ribbon.

EMBELLISH

Glue the double-heart charm on the pink ribbon (I used glue dots AND glue). Put a drop of pink liquid pearls onto each cross point of the patterned paper, and let them dry. Finish with a double bow of pink ribbon glued to the center of the ribbon strip.

Thanks for stopping by!

Orange_Green

Thursday, February 2, 2012

Bluebirds of Happiness

Inspiration

Here's another Heartfelt Creations card, made with an image from the Chateau Gate Collection, and a sentiment from a release from last summer - their stamps all coordinate so well! Be sure to check out the Heartfelt Creations blog - you'll want to see all beautiful creations by the design team!!

Bluebirds

Ingredients

Note: Finished card size: 5" x 7"

Heartfelt Creations Products

Paper

Bashful Blue (SU!)7" x 10", scored at 5", and
3" x 3"
Marina Mist (SU!)4 1/2" x 6", and
1 1/4" x 7", and
3" x 6" cut at an angle
Stamper's Select White (Papertrey Ink)4 1/2" x 6"

Ink

Memento Tuxedo Black (Tsukineko)
Marina Mist (SU!)

Accessories

Oval Grand Nestabilities (Spellbinders)
Grand Big Scalloped Ovals Nestabilities (Spellbinders)
Nested Hearts Shapeabilities (Spellbinders)
Grand Calibur (Spellbinders)
COPIC Markers (Imagination International)
Sponge
Ribbon (Colorbok)
Peg Bow Maker (Unity Stamp)
Double-sided Tape (PK Glitz)
3-D Foam Squares (Scrapbook Adhesives)
ATG (3M)
Scor-Pal
Scissors
Rotary Trimmer (Fiskars)

Instructions

BASE CARD

Cut a piece of light blue card stock measuring 7" x 10", score at 5", and fold. Cut an angled piece of dark blue card stock measuring approximately 3" x 6". Adhere starting at the left corner of the card front. Cut a strip of dark blue card stock measuring 1 1/4" x 7". Tie a bow, and thread it onto a strip of ribbon. Adhere this ribbon onto the blue card stock using double-sided tape. Mount this strip across the front of the card.

IMAGE

Cut/emboss a dark blue scalloped oval. Cut/emboss a white oval. Stamp the image in black ink onto the white oval. Color the image using COPIC markers. I used these colors:

  • Leaves: YG13
  • Branches: E35
  • Grass/Trees: YG17
  • Path: E34
  • Birds: B91, B93, R11, YR61

Mount the image oval onto the blue scalloped oval, and mount this onto the front of the card.

SENTIMENT

Cut/emboss the medium heart die from light blue card stock, and sponge the embossed areas with blue ink. Stamp the sentiment in blue ink onto the heart, and mount using foam squares onto the front of the card.

Thanks for stopping by!

Orange_Green

Thursday, January 26, 2012

Love Lives Here

Inspiration

Here's my second card this week for Heartfelt Creations. I have several masculine birthdays in January and February, and I love this mountain scene from the Mystic Hideaway set. I picked up this designer paper at the Scrap & Stamp show last week in Mesquite, and I thout it made a perfect pair with the scene. It also is my first use of the Sew Easy tool - that took a bit of effort; I'm not sure twine is the best product for this tool, but I made it work, and I like the final look.

LoveLivesHere

Ingredients

Note: Finished card size: 4 1/4" x 5 1/2"

Paper

Soft Suede (SU!)5 1/2" x 8 1/2", score at 4 1/4"
Huckleberry Pond Distressed (The Paper Loft)3 3/4" x 5"
Huckleberry Pond Patterned (The Paper Loft)3 1/4" x 4 1/2"
Vintage Cream (Papertrey Ink)3 1/4" x 4 1/2"

Ink

Memento Rich Cocoa (Tsukineko)
Soft Suede (SU!)

Stamps

HCPC 3445: Mystic Hideaway PreCut Set (Heartfelt Creations)
HCPC 3449: Door to My Heart PreCut Set (Heartfelt Creations)

Accessories

Deckled Ovals Large (Spellbinders)
Grand Calibur (Spellbinders)
COPIC Markers (Imagination International)
Sew Easy (We R Memeory Keepers)
Baker's Twine (The Twinery)
Needle
Sponge
Scor-Pal
3-D Foam Squares (Scrapbook Adhesives)
ATG (3M)
Rotary trimmer with straight & deckled blades (Fiskars)

Instructions

BASE CARD and MAT LAYERS

Cut a piece of brown card stock measuring 5 1/2" x 8 1/2", score at 4 1/4" and fold. Cut a piece of blue distressed card stock measuring 3 3/4" x 5" and mount on the card front. Cut a piece of forest patterned paper measuring 3 1/4" x 4 1/2" and mount in the center of the blue paper.

STITCHING

Pierce the holes for stitching using the Sew Easy tool along the edge of the mat. If the holes don't go through the card stock, use the needle to open the holes. Cut a length of twine, about 10 inches, and thread the needle. Anchor the twine on the back of the card with a piece of tape, and stitch around the card. Start a new piece of twine when you need to, always anchoring with tape to hold it on the back. When you've stitched all the way around and anchored the last piece of twine, you may want to cover the back of the card front with a piece of card stock to cover all the twine ends and tape.

IMAGE

Cut/emboss a large deckled oval from ivory card stock. Stamp the image and the sentiment in brown ink in the center of the oval. Color the image with COPIC markers. I used these colors: YG91, YG93, YG95, E53, E55, W3, B0000, B91. Use a sponge to apply brown ink around the edge of the oval. Mount the oval on the card front using foam squares.

Thanks for stopping by!

Blue_Orange

Wednesday, January 25, 2012

Mr and Mrs

Inspiration

Hello and welcome to another Heartfelt Creations Wednesday! Here's another card created with the Chateau Gate Collection. This wedding card shows you how really versatile these stamps and dies really are - there are no "gates" on this card at all, right? But I used the Chateau Gate Die to create a frame for the sentiment and base for the candles. Hope you like it!

MrAndMrs

Ingredients

Note: Finished card size: 5" x 7"

Paper

Pink Textured (Core'dinations)7" x 10"
Night of Navy (SU!)4 3/4" x 6 3/4", and
3 1/2" x 4"
Vintage Roses (Paper Pizazz)4 5/8" x 6 5/8"
New England Ivy designer paper (CTMH)4 1/4" x 5 1/2"
Stamper's Select White (Papertrey White)1" x 6 3/4", and
1 1/2" x 2 1/4", and
2" x 4"

Ink

Memento Tuxedo Black (Tsukineko)
Blushing Bride (SU!)

Stamps

HCPC 3448: Dainty Blooms and Birdies PreCut Set (Heartfelt Creations)
HCPC 3449: Door to My Heart PreCut Set (Heartfelt Creations)

Accessories

HCD 718: Decorative Chateau Gate Die (Heartfelt Creations)
HCD 712: Bella Rose Die (Heartfelt Creations)
Grand Calibur (Spellbinders)
Wedding Borders Embossing Folders (Provo Craft)
Cuttlebug (Provo Craft)
COPIC Markers (Imagination International)
SPICA Glitter pen (Imagination International)
Scor-Pal
Art Institute Glue - Dries Clear
3-D Foam Squares (Scrapbook Adhesives)
ATG (3M)
Rotary trimmer with straight & deckled blades (Fiskars)

Instructions

BASE CARD and MAT LAYERS

Cut a piece of pink card stock measuring 7" x 10", score at 5" and fold. Cut a piece of navy card stock measuring 4 3/4" x 6 3/4" and mount on the card front. Cut a piece of rose patterned paper measuring 4 5/8" x 6 5/8" and mount onto the navy mat.

EMBOSSED BORDER

Cut a piece of white card stock measuring 1" x 6 3/4". Emboss with the border embossing folder, and mount this across the bottom of the front of the card.

ROSE LEAVES

Cut/emboss a rose leaf spray from the green designer paper. Clip the die cut in half, and trim into your desired shapes and glue at the lower left and upper right areas of the card.

SENTIMENT

Cut/emboss the smaller chateau gate from navy card stock. Cut out the center doors to create a frame. Cut a white card stock rectangle measuring 1 1/2" x 2 1/4", and glue this into the frame. Glue this onto the card front. Stamp the sentiment in pink ink inside the frame.

FLOWERS

Stamp the flower and candle image in black ink on white card stock, and trim it closely. Color with COPIC and SPICA markers. I used these colors: Candles: E53, E55, Y35; Roses: RV93, RV95; Leaves: BG93, BG96, YG000; Ribbons: B93, B97; Baby's Breath: Clear SPICA Glitter Pen. Mount the image at the bottom of the frame using foam squares.

HC Blog

Head over to the Heartfelt Creations blog to see all the beautiful creations by the design team!

Thanks for stopping by!

Blue_Orange

Sunday, January 15, 2012

Button Anniversary

Inspiration

Here's a whimsical anniversary card I made last fall for a few anniversaries that I never had a chance to post. Hope you enjoy!

ButtonAnniversary

Ingredients

Note: Finished card size: 5" x 7"

Paper

Garden Green (SU!)7" x 10", and
3 1/2" x 3 1/2"
Crystal Blue (CTMH)4" x 5 1/2"
Cafe Mediterranean designer paper(DCWV)3 3/4" x 5"
Very Vanilla (SU!)3 1/4" x 3 1/4"

Stamps

Flowers (Inkadinkado)
Happy Anniversary (Annette Allen Watkins)

Ink

Basic Black (SU!)
Garden Green (SU!)
Marina Mist (SU!)

Accessories

Label 1 Nestabilities (Spellbinders)
Grand Calibur (Spellbinders)
Corner Rounder punch (Fiskars)
Buttons (SU!)
Embroidery floss
Needle
Raffia
Watercolor brush
3-D Foam Squares (Scrapbook Adhesives)
Clear tape (3M)
ATG (3M)
Scor-Pal
Scissors
Rotary Trimmer (Fiskars)

Instructions

BASE CARD

Cut a piece of green card stock measuring 7" x 10", score at 5" and fold. Use the corner rounder punch to round the two outer corners.

MAT LAYERS

Cut a mat of blue card stock measuring 4" x 5 1/2" and mount at the top center of the card front. Cut a mat of designer paper measuring 3 3/4" x 5" and mount on the blue mat.

SENTIMENT

Stamp the sentiment in green ink below the mat layer.

IMAGE

Cut a label 1 die cut from vanilla card stock, and stamp the flower image in black ink on the die cut. Use a watercolor brush to color the flowers and leaves using ink from ink pads. Use a needle and embroidery floss, attach the buttons to the image, fixing the floss on the back with tape. Wrap a piece of orange raffia around the bottom of the die cut and tie a knot.

Cut/emboss a label 1 die cut one size larger than the image die cut using green card stock. Attach it to the card front using foam squares. Add the image panel onto the green die cut using foam squares.

Thanks for stopping by, and again I wish you the very best in the coming new year!

Blue_Orange

Thursday, January 12, 2012

Door to My Heart

Inspiration

Here's my second card this week, made with the new Chateau Gate Collection from Heartfelt Creations. It's not too early to start making Valentine cards, you know, and this collection has some very pretty images and sayings that will be perfect for those "heartfelt" cards! This one features the Grand Portal set, and sentiments from the Door to My Heart sentiment set, and the beautiful new die that creates perfect little doors!

And, by the way, if you're in the Dallas area, Heartfelt Creations has a booth at the Stamp Scrap Art Tour in Mesquite this Saturday & Sunday. I'm doing the make & take at the booth - stop by to see me & pick up the new collection!

DoorToMyHeart

Ingredients

Note: Finished card size: 5" x 7"

Paper

Regal Rose (SU!)7" x 10"
Rose Red (SU!)5" x 5"
Melody Collection (Prima)4 3/4" x 6 3/4"
Elegant Eggplant (SU!)2 1/2" x 4 1/2", and
4" x 4"
Vellum (SU!)2 1'2" x 3 1/2"
Whisper White (SU!)1 1/2" x 2 1/2", and
5" x 5"

Ink

Versamark (Tsukineko)
Rose Red (SU!)

Stamps

HCPC 3442: Grand Portal PreCut Set (Heartfelt Creations)
HCPC 3449: Door to My Heart PreCut Set (Heartfelt Creations)

Accessories

HCD 718: Decorative Chateau Gate Die (Heartfelt Creations)
Scalloped Hearts (Spellbinders)
Fancy Tags 2 Shapeabilties (Spellbinders)
Petite Scalloped Oval Large Nestabilities (Spellbinders)
Grand Calibur (Spellbinders)
Nestabling (Want2Scrap)
White embossing powder (Sweet Stamps)
Heat gun
Scor-Pal
Art Institute Glue - Dries Clear
3-D Foam Squares (Scrapbook Adhesives)
ATG (3M)
Rotary trimmer with straight & deckled blades (Fiskars)

Instructions

BASE CARD and MAT LAYER

Cut a base card from light pink card stock measuring 7" x 10", score at 5", and fold. Using a deckled blade, cut patterned paper measuring 4 3/4" x 6 3/4", and mount to the front of the card.

HEART

Cut/emboss the largest scalloped heart from dark pink card stock, and mount at the top of the card front. Embellish with matching white Nestabling.

SENTIMENT

Cut/emboss a fancy tag from dark purple card stock, and the smallest scalloped petite oval from white card stock. Stamp the sentiment in dark pink ink on the white oval, and mount the sentiment onto the fancy tag. Use dries-clear glue to mount the sentiment tag below the heart on the card front.

DOOR

Stamp the door image on vellum using Versamark, and heat emboss with white embossing powder. Trim this closely. Cut/emboss dark purple card stock using the Chateau Gate die. Glue the trimmed vellum image to the back of the die cut door. Use foam squares to mount the door over the heart image on the front of the card.

DoorToMyHeartInside

INSIDE

Cut/emboss the largest scalloped heart from white card stock, and mount at the top of the card inside. Stamp the sentiment in dark pink ink on the heart.

Comment on the HC Blog!

Remember to leave a comment on the Heartfelt Creations blog by January 17 to be eligible to win the entire Chateau Gate Collection release valued at $174.90. The winner will be announced on January 18!

Stop by the HC Booth in Mesquite!

I'd love to meet you - please come see us at the HC booth at the Stamp Scrap Art Tour in Mesquite this Saturday & Sunday.

Thanks for stopping by!

Blue_Orange

Sunday, September 18, 2011

Clean and Simple Anniversary

Inspiration

There's a whole "discipline" of card design called Clean and Simple, or CAS. In fact, Splitcoast Stampers features a weekly CAS challenge, and they define it this way: " It's all about the design; not the technique, not the tools, not the embellishments. It's all about the design: uncluttered, lots of white or open space, one main focal point" (directly quoted from SCS).

I like doing the CAS designs - they are a respite from the layers and embellishments and intricate cutting I often do. And they often result in quite elegant creations that are a real pleasure to send.

This CAS card can be used for many occassions - I'm sending it for fall anniversaries this year.

CAS Anniversary

Ingredients

Note: Finished card size is 4 1/4" x 5 1/2"

Paper

Crumb Cake (SU!)4 1/4" x 11"; scored at 5 1/2"
Essentials (Martha Stewart)4 7/8" x 3 3/8"

Images

Art of Life (SU!)

Ink

Crumb Cake (SU!)

Accessories

Big Shot Pro (Sizzix)
Label 17 Nestabilities (Spellbinders)
Sponge
Foam tape
Ribbon (Hobby Lobby)
Bow-Easy
Scor-Pal
Rotary Trimmer

Instructions

Base Card

Cut the brown card stock to 4 1/4" x 11", score at 5 1/2", and fold. Position the Label 17 die just below the fold, and use a little bit of tape to hold it in place. Run this through the die cut machine to create the base card.

Image Panel

Use the next smaller sized Label 17 die to cut a label from patterned paper. Sponge brown ink lightly around the edges of the label. Stamp the silhouetted flower image in matching brown ink on the panel. Tie a bow, and mount it around the panel.

Assembly

Only one step here! Use foam tape and mount the image on the front of the card.

Thanks for stopping by!

Blue_Orange

Wednesday, September 7, 2011

Acetate Basket

Inspiration

I used to teach computer programming (way too far back to admit), but think mainframe and COBOL... Anyway, I used transparencies (we called them foils) on an overhead projector to guide the classes through the material, and I always had a box of colored pens to draw on the film. Well, I found a box of blank transparencies in a closet and my crafting soul went "AHA"! I did a little surfing for techniques and found lots of ideas.

Today's Heartfelt Creations card is an acetate panel, colored with alcohol inks, and the image embossed and embellished - hope you like it!

Be sure to head to the Heartfelt Creations blog - to see their beautiful work!

Acetate Basket

Ingredients

Note: Finished card size is 5" x 7"

Paper

Elegant Eggplant (SU!)7" x 10"; scored at 5"
Pacific Point (SU!)4 3/4" x 6 3/4"
Whisper White (SU!)4 1/4" x 5 1/4", and
2" x 4"
Transparency (3M)3 3/4" x 3 3/4"

Inks

White Dye Ink (Sweet Stamps)
Elegant Eggplant (SU!)

Stamps

HCPC 3410: Decorative Basket PreCut Set (Heartfelt Creations)
HCPC 3389: Sentiments For Mom PreCut Set (Heartfelt Creations)

Accessories

Grand Calibur (Spellbinders)
Ribbon Banners Shapeabilities (Spellbinders)
Alcohol Inks & Applicator (Ranger)
White embossing powder (Sweet Stamps)
Heat gun
Corner rounder punch (Fiskars)
Card Creators Trumpet Flower punch (EK Success)
Adhesive Gems (Recollections)
Sponge
Foam Tape
ATG (Scotch)
Scor-Pal
Scissors
Rotary Trimmer

Instructions

IMAGE

Cut transparency film to 3 3/4" x 4 3/4". Apply a few drops of alcohol ink to a felt applicator and pounce onto the transparency. I used the colors Stream, Wild Plum, and Pearl metallic additive. Stamp the basket image with the white ink in the center of the transparency, and cover in white embossing powder. Heat with heat gun to emboss, constantly moving the heat so the transparency does not melt. Cut white cardstock to 4 1/4" x 5 1/4". Use the corner punch on each corner. Slip the dried transparency into the punched corners, and adhere with tape on the back of the panel.

SENTIMENT

Cut/emboss the ribbon banner using the smaller piece of white paper. Stamp the sentiment on the banner in dark purple ink, and use a sponge to brush color around the edges of the banner.

ASSEMBLY

Cut dark purple cardstock to 7" x 10", and score at 5". Cut blue cardstock to 4 3/4" x 6 3/4", and mount it on the front of the card. Mount the basket panel on the blue mat, leaving room at the bottom for the banner and a row of gems. Mount the sentiment banner using foam tape below the basket image. Finish the card by adhering a string of purple gems below the sentiment, dark pink gems in the center of the flowers, and light pink gems on each dot on the basket.

Thanks for stopping by!

Blue_Orange

Thursday, August 25, 2011

A Basket of Best Wishes

Inspiration

Here's a basket of flowers created by combining two lovely sets from Heartfelt Creations' August release, the Decorative Basket Collection. The basket is the Woven Basket - a nice basket image you can fill with any set of flowers to set the mood!

Basket of Best Wishes

Ingredients


Note: Finished card size is 5" x 7"

Paper

Bermuda Bay (SU!)7" x 10"; scored at 5"
Linen Closet ivory patterned paper (DCWV)4 7/8" x 6 7/8"
Pale Plum (SU!)4" x 5"
Very Vanilla (SU!)7/8" x 2 5/8"
Linen Closet brown patterned paper (DCWV)4" x 5"
Stamper's Select White (Paper Trey Ink)4" x 5"

Inks

Soft Suede (SU!)
Bermuda Bay (SU!)
Memento Tuxedo Black (Tsukineko)

Stamps

HCPC 3411: Woven Basket PreCut Set
HCPC 3362 Angel Trumpet Flower PreCut Set

Accessories

HCD 714: Decorative Layered Basket Die
Grand Calibur (Spellbinders)
Fancy Tags 2 Shapeabilities (Spellbinders)
Handsome Hunter marker (SU!)
COPIC markers (Imagination International)
Wild Pansy adhesive gems (Bazzill Basics)
Xyron
Stamp-a-ma-Jig
ATG
Foam squares
Zip-Dry
Scor-Pal
Scissors
Rotary trimmer

Instructions

BASE CARD

Cut blue cardstock to 7" x 10", score at 5", and fold.

BASKET

Basket Vine 1

Stamp the basket on the brown patterened paper in brown ink. Cut out the basket using the basket outline die.

MAT

Cut ivory patterned paper to 4 7/8" x 6 7/8". Use the green marker to color just the leaves & swirls on the trumpet flower stamp.


Basket Vine 2

Use the Stamp-A-Ma-Jig to stamp the swirls on the ivory paper, positioning them where they will show outside the edges of the basket.


Basket Vine 4

Stamp the same swirls/leaves in black ink on white paper. Cut the leaves out closely, and color them with a G29 COPIC marker.

FLOWERS

Stamp the flowers on white paper in black ink. Trim the entire bouquet closely. Stamp the bottom three flowers again, and trim out just the fronts of the blossoms. Color the leaves in the bouquet with the G29 COPIC, and the flowers with V91 and V95 markers.

ASSEMBLY

Mount the ivory mat on the front of the card, and the basket lined up with the stamped leaves/swirls. Glue the individual leaves over the stamped leaves. Mount the bouquet in the basket opening. Use foam tape on the individual flower fronts to mount them to the matching blossoms. Adhere 3 purple gems in the centers of each flower.

SENTIMENT

Cut/emboss a fancy tag from the light purple paper. Cut a rectangle out of vanilla paper measuring 7/8" x 2 5/8", and stamp the sentiment in blue ink in the center of the vanilla rectangle. Mount the sentiment on the tag, and the tag at the bottom center of the card front.

Thanks for stopping by!

Blue_Orange

Wednesday, July 6, 2011

Tri-Shutter Wedding Card

Inspiration

It's "Heartfelt Wednesday", and I have a wedding card and some fun summery cards on today's blog post at Heartfelt Creations. Today, I'll show you the wedding card, and the details for the additional cards will be posted tomorrow and Friday. Be sure to visit the HC blog for lots of beautiful creations by our design team members - they are such a talented group!

The wedding card uses several stamps from the Heartfelt Wedding Collection, including the HCPC 3403 Shabby Chic Lace stamp, which when embossed creates a beautiful delicate pattern. This is a tri-shutter card - a fun card to make with a very impressive result. I have a template below, or you can check out the tutorial at Splitcoast Stampers. TriShutter Wedding

Ingredients

Note: Finished card size is 4 1/4" x 5 1/2"

Paper

Sparkling Merlot Metallic (Wassau)5 1/2" x 12"
Vellum8 1/2" x 11"
Pink Pirouette (SU!)5 1/2" x 8 1/2"
Stamper's Select White (Paper Trey Ink)2" x 4"

Inks

White Dye Ink for Parchment Crafting (Sweet Stamps)
Purely Pomegranate (SU!)

Stamps

HCPC 3400 Bella Rosebuds PreCut Set
HCPC 3403 Shabby Chic Lace PreCut Set
HCPC 3404 Wedding Sentiment PreCut Set

Accessories

Grand Calibur (Spellbinders)
Labels 4 Nestabilities (Spellbinders)
Labels 4 Small Nestabilities (Spellbinders)
Fancy Tags Nestabilities (Spellbinders)
White embossing powder (Sweet Stamps)
Heat gun
Gelly Roll pens (Sakura)
Adhesive gems (Recollections)
Scor-Pal
ATG 714
Scissors
Rotary Trimmer

Instructions

Base Card

Trishutter Template

Start with a piece of metallic card stock, measuring 5 1/2" x 12". Using a scoring tool, line up the long side of the paper at the top of the scoring board, and score at 2", 4", 8", and 10". Now, measure in 1 1/2" along the score lines, and cut from the 2" score line to the 10" score line. Repeat this cut on the other side of the base card.

Trishutter Top View

To create the trishutter fold, the top and bottom strips are folded differently than the center strip of the card. For the top and bottom strips, the 2" and 8" scores are "mountain" folds, and the 4" and 10" scores are "valley" folds. For the center strip, leave the 2" and 10" scores flat, do a mountain fold on the 4" score, a valley fold on the 8" score. Here's a top view of the card that should help all this make sense.

Lace Trim

Stamp and emboss the lace stamp on vellum paper using white ink and white embossing powder. You will need 3 copies of the lace image. From the bottom edge of the lace images, measure up 1 1/2" , and cut straight across the lace. Trim these pieces to match the upper panels of the card (2 pieces 2" long, and 1 piece 4" long). Cut the upper edge of the lace around the points, and through the curves below each point, creating a "swag" effect. Trim these pieces to match the upper panels of the card (2 pieces 2" long, and 1 piece 4" long). Mount the lace images on the upper and lower panels of the card.

Images

Cut and emboss 2 labels from pink paper using the largest standard Label 4 Nestabilities die from pink paper. Cut and emboss a single label from pink paper using the largest Label 4 Small Nestabilities die. On each of the two larger labels, stamp the rose bud image in the dark pink ink. Color with Gelly Roll pens (I used Green, Rose Star, and Clear Star). Add gems in the center of the small flowers. On the smaller label, stamp the sentiment in the dark pink ink.

ASSEMBLY

Mount the rose bud labels on the first and third panels of the center strip, and the sentiment on the middle panel. Stamp the "special couple" sentiment in dark pink on white cardstock, and cut and emboss it with the Fancy Tag Nestabilities, and adhere it to the lower portion of the front image label.

Thanks for stopping by!

Blue_Orange

Thursday, June 30, 2011

Antique Linen Bride and Groom

Inspiration

Here's the other wedding card posted on yesterday's Heartfelt Creations blog. It's a little more elegant - using gold metallics and antique linen colors, and June's Heartfelt Wedding Collection release.

Antique Linen Bride

Ingredients

Note: Finished card size is 5" x 7"

Paper

Very Vanilla (SU!) 7" x 10", scored at 5"; and
3" x 4"; and
2" x 3" (2 pieces)
Gold Metallics (Wausau) 2 1/8" x 7" (2 pieces); and
3" x 4"
Gold Wedding Stripe (Paper Studio) 2" x 7"

Inks

Antique Linen Distress (Tim Holtz)

Stamps

HCPC 3404 Wedding Sentiment PreCut Set
HCPC 3394 Classic Bella Rose PreCut Set
HCPC 3391 Bold Bella Rose PreCut Set

Accessories

HCD 712: Bella Rose Die
Grand Calibur (Spellbinders)
Labels 4 Nestabilities (Spellbinders)
Labels 4 SMALL Nestabilities (Spellbinders)
Shell White Superfine Microglitter
Sticky Tape Sheets
Bangle Chain Deep Double Edge Punch (Martha Stewart)
Ribbon (Michaels)
Bow-Easy
Adhesive Gold Pearls (Recollections)
Glue dots
Zip Dry glue
ATG
Scor-Pal
Rotary trimmer

Instructions

Card

Start with a piece of vanilla measuring 7" x 10", and score it at 5". Use the single rose bud stamp from the Bold Bella Rose set to stamp randomly around the front of the card using the distress ink.

Vertical Decoration

Mount a 2" x 7" piece of patterned paper on a strip of gold metallic paper measuring 2 1/4" x 7". Use the double-edged punch to create a strip 7" long from the gold metallic paper. Mount the punched strip to back of one long side of the vertical decoration. Mount a strip of ribbon at the opposite side of the vertical decoration. Mount the entire stack to the right side of the card front.

Sentiment

Cut and emboss a gold label, and a vanilla paper, using the Label 4 dies. Stamp the sentiment on the vanilla label using distress ink. Mount the vanilla label on the gold label, and mount it on the front over the card.

Roses

Stamp one rose on vanilla cardstock using the distress ink. Cut it out using the matching Bella Rose die. For the second rose, mount a piece of Sticky Paper on vanilla cardstock, and cover in microfine glitter. The stamp the rose again on the glittered paper, using the distress ink, and cut it out with the matching die. Mount the plain rose above the sentiment on the card, and the glittered rose just to the left, over the plain rose.

Final Touches

Tie a triple loop bow in matching ribbon, and mount it over the rose stems and above the sentiment. Add 3 gold pearls in the lower right corner of the card.

Thanks for stopping by!

Blue_Orange

Wednesday, June 29, 2011

Vellum Wedding Wishes

Inspiration

It's Heartfelt Wednesday, and I have a couple of wedding cards on the Heartfelt Creations blog. June's Heartfelt Wedding Collection release is so pretty, and gives me lots of ideas for wedding wishes, even though I don't have any weddings coming up!

This one is made from vellum, a perfect medium for wedding greetings. And I used Spellbinders' dies to create a shaped card - really fun.

Vellum Wedding

Ingredients

Note: Finished card size is 5" x 5"

Paper

Vellum5 1/2" x 11", scored at 5 1/2"
Pink "Handmade" Flowers (Paper Studio)5" x 5"; and
2" x 3"
Stamper's Select White (Paper Trey)4" x 4"

Inks

Versamark (Tsukineko)
Rose Red (SU!)

Stamps

HCPC 3398 Bella Rose Wedding PreCut Set
HCPC 3404 Wedding Sentiment PreCut Set

Accessories

Grand Calibur (Spellbinders)
Grand Labels 1 Nestabilities (Spellbinders)
Labels 1 Nestabilities (Spellbinders)
Petite Ovals Large Nestabilities (Spellbinders)
COPIC Markers (Imagination International)
White Embossing Powder (Sweet Stamps)
Heat Gun
Stamp-A-Ma-Jig
Rotary trimmer

Instructions

Image

Stamp the image in embossing ink, and heat emboss with white embossing powder. Use the Labels 1 Nestabilities die to cut out the image. Color the image with COPIC markers. The colors I used were R81, R83, and G82.

Sentiment

Stamp the sentiment in dark pink on the small piece of pink paper, and cut and emboss it using the Oval Nestabilities die.

Card

Vellum Wedding Inside

After folding the scored vellum, position the Grand Labels 1 Nestabilities die just over the folded edge, so that the entire fold is not cut. Cut and emboss to form the shaped card.

Inside

For the inside card, cut and emboss pink paper using the largest Lable 1 Nestabilities dies, so that it fits inside the overall size of the card. Mount it on the inside of the vellum card.

Final Assembly

For the front of the card, mount the oval sentiment in the lower right corner. Add the rosebud image just overlapping the edge of the oval.

Thanks for stopping by!

Blue_Orange

Friday, June 24, 2011

Burgundy Wedding Wishes

Inspiration

Here's my other Heartfelt Creations card posted on the HC blog this week. It's a wedding card, but kind of a winter wedding color theme, I think! This one uses the Bella Rosebuds set, which are just really pretty flowers - they could be used for lots more than just wedding greetings!


Burgundy Wedding Wishes

Ingredients

Note: Finished card size is 4 1/4" x 5 1/2"

Paper

Textured Burgundy (Core'dinations)5 1/2" x 8 1/2", scored at 4 1/4"; and
4" x 4"
Stamper's Select White (Paper Trey)4" x 5 1/4"; and
4" x 4"

Inks

Tuxedo Black (Memento)
Bravo Burgundy (SU!)

Stamps

HCPC 3400 Bella Rosebuds PreCut Set
HCPC 3404 Wedding Sentiment PreCut Set

Accessories

Grand Calibur (Spellbinders)
Lacy Oval Nestabilities
Classic Oval Large Nestabilities
Textile texture embossing folder (Cuttlebug)
SPICA Glitter Markers (Imagination International)
Adhesive gems (Paper Studio)
ATG
Scissors
Rotary trimmer

Instructions

Image

Stamp the rosebut image on white paper in black ink, and cut it out using the largest classic oval Nestabilities die. Color the image with SPICA markers. I used these colors: Garnet, Olive, Blossom. Finish with adhesive gems in the middle of the small flowers. Cut the largest lacy oval Nestabilities die from the burgundy paper, and mount the image oval onto the lacy oval.

Burgundy Wedding Wishes Inside

Assembly

Emboss a piece of white paper using the embossing folder. Use the burgundy ink pad to color the embossed pattern. Trim the edges to end up with a rectangle measuring 3 3/4" x 5". Mount this onto the base card, then add the image in the center of the card.

Inside

Mount a white panel measuring 3 3/4" x 5", and stamp the sentiment in burgundy ink.

Thanks for stopping by!

Blue_Orange

Thursday, June 23, 2011

Lacy Lavender Heart

Inspiration

Since we did shoes yesterday, my weekly Heartfelt Creations cards will be posted today and tomorrow. If you want to check out the Shoe Blog Hop, or to see all the other weekly creations by the design team, be sure to jump over to the Heartfelt Creations blog!

The June release from Heartfelt Creations is the Heartfelt Wedding Collection and it has such pretty images! This card uses the versatile Decorative Lace Border Die, which I trimmed to give it a totally different look. This die presents so many possibilities for ways to use it!

Lacy Lavender Heart

Ingredients

Note: Finished card size is 6" x 6"

Paper

Textured Purple (Core'dinations)6" x 12", scored at 6"; and
4" x 4"; and
1" x 6"; and
4 1/2" x 4 1/2"
Shimmer Glitter Designer paper (Heidi Grace)5 7/8" x 5 7/8" (2 pieces)
Silver white metallic (Wassau)4" x 6"; and
3 3/4" x 3 3/4"
Stamper's Select White (Paper Trey)4" x 4"; and
4 1/4" x 4 1/4"

Inks

Tuxedo Black (Memento)
Elegant Eggplant (SU!)

Stamps

HCPC 3402 Bella Rose Heart PreCut Set

Accessories

HCD 713: Decorative Lace Border Die
Grand Calibur (Spellbinders)
Classic Scalloped Heart Nestabilities (Spellbinders)
COPIC Markers (Imagination International)
Burgundy Embossing Glitter (PK Glitz)
heat gun
embossing marker (Versamark)
Ribbon (Hobby Lobby)
Adhesive gems (Paper Studio)
Foam Tape
Zip Dry
Scissors
Rotary trimmer with straight and scalloped blades.

Instructions

Image

Stamp the heart image on the 4" x 4" white paper with black ink. Cut out the scalloped heart with the matching Nestabilities die. Color the leaves, stems, and roses with COPIC markers. The colors I used are: G21, G24, V91, V93, V95. Color over the background flowers with the clear Versamark marker. Sprinkle the embossing glitter on the embossing ink, and emboss with the heat gun. Add a purple adhesive gem in each scallop of the heart.

Lace Layer

Using the Decorative Lace die, cut a border from the metallic white paper, then trim the border around the round edges to create a more narrow lace trim. Adhere this to the 1" x 6" strip of purple card stock. Wrap a strip of ribbon around the layer, and create a bow and adhere it to the right edge of the layer.

Assembly

Lacy Lavender Heart

After scoring and folding your base card, run the bottom, open edge through the rotary trimmer using a scalloped blade. Do the same for both pieces of the designer paper - trimming only one edge with the scalloped blade. Adhere one piece of the designer paper to the base card. Mount the lace layer across the middle of the card. Mount the 4" square of purple card stock over the lace, centering it on the card. Add the metallic white square on the purple one, and add the scalloped heart using foam tape.

Inside

For the sentiment, mount the other designer paper square, with one scalloped edge. For the sentiment, mount the 4 1/2" purple square, followed by the remaining white square, and stamp the sentiment in dark purple.

Thanks for stopping by!

Blue_Orange

Thursday, June 16, 2011

Anniversary Bell

Inspiration

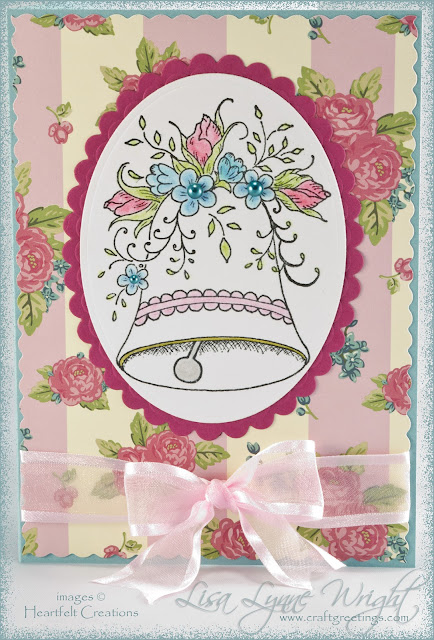
I'm working on cards for June anniversaries, and here's one that features the Wedding Bell from the HCPC 3398 Bella Rose Wedding set, one of the beautiful images from June release - the Heartfelt Wedding Collection. Visit the HC blog to see all of this week’s beautiful creations by the design team.

Wedding Bell

Ingredients

Note: Finished card size is 5" x 7"

Paper

Baja Breeze (SU!) 7" x 10", score at 5"
Springtime Vintage DSP (SU!) 5" x 7"
Rose Red (SU!) 3" x 4"
Whisper White (SU!) 3" x 4"

Inks

Brilliance Archival Black (Tsukineko)
Not Quite Navy (SU!)

Stamps

HCPC 3398 Bella Rose Wedding PreCut Set
HCPC 3404 Wedding Sentiment PreCut Set

Accessories

Grand Calibur (Spellbinders)
Petite Scallop Oval Large (Spellbinders)
Petite Oval Small (Spellbinders)
Fancy Tags 3 Shapeabilities (Spellbinders)
Labels 10 (Spellbinders)
Clear embossing powder (Stampendous)
Heat gun
Chalk Pastels (Koss)
Gold metallic pen (Uniball)
Bow-Easy
Ribbon (Michaels)
Adhesive blue pearls (Recollections)
Scor-Pal
ATG 714
Scissors
Rotary Trimmer with straight and scalloped blades

Instructions

Image

Stamp the bell image on white cardstock with black pigment ink, and heat emboss with clear powder. Lightly color the flowers and trim using chalks - I used small sponge applicators. Use the gold metallic pen to color the rim of the bell. Use the plain oval Nestabilities die to cut out the bell image.

Cut and emboss a scalloped oval from the dark pink cardstock, and mount the bell image onto it.

Assembly

Use a scalloped blade on your paper trimmer to cut the patterned paper to 4 7/8" x 6 7/8". Tie a bow and thread a straight ribbon through the bow, and mount this on the lower part of the patterned panel. Mount the image oval centered above the bow.Wedding Bell inside

Inside

Cut and emboss dark pink cardstock, using the fancy tag Nestabilities die. Stamp the sentiment on white cardstock, and cut and emboss it, using the Label 10 Nestabilities die. Mount the white sentiment on the tag, and mount it on the inside.

Thanks for stopping by!

Blue_Orange

Wednesday, June 15, 2011

Happy Anniversary

Inspiration

As I told you on Sunday, I just celebrated my 31st anniversary. Here's the card I made for my DH. When I saw the background stamp in the Heartfelt Creations booth at the scrapbook convention, I knew it would be perfect for our anniversary - we had 1 Corinthians 13 read at our wedding and has always meant so much to us both.

The main images are from Heartfelt Creation's new release - the Heartfelt Wedding Collection. Today's HC blog features all the beautiful creations by the design team, and the winner of the full release is announced - be sure to check it out.

Happy Anniversary

Ingredients

Note: Finished card size is 4 1/4" x 4 1/4"

Paper

Basic Black (SU!) 5" x 10"
Very Vanilla (SU!) 4" x 4" (2 pieces)

Inks

Versamark (Tsukineko)

Stamps

HCPC 3398 Bella Rose Wedding PreCut Set
HCPC 3402 Bella Rose Heart PreCut Set
HCPC 3323 Large Elegant Word Background PreCut Set

Accessories

Grand Calibur (Spellbinders)
Labels 3 (Spellbinders)
Scalloped Square Grand Nestabilities (Spellbinders)
Lacy Squares Nestabilities (Spellbinders)
Ultrafine gold embossing powder (Stampendous)
Heat gun
Pen-Touch Calligrapher 5mm Gold metallic pen (Sakura)
Zip Dry
Scor-Pal
ATG 714
Scissors
Rotary Trimmer

Instructions

Base Card

Start by stamping the word background in embossing ink at one end of a piece of black card stock measuring 5" x 10". Heat emboss with gold powder. Score the card at 5" and fold. Position the Scalloped Square Grand Nestabilities die so the fold of the card is just below the row of scallops and secure in place with tape. Cut and emboss - this gives the card scallops on three sides.

Image

Cut and emboss a Label 3 from vanilla cardstock. Stamp the rose/ring image in embossing ink on the Label 3, and heat emboss with gold powder.

Sentiment

Cut and emboss a Lacy Square from vanilla cardstock. Use a black marker to ink the single word "Together" on the sentiment stamp, and stamp on the Lacy Square.

Final Assembly

Use the metallic pen to paint the embossed edge in gold on each shape; Do both the outside and inside edges of the base card, the rose/ring label, and the sentiment Lacy Square. Mount the rose/ring image on the front of the card, and the sentiment label inside.

Thanks for stopping by!
Blue_Orange

Thursday, June 9, 2011

Wedding Dove

Inspiration

I love this new image from the Heartfelt Wedding Collection by Heartfelt Creations, just released yesterday. It's the Wedding Dove PreCut Set, and it has really pretty, intricate detail. And be sure to check out designs by the team on the HC blog - they've really outdone themselves!

Here's another easel card - I'm on a theme this week, I guess - LOL!

Wedding Dove Easel

Ingredients

Note: Finished card size is 6" x 6"

Paper

Lavender Lace Textured (SU!) 12" x 12"
Vellum (Sweet Stamps) 6" x6" (2 pieces)

Inks

Versamark (Tsukineko)

Stamps

HCPC 3399 Wedding Dove PreCut Set (Heartfelt Creations)

Accessories

Grand Calibur (Spellbinders)
Scallop Circle Grand Nestabilities (Spellbinders)
Classic Scallop Circle Large Nestabilities (Spellbinders)
Standard Circle Large Nestabilities (Spellbinders)
White embossing powder (Sweet Stamps)
Heat gun
Markers (SU!)
Pleated lace fringe (Offray)
Holiday ribbon (Michaels)
Bow-Easy
Scor-Pal
Zip Dry
Glue dots
Vellum tape
Clear Scotch tape
Scissors
Rotary Trimmer

Instructions

Base Card

To create the easel card, start with a piece of cardstock measuring 6" x 12". Score this piece at 6" and fold on the score line. Position the Grand Scallop Circle die just above the fold, and run it through the Grand Calibur to cut out the shaped card. Score one of the sides of the card again through the middle of the circle, and fold it to create the base of the easel.

Card Face

Cut another single scallop circle of the same side from matching cardstock. This will be the base for the upright face of the card. Cut another piece of matching cardstock using the largest plain circle Nestability. Stamp the dove image using embossing ink on the vellum, and heat emboss with white embossing powder. Cut this out in a circle slightly smaller than the main card face. Color the flowers in the image on REVERSE side of the image, using markers in coordinating colors. I used Lavender Lace, Regal Rose, and Pear Pizzazz. Mount the vellum circle with the image on the plain circle.

Sentiment

Cut a scallop circle from vellum using the classic scallop Nestabilities, and stamp the sentiment in the lower portion of the circle using embossing ink on the vellum, and heat emboss with white embossing powder.

Assembly

The pleated lace is going to be slightly curved already, so it is fairly easy to shape into a circle. Arrange the lace around the single large scallop circle that is the base for the face of the card. I used a generous amount of Zip Dry under the lace, and clear tape on the inner edges of the lace to secure it. The mount the dove image panel onto the lace. Adhere the card face to the front of the folded card base. Finish the card by mounting the sentiment vellum on the bottom panel, and attaching a matching bow to act as a stop to hold the front of the card upright.

Reminder

Remember, one lucky person will win the entire new release - the Heartfelt Wedding Collection! To be entered in the drawing for the Wedding Collection give away, leave a comment by June 14 midnight on my post yesterday, or on the Heartfelt Creations blog to see the all the beautiful creations by the design team.

Thanks for stopping by!

Blue_Orange

LinkWithin

Blog Widget by LinkWithin