Showing posts with label Unity. Show all posts

Sunday, April 1, 2012

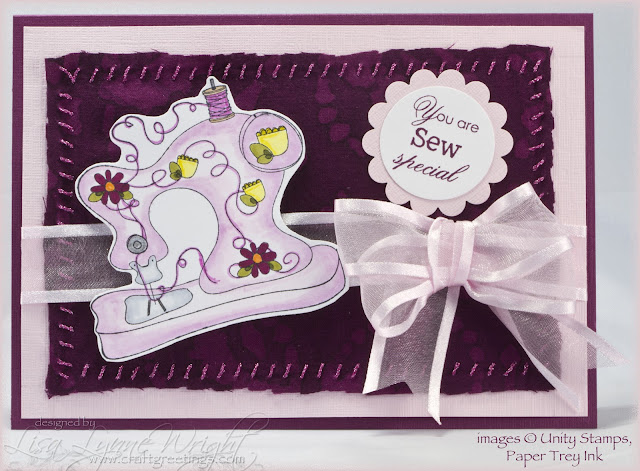
Sew Special

Inspiration

Happy April Fool's Day! The only joke here is that this card is the closest I ever get to sewing (My friend, Helen, can attest...). I made this card for the March birthday of my cousin who is a wonderful seamstress, and such a very special person.

SewSpecial

Ingredients

Note: Finished card size: 5" x 7"

Paper

Rich Razzleberry (SU!)7" x 10", scored at 5"
Pink Pirouette textured (SU!)4 7/8" x 6 7/8", and
2" x 2"
Stamper's Select White (Paper Trey Ink)4" x 4", and
2" x 2"

Ink

Memento Tuxedo Black (Tsukineko)
Rich Razzleberry (SU!)

Stamps

Sew Cute (Unity)
Heartfelt Basics (Paper Trey Ink)

Accessories

COPIC markers (Imagination International)
SPICA (Imagination International)
Fabric (Joann)
SewEasy (We R Memory Keepers)
Sew Easy Fancy Floss (We R Memory Keepers)
Ribbon (Hobby Lobby)
Peg Bow Maker (UNITY)
1 3/8" Circle Punch (SU!)
Scalloped Circle Punch (SU!)
3-D Foam Squares (Scrapbook Adhesives)
Clear tape (3M)
ATG (3M)
Rotary Trimmer (Fiskars)

Ingredients

BASE CARD

Cut a piece of dark purple card stock measuring 7" x 10", score it at 5", and fold.

MATS

Cut a piece of pink card stock measuring 4 7/8" x 6 7/8". Cut a piece of fabric about 4 1/4" x 6 1/4". Use the Sew Easy tool to punch holes through the paper about a 1/2" from the edge. Attach the fabric to the pink mat stitching through the holes in the pink mat, and using tape to anchor the thread to the back of the mat. Tie a double-loop bow onto a strip of ribbon, and mount it around the mat. Mount the mat onto the front of the card.

IMAGE

Stamp the sewing machine using black ink on white paper. Color with COPICS and SPICA pens. I used these colors:

  • Sewing Machine: RV0000, RV63, RV66
  • Presser Foot: C00, C3
  • Spool: E33
  • Thread: SPICA Pink
  • Daisies: RV69, SPICA Orange
  • Tulips: Y02
  • Leaves: YG95, 99

Mount on the front of the card using foam squares.

SENTIMENT

Stamp the sentiment on white paper using dark purple ink. Punch out with a 1 3/8" circle punch. Punch a scalloped circle from pink card stock. Glue the sentiment onto the scalloped circle. Mount on the front of the card using foam squares.

Thanks for stopping by!

Orange_Green

Sunday, March 4, 2012

Dads Are Special

Inspiration

I made this card for my FIL's birthday - he turned 83 on February 22! I cased it from a card by Elizabeth Jones that was published in the book Best of Stamp It! Cards.

DadsAreSpecial

Ingredients

Note: Finished card size: 5" x 7"

STAMPS

Growing in Unity (Unity Stamps)
Father's Day Centers (Cornish Heritage Farms)

Paper

Chocolate Chip7" x 10" scored at 5"
Old Olive4 7/8" x 6 7/8"
Not Quite Navy4 1/4" x 4 1/2"
Very Vanilla4 5/8" x 6 5/8", and
3 3/4" x 4"

Ink

Chocolate Chip (SU!)
Old Olive (SU!)
Not Quite Navy (SU!)

Accessories

Markers (Old Olive, Chocolate Chip by SU!)
Twine (No Time to Stamp)
Stipple Brush
Glue Dots
ATG (3M)
Tape (Scotch)
Scor-Pal
Rotary Trimmer (Fiskars)

Instructions

BASE CARD and MAT LAYER

Cut a piece of brown card stock measuring 7" x 10", score it at 5", and fold. Cut a piece of green card stock measuring 4 7/8" x 6 7/8" and mount it on the front of the card.

SENTIMENT LAYER

Cut a piece of vanilla card stock measuring 4 5/8" x 6 5/8". Use a stipple brush with brown ink and lightly stipple color around the edges of the card. Stamp the sentiment in blue ink in the bottom center of the panel. Cut three pieces of twine about 6" long, and tie them together with a knot about 2" from one end. Put a glue dot on the knot and adhere it to the panel above the sentiment toward the right side of the panel. Use tape to secure the ends on the back of the panel. Mount the sentiment layer on the front of the card.

IMAGE

Ink the leaf portion of the tree stamp with green ink. Use the "rock and roll" method with the stamp to ink the outer edges of the tree with brown ink. Use a brown marker to color the trunk, and a green marker to blend a little where the 2 colors meet. Stamp the image onto a vanilla panel measuring 3 3/4" x 4". Stipple around the outer edges with dark blue ink. Cut the image into exact thirds (1 1/4" each).

Cut a piece of dark blue card stock measuring 4 1/4" x 4 1/2". Mount the 3 panels of the image onto the blue card stock, then mount the image onto the card front.

Thanks for stopping by!

Orange_Green

Sunday, June 26, 2011

Look Up at the Stars

Just a Note

I missed last Sunday's post, AND I'm a little late today. I've been transitioning to a new computer over the last two weeks, and it is a BIG transition - I'm moving to an iMAC! My dear husband surprised me with a beautiful new iMAC for our anniversary. So, after 20+ years as a Windows devotee, I'm making the switch and I love it!! However, the transition is a little painful - for things I do by rote on my Windows machine, I now have to do a little research to figure out how to make it work! Like... how to right click the mouse or select text one word at a time! LOL! Anyway, it has somewhat slowed me down. Today is the first post I've done entirely from the iMAC, including the pictures and text. I'll get caught up on my Splitcoast, Technique Junkies, and Facebook galleries soon.

Inspiration

This card is one I made as part of a group of "inspirational" cards. My customer asked for 5 "girly" cards with inspirational sayings. I'll show them all to you over the next few weeks.

Look Up at the Stars

Ingredients

Note: Finished card size is 5" x 7"

Paper

Pixie Pink (SU!)7" x 10"", scored at 5"
Whisper White (SU!)4 3/4" x 6 3/4"

Inks

Pixie Pink (SU!)

Stamps

Beautiful Fairies (Inkadinkado)
Birdie Inspirations (Unity)
Star Background (Rubber Stampede)

Accessories

SPICA Markers (Imagination International)
Sheer Shimmer Spritz - "Sparkle" (Tuskineko)
Pixie Pink and Basic Black markers (SU!)
Sponge
Scor-Pal
ATG 714
Rotary trimmer with straight & deckled blades

Instructions

Cut a white panel using the deckled blade on your rotary trimmer. Ink the fairy with the markers - color the fairy in black and the stars in pink. Stamp the image in the middle of the white panel. Color the image with SPICA markers. The colors I used were Pink, Sand, Baby Blue, Lemon, and Clear.

The sentiment from Unity is all one stamp, so I inked the upper portion of the saying with the black pen and stamped it above the fairy, and the "stars" portion below. I used the Gold SPICA to fill in some of the letters for a little more glitz.

To finish up the the image, I used a sponge and the pink ink to color the deckled edge of the panel, then stamped the star background around the edges. I filled in the largest stars in the background using the Clear SPICA pen.

Finally, mount the white panel onto the front of the card, and spritz the whole card front with the Shimmer Spritz.

Thanks for stopping by!

Blue_Orange

Wednesday, March 16, 2011

Quick and Easy

Inspiration

Ever had a week where you just don't have time to get everything done you want to do? Like every week, right? This is one of those weeks for me - I have lots of "have to do's (work, house work, etc.)", and lots of "get to do's (Heartfelt Creations design team submission, Tommy Tune musical, Photoshop training, HTML/CSS class)", plus a ton of "want to do's (card making, studying, supporting Joe's business, etc., etc., etc.)" things - something for sure won't get done. LOL! But reviewing the list DOES make me count my blessings instead of my burdens.

With that in mind, these two cards are made with a major time-saver set of stamps from Gina K Designs - they are decorated frames that coordinate with Spellbinders Nestabilities dies. Since they are already decorated, you don't need much time or many materials to make nice, quick greetings (and a quick blog entry)!

Card One - Fabulous Frame

20110316_FabulousFrame

Ingredients

Note: Finished card size is 4 1/4” x 5 1/2”

Paper

Ruby Red (SU!):  4 1/4” x 11”, scored at 5 1/2”
English Garden DSP (SU!):  4” x 5 1/4”
Whisper White (SU!):  3” x 3”

Inks

Ruby Red (SU!)

Stamps

Lovely Labels (Gina K) Simply Said (Unity)

Accessories

Labels 9 Nestabilities (Spellbinders) Grand Calibur (Spellbinders)
Ribbon and Foam Tape Scissors
Scor-Pal Adhesive Transfer Gun 714 (Scotch)
Rotary trimmer with deckle and straight blades (Fiskars)

Instructions

Step 1: Stamp the decorated label on the white cardstock in red, and then add the sentiment in the middle of the open space in the label.

Step 2: Create the label using the Label 9 die - run it through the die cut machine twice - once to cut, once to emboss.

Step 3: Mount a ribbon with a tied not around the middle of the patterned paper panel.

Step 4: Mount the patterned paper with the ribbon to the front of the card.

Step 5: Add the stamped label, using foam tape for a little bit of dimension.

Card Two - Wasabi Wishes

20110316_WasabiWishes

Ingredients

Note: Finished card size is 4 1/4” x 5 1/2”

Paper

Wild Wasabi (SU!):  4 1/4” x 11”, scored at 5 1/2”
Linen Closet Patterned Cardstock (DCWV):  4” x 5 1/4”
Whisper White (SU!):  3” x 4”

Inks

Wild Wasabi (SU!)

Stamps

Lovely Labels (Gina K) Elegant Post (Gina K)

Accessories

Labels 4 Nestabilities (Spellbinders) Grand Calibur (Spellbinders)
Pearl Stickers (Recollections) Foam Tape
Scor-Pal Adhesive Transfer Gun 714 (Scotch)
Rotary trimmer with deckle and straight blades (Fiskars)

Instructions

Step 1: Stamp the decorated label on the white cardstock in green, and then add the sentiment in the middle of the open space in the label.

Step 2: Create the label using the Label 4 die - run it through the die cut machine twice - once to cut, once to emboss.

Step 3: Mount the patterned paper panel on the front of the card.

Step 4: Add the stamped label, using foam tape for a little bit of dimension.

Step 5: Add matching pearl stickers in the design on the label.

Final Notes

Hope this shows you quick & easy can still be really nice – and the recipient always appreciates the card, no matter how simple.

Thanks for stopping by!

Coral_Purple_Sign

Wednesday, February 16, 2011

Tree of Hearts

Inspiration

My last Valentine for this year – this one was for my husband, Joe. 

I got the idea of cutting up the image from a sample in a Stampington Take Ten magazine, but I used my new “Grand” sized dies from Spellbinders to shape the card.  Piecing together the pieces to line up perfectly was a little tougher than I thought it would be – even with the graph paper design on the mat paper, so it’s not quite as perfect as I would have liked.  Afterward, I decided the base card and the image layer could have used some distressing – maybe sponging on some color to enhance the layers.

Fortunately, Joe never sees all the flaws I do, and he loved the card!

20110216_TreeOfHearts_Outside


Ingredients

Paper

Note: finished card size is about 6” x 6”

Crushed Curry (textured) (SU!) 6” x 12”, scored at 6”
Razzleberry Lemonade DSP (SU!) 6” x 6”
Whisper White (SU!) 6” x 6”


Ink

Early Espresso (SU!)

Stamps

Grow in Unity (Unity)

Inspiration

Grand Label One dies (Spellbinders); Grand Calibur (Spellbinders); 1/16” hole punch; Heart brads (Spare Parts); SPICA glitter pen – garnet (Imagination International); Foam Tape; Scor-Pal; Adhesive Transfer Glider 714 (Scotch); Rotary trimmer with straight blade (Fiskars); Scissors

Instructions

Base Card

To create the base card, position the 6” grand die on the scored, folded card base so that the Tape on Diefold is just inside the blade of the die.  I found it to be a little tricky, so I used a couple of small pieces of tape to hold the cardstock in place as it goes through the die cutter.

Then I added the cardstock positioning it carefully and pressing the tape down.Cardstock on Die

Now, it’s ready to run through the Grand Calibur to cut the card out.  The folded edge should be intact.


Cut the mat from the designer paper using the next smaller die, and a white panel using the next smaller die.

Image

Ink the tree image stamp with the brown ink, and stamp it on the white panel.  Then color over the entire tree with the glitter pen.

Using the paper trimmer, cut image panel into 16 pieces – about 1 1/8” x 1 1/8” squares.

Then, using the small hole punch and the heart brads, randomly place hearts in the limbs of the tree.

Assembly

Mount the designer paper on the base card. The using foam tape adhere the image pieces to the designer mat. 20110216_TreeOfHearts_Inside

Final Notes

Inside

For this card, I used the same paper stack inside the card.

I stamped the “love you” sentiment (Big Spring by SU!) in brown, and colored in the letters using a Rose Star Gelly Roll pen (Sakura).  I added a bigger heart brad in the middle of the heart in the word.

The valentine greeting is from the Teeny Tiny Wishes set in Melon Mambo ink (both SU! products).

Thanks for stopping by!

RedSignature

Sunday, February 13, 2011

Creative Valentine

Inspiration

This one doesn’t look much like a Valentine, but I made it for a friend who shares my passion for stamping and card-making.  In fact, she is more creative than I – she also quilts and knits!  Not sure where she finds the time!  Well, she gets this special greeting from me.  And Helen, in case you haven’t seen your Valentine yet – don’t peek!

20110213_CreativeValentine


Ingredients

Paper

Note: finished card size is 4 1/4” x 5 1/2”

Blushing Bride (SU!)

  4 1/4” x 11”; score at 5 1/2”

  Pear Pizzaz (SU!)

  4 1/4” x 5 1/2” – cut in half diagonally

  Sahara Sand (SU!)   3 1/4” x 4 3/4”

  Early Espresso (SU!)

  4” x  5 1/4”

Ink

Early Espresso (SU!)

Stamps

Urban Tapestry (Tim Holtz) ; Grow in Unity (Unity)

Accessories

SPICA Glitter Pens (Imagination International); Pearl Stickers (Recollections); Scor-Pal; Adhesive Transfer Glider 714 (Scotch); Rotary trimmer with straight blade (Fiskars)

Instructions

Image

Stamp the text in brown on the sand cardstock.  Carefully tear the edges of the image.

Assembly

Mount the green triangle on the right half of the base card.

Stamp the flowered swirls in brown in the upper left, and lower right corners of the card.  Color the swirls with the brown glitter pen, and the centers of the flowers with the pink glitter pen.

Tear the edges of the dark brown panel, and mount it at an angle on the front of the card.  Mount the text image panel on the brown panel, rotating it slightly.

Add pink pearls at the top of the card, and green pearls at the bottom of the card.

Final Notes

As I mentioned, I used this for a friendly Valentine greeting, but you could use this for any occasion!

Thanks for stopping by!

RedSignature

Sunday, November 7, 2010

Friendly Greeting

Inspiration

There are lots of November birthdays among my family and friends, so in addition to trying to design Christmas cards, I’ve put together some birthday cards, too!  Here’s an easy one – a single large image on a square card with a simple greeting.  This one goes to my friend, Nancy, today – hope she enjoys it as much I enjoyed making it!

Blog_20101107_FriendlyBirthday

Ingredients

Paper

Note: finished card size is 5” x 5”

Not Quite Navy (SU!): 5” x 10”, score @ 5”; River Rock (SU!): 4 7/8” x 4 7/8”, 3 7/8” x 3 7/8”, plus a 2” x 2” square; Rose Red DSP (SU!): 4 3/4” x 4 3/4”; Whisper White (SU!)": 3 3/4” x 3 3/4”, plus a 2” x 2” square.

Ink

Versamark (Tsukineko); Rose Red (SU!)

Stamps

Growing in Unity (Unity); Best Yet (SU!)

Accessories

Burgundy Pearlescent Embossing Powder (Stampendous); Pink brads; Circle dies (Spellbinders); Cuttlebug (Provo Craft); Crop-A-Dile (We R Memory Keepers); Scor-Pal; Adhesive Transfer Gun 714 (Scotch); Rotary trimmer with straight blade (Fiskars); Heat gun; Scissors

Instructions

Image

Stamp the tree on the large white square using Versamark ink.  Emboss the image using the burgundy embossing powder.  Mount the image panel on the middle green panel, and punch holes in the top 2 corners, and the lower right corner.  Put the brads through the holds and secure them in place.

Stamp the sentiment in Rose Red on the smaller white square.  Cut the sentiment from the white square smallest circle die. Cut a larger circle from the green paper, and mount the sentiment on the green circle.

Assembly

Now, complete the assembly of the card: Mount the larger green square on the base card, followed by the patterned paper, and the image panel.  Mount the sentiment over the lower left corner of the image where there is no brad.

Thanks for stopping by!

BlueSignature

LinkWithin

Blog Widget by LinkWithin