Saturday, April 30, 2011

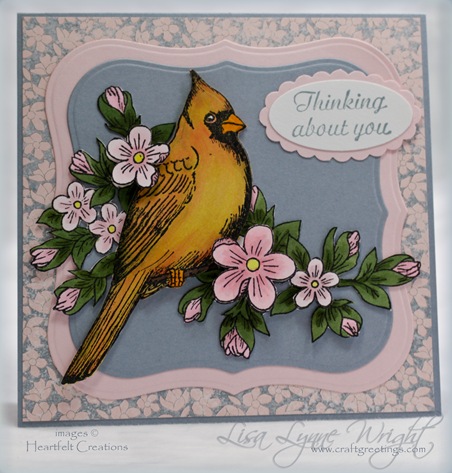
Spring Cardinal Birthday

Inspiration

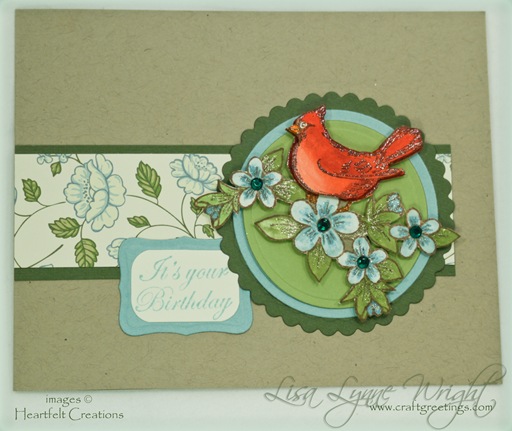
Good morning on this Saturday morning!  I’m SO glad it’s the weekend – lots of uninterrupted crafting time!  Here's a birthday card that was featured on the Heartfelt Creations blog on Wednesday.

LLW_SpringCardinalBirthday

Ingredients

Note: Finished Card Size: 4 1/4" x 5 1/2" (A2 size)

Paper

Crumb Cake (SU!) 4 1/4” x 11”, scored at 5 1/2”
Always Artichoke Textured (SU!) 2” x 5”, and
3” x 3”
Baja Breeze (SU!) 3” x 3”, and
2” x 2”
Pear Pizzazz (SU!) 3” x 3”
Springtime Vintage DSP (SU!) 1 3/4” x 5”
Pure Luxury ivory (Gina K) 3 1/2” x 3 1/2”, and
2” x 2”

Inks

Memento Rich Cocoa (Tsukineko)
Baja Breeze (SU!)

Stamps

HCPC3388 Spring Cardinals PreCut Set (Heartfelt Creations)
HCPC3353 Cardinal Family PreCut Set (Heartfelt Creations)

Accessories

HCD706 Cardinal Family Diecuts (Heartfelt Creations)
Labels 8 Nestabilities (Spellbinders)
Petite Scallop Circle Large Nestabilities (Spellbinders)
Standard Circle Small Nestabilities (Spellbinders)
Standard Circle Large Nestabilities (Spellbinders)
Grand Calibur (Spellbinders)
Corner rounder punch (SU!)
COPIC markers (Imagination International)
SPICA glitter pens (Imagination International)
I-Rock Heat setter & jewels (Imaginesce)
Foam Tape
Scissors
ATG 714 (Scotch)
Rotary Trimmer (Fiskars)

Instructions

Image

Stamp the full cardinal on the branch image on ivory paper. Trim it closely. Stamp another individual cardinal on ivory, and cut it out using the matching cardinal die. Color the images with COPICs. Enhance the image with SPICAs. Here's the colors I used:

  • Cardinal: R02, R08, E08, YR15, Garnet SPICA
  • Flowers: BG70, BG72, E43, Baby Blue SPICA
  • Leaves: G82, G99, Mint SPICA

Sentiment

Cut and emboss the smallest label 8 die out of blue paper. Stamp the sentiment in blue ink on ivory. Cut it out and round the corners with the punch. Mount it on the blue label.

Assembly

Cut and emboss a scalloped circle from dark green paper, a plain circle from blue paper, and a smaller plain circle from light green paper.

Cut a 1 1/4" x 5" strip of dark green paper, and a 1" x 5" strip of patterned paper. Mount the patterned paper on the green strip.

Mount the patterned strip, followed by the sentiment label. Add the circle die cuts, then using foam tape, add the cardinal image on top of the circles. Finish the card off by heat setting blue jewels in the center of the stamped flower images.

Thanks for stopping by!

Blue_Orange

Friday, April 29, 2011

Cherries to Cheer You

Inspiration

This is a quick and happy card that could be used for different occasions - a get well, an apology, an "I'm thinking of you", or just a note. This card was featured on the Heartfelt Creations blog on Wednesday, and uses the Luscious Cherries set, which is part of the Spring Cardinals collection.

LLW_CherriesToCheerYou

Ingredients

Note: Finished Card Size: 4 1/4" x 5 1/2" (A2 size)

Paper

Rich Razzleberry (SU!) 4 1/4” x 11”, scored at 5 1/2”
Soft Lilac Core'dinations 4” x 5 1/4”
Razzleberry Lemonade DSP (SU!) 3” x 4”
Stamper's Select White (Paper Trey Ink) 3” x 4”

Inks

Memento Tuxedo Black (Tsukineko)
Rich Razzleberry (SU!)
Pale Plum (SU!)

Stamps

HCPC3387 Luscious Cherry Swirls

Accessories

Razzleberry ribbon (SU!)
Bow-Easy
COPIC markers (Imagination International)
Paper piercing tool and template (SU!)
Glue dots
Scissors
ATG 714 (Scotch)
Rotary Trimmer (Fiskars)

Instructions

Image

Stamp the cherry image on white cardstock. Using the rotary trimmer cut from the right edge of the right leaf about 2 1/4", then turn the paper to cut at a right angle, and cut about 1 1/2". Turn again, and cut straight back to the lowest cherry. Finish up the by continuing the cut on the other side of the cherry for about a 1/2", then finish up by cutting the final edge of the frame up to the bottom of the left leaf. Using scissors, trim around the bottom of the cherry, and the tops of the leaves. Use the paper piercing tool to punch a row of dots around the edge of the white panel. Stamp the sentiment in purple ink to the right of the cherries. Color the image, using the COPICs. Here's the colors I used:

  • Cherries: RV63, RV66, RV69
  • Leaves: YG95, YG97
  • Shadow: C00, C1, C3

Assembly

Create the background on the lilac panel, using the pale purple ink and stamping the cherry outline image repeatedly at random angles. Mount the patterned paper across the middle of the lilac panel. Adhere a strip of ribbon across the top of the patterned paper, and tie a bow and attach it to the right portion of the ribbon strip, using glue dots. Add the image panel on the patterned paper, with the leaves over the ribbon.

Thanks for stopping by!

Blue_Orange

Thursday, April 28, 2011

Cardinal Keepsake Box

Inspiration

One of the requirements for being on the Heartfelt Creations design team is to make at least one altered item a month. This is a real challenge for me! I'm a card-maker through and through, and creating other items - even scrapbook pages - are a stretch. SO, dear blog readers, you will be witnessing my experiments first-hand!

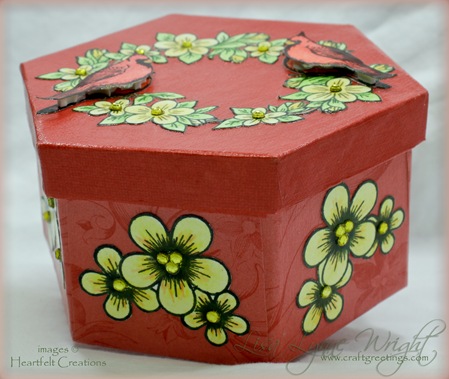
My first altered project featured on the HC Blog is a decorated paper mache box using images from April's Spring Cardinal release, and some others. I'd love to hear what you think!

  LLW_CardinalKeepsakeBox_02

Ingredients

Paper

Fleur Des Jardines patterned paper - Cranberry (CTMH)
Stamper's Select White (Paper Trey Ink)

Inks

Memento Tuxedo Black (Tsukineko)

Stamps

HCPC3384Cardinal Posy Wreath PreCut Set
HCPC3353 Cardinal Family PreCut Set
HCPC3303 Posy Patch Flowers PreCut Set

Accessories

HCD706 Cardinal Family Dies (Heartfelt Creations)
Grand Calibur (Spellbinders)
I-Rock Heat setter & Jewels (Imaginesce)
Masking Magic (ThermoWeb)
Colored Pencils (Prisma Color)
Gamsol
Paper Stubs
Foam Tape
Paper Mache Box
ModPodge
Foam Brush
Scissors

Instructions

Image for Top of BoxLLW_CardinalKeepsakeBox_01

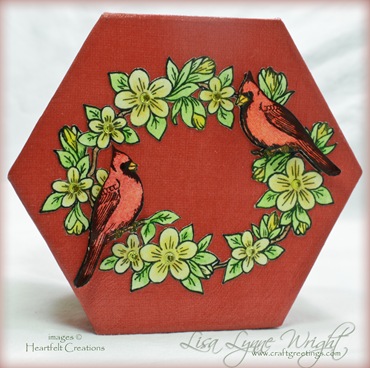
Stamp the cardinal wreath in black ink on white paper. Color the image with colored pencils and blend with paper stubs and Gamsol, then carefully trim the entire image. Stamp two individual cardinal images, and color. Use the dies to cut out the individual cardinals.


Images for Sides of BoxLLW_CardinalKeepsakeBox_03

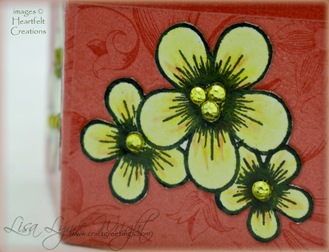
Create masks for the three posy images by stamping the images on the masking paper, or a post-it note, then cutting them out. To create the group of posies for the box sides, stamp the largest image first, then cover it with the matching mask. Then stamp the smaller two images on each side of the larger image, overlapping one or two petals. Remove the mask, and you have a grouping of three posies. Color with pencils and Gamsol, then trim the grouping closely. Repeat this technique to create a group of flowers for each side of the box.

Cover the Box

To cover the box in the red paper, start with the lid. Use the lid as a pattern, trace around the lid on the backside of your paper. Cut out the paper to cover the lid, leaving a wide margin around the traced pattern. Using a foam brush, cover the top of the lid with ModPodge. Apply more ModPodge to the backside of the paper. Place the lid top side down on the paper, and press to smooth it carefully. Fold the excess down over the sides of the lid, trimming at the corners to make the paper cover the edges entirely. Once you have it trimmed to fit, use your foam brush again, to cover the box lid sides and the paper, and smooth paper over the sides of the lid. Now, cover the whole lid with another coat of ModPodge and let it dry. Follow the same procedure for the box itself. If you're feeling ambitious, try covering the inside of the box, too!

Decorate the Box

Use ModPodge to adhere the images to the box - adhere the wreath to the top of the box and a group of flowers to each side of the box. Add more layers of ModPodge, letting each layer dry before adding another.

When the box with images is completely dry, heat set yellow jewels in the center of the flowers in the wreath, and in the groups of posies. Using foam tape, add the single cardinal images on top of the wreath.

Thanks for stopping by!

Blue_Orange

Wednesday, April 27, 2011

Female Cardinal For Mom

Inspiration

This week's Heartfelt Creations blog continues to feature the Spring Cardinal collection. I have 4 cards on the HC blog, so I'll post them here on my blog over the next few days.  Be sure to visit the HC blog to see all the beautiful work from the design team – they are really talented!

Today's card is a Mother's Day card with a different take on the cardinal - I was trying to achieve the look of a female cardinal. My coloring is probably a little brighter than a real female of the species, but I found myself concentrating on blending the colors more than the overall look of the bird. Still, I liked the result. This card is also an entry for the Stampin' B's challenge for this week.

LLW_FemaleCardinalForMom_1

Ingredients

Note: Finished Card Size: 5" x 5"

Paper

Bordering Blue (SU!) 5” x 10”, scored at 5”, and
5” x 5”
Bella Birds DSP (SU!) 4 7/8” x 4 7/8”
Pink Pirouette (SU!) 5” x 5”, and a small scrap
Stamper's Select White (Paper Trey Ink) 5” x 5” - 2 pieces

Inks

Memento Tuxedo Black (Tsukineko)
Bordering Blue (SU!)

Stamps

HCPC3383 Cardinal Posy Branch PreCut Set
HCPC3353 Cardinal Family PreCut Set
HCPC3389 Sentiments for Mom PreCut Set

Accessories

HCD706 Cardinal Family Diecuts (Heartfelt Creations)
Labels 1 Grand Nestabilities
Labels 1 Nestabilities
Grand Calibur (Spellbinders)
Medium oval punch (SU!)
Scalloped oval punch (SU!)
COPIC Markers (Imagination International)
Foam Tape
Scissors
ATG 714 (Scotch)
Rotary Trimmer (Fiskars)

Instructions

Image

Stamp the cardinal on the branch on white; stamp a large individual cardinal. Color with COPIC markers. Here are the colors I used:

  • Cardinal: Y21, YR15, R02, R08
  • Flowers: R0000, R10, R11, Y13
  • Leaves/Branch: G94, G99, E77

Cut out the single cardinal using the HC Die. Stamp the posy branch again, and trim out the three largest posies. Color these with COPICs.

Sentiment

Stamp the sentiment in blue ink on white paper, and punch it out with the plain oval punch. Punch out a pink scalloped oval, and mount the sentiment oval on it.

Assembly

Using pink card stock, cut and emboss the smallest Grand Label 1 die. Using blue card stock, cut and emboss the largest Label 1 die. Mount a square of patterned paper on the base card. Then adhere the pink label die cut, followed by the blue label die cut. Mount the full cardinal image on the blue die. Using foam tape, mount the individual cardinal and individual flowers on top of the image. LLW_FemaleCardinalForMom_2Mount the sentiment in the upper right area of the card front.

Final Touches

For the card inside, cut and mount a pink square. Stamp the Mother's  Day greeting in blue on the pink panel.

Thanks for stopping by!

Blue_Orange

Sunday, April 24, 2011

Friend To Friend

Ingredients

Hello and Happy Easter! I hope you all have a blessed day.

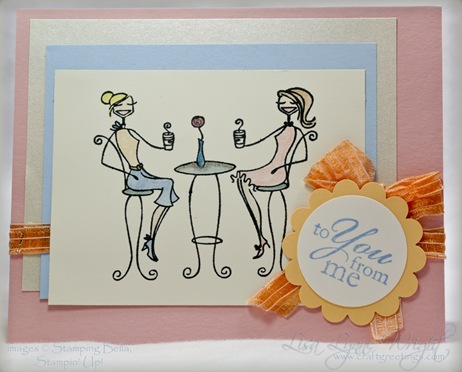
Here's a friend-to-friend thank you note I've made for a new girlfriend who showed me real kindness on our very first meeting! I used SplitCoast sketch #328 to get started, and the Color Combos Galore #189 challenge for my color choices.

20110424_FriendToFriend

Ingredients

Note: Finished card size is 4 1/4” x 5 1/2”

Paper

Blushing Bride (SU!) 8 1/2” x 5 1/2”, scored at 4 1/4”
Champagne Pearl Metallics (Wassau) 3 1/2” x 4 3/4”
Bashful Blue (SU!) 3 1/4” x 4 1/4”
Very Vanilla (SU!) 3” x 4”,
and 1 1/2” x 1 1/2”
Almost Apricot (SU!) 2” x 2”

Inks

Basic Black (SU!)Bashful Blue (SU!)
Almost Apricot (SU!)Blushing Bride (SU!)
Sunshine Yellow (SU!)Creamy Caramel (SU!)
Blush Blossom (SU!)Going Gray (SU!)

Stamps

Javabellas (Stamping Bella)
Best Yet (SU!)

Accessories

Blender pen (SU!)Gelly Roll Pens (Sakura)
1 3/8" Circle Punch (SU!)Scalloped Circle Punch (SU!)
Ribbon (unknown vendor)Glue dots
Scor-Pal Measuring & Scoring BoardScissors
ATG 714 (Scotch)Rotary trimmer with straight blades (Fiskars)


Instructions

Image

Stamp the image in black on the vanilla panel. Color with blender pen, using the ink from the ink pads. Enhance the flower, vase, and table with the glitter pens.

Stamp the sentiment in blue ink on the small vanilla square. Punch it out with the plain circle punch. Punch an apricot scalloped circle. Mount the sentiment on the scalloped circle.

Assembly

Adhere the metallic paper to the base card, followed by the blue panel. Mount a strip of ribbon across the card, and secure the ends on the back of the card front. Mount the image panel over the blue panel and ribbon.

Loosely tie a bow from the same ribbon and and mount it to the right of the image using glue dots. Mount the sentiment over the bow.

Thanks for stopping by.

Orange_Green_Sign

Wednesday, April 20, 2011

Spring Cardinals for Mom

Inspiration

I'm happy to be home again from my trip to Tennessee, and back to making cards! It's time to start thinking about May cards, and Mother's Day is a perfect opportunity to give a beautiful keepsake.

And CONGRATULATIONS to Marilyn (newfiecrafter) – she is the lucky winner of the complete Springtime Cardinal release by commenting on the Heartfelt Creations and DT blogs. She is going to love these new images!

Here's another Springtime Cardinal card. The collection includes some really nice sentiments for Mother's Day, and you'll get lots of ideas from all the design team members' samples on the HC blog.

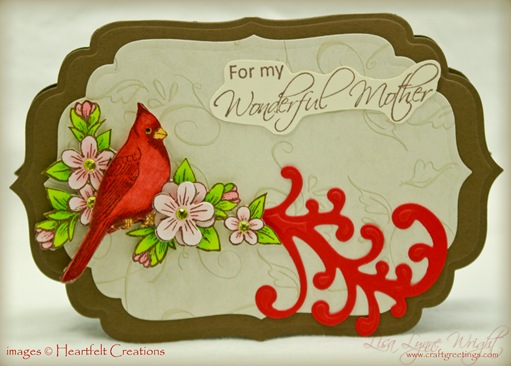
LLW_SpringCardinalForMom

Ingredients

Note: Finished card size is 4” x 6”

Paper

Soft Suede (SU!) 9” x 12”, scored at 4 1/2”
Ivory Swirls & Twirls (Paper Pizazz) 4” x 6”
Stamper's Select White (PaperTrey Ink) 3” x 3 1/2” - 3 pieces
Poppy Parade (SU!) 4” x 6”
Very Vanilla (SU!) 3” x 2”

Inks

Memento Rich Cocoa (Tsukineko)

Stamps

HCPC 3388 Spring Cardinals (Heartfelt Creations)
HCPC 3389 Sentiments for Mom (Heartfelt Creations)

Accessories

HCD 706 Cardinal Family Die (Heartfelt Creations)
HCD 701 Posy Patch Die (Heartfelt Creations)
HCD 711 Decorative Dutch Iris Die (Heartfelt Creations)
Labels 4 Grand Nestabilities (Spellbinders)
Grand Calibur (Spellbinders)
COPIC Markers (Imagination International)
IRock Heat Setter & Jewels (Imaginisce)
Scor-Pal Measuring & Scoring Board
Foam Tape
Scissors
ATG 714 (Scotch)
Rotary trimmer with straight blades (Fiskars)

Instructions

Cut Base Card

Score and fold the brown cardstock to make the base card. To shape it, use the 6" Label 4 die to cut the base card by laying the die just above the folded edge of the scored, folded card base.

Cut the patterned mat layer using the next smallest die. Assemble by mounting the patterned paper layer centered on the base card.

Image

Stamp the image on white paper 3 times. Use the matching cardinal die to cut the bird from one image, and the matching posie die to cut the largest flower from another image. Carefully cut out the entire image from the third copy. Color all the trimmed images with COPIC markers.

  • Bird: R02, R08, E08, Y35, E37, .003 Black Multiliner
  • Posies: R0000, R21
  • Leaves: YG01, YG03

Heat set yellow jewels in the center of the three outer flowers on the main image, and the center of the flower die cut image.

Assembly

Stamp the sentiment on the vanilla paper and trim around it closely.

Use the flourish die from the Dutch Iris Diecuts set to cut and emboss a red flourish. Cut the flourish in half.

Adhere the sentiment, and the red flourish to the patterned mat using adhesive. Mount the full image to the card with foam tape. Add the cardinal die cut image on top of the base cardinal with foam tape. Add the flower die cut image slightly rotated on top of the main flower with foam tape.

Thanks for stopping by.

Orange_Green_Sign

Saturday, April 16, 2011

Smoky Mountain Springtime

Instead of card this weekend, I have a few photos for you.  I've been in the Smoky Mountains on a photography trip since last Wednesday, and won't be back at card making until early next week.  I'll have another Heartfelt Creations card for you on Wednesday, but in the meantime, I thought I'd share a few of the shots I've made on this trip.

Here's a shot of dogwoods in the early morning – very “Tennessean”!
Dogwoods

This one is at Cade’s Cove.  I was really CadesCovePerspectivestruck with the green, green grass and the bits of blue sky.


The technique we were learning is called “Hyper-focal Focusing” – a wide angle shot with everything from about 1 1/2 feet to infinity all in focus.

The fence is very close, and the mountains very far…


  CadesCoveTallTrees

This is another hyperfocal picture, also from Cade’s Cove.  The storms were moving in, and the wind was blowing wildly, but I still think the trees were captured pretty well.


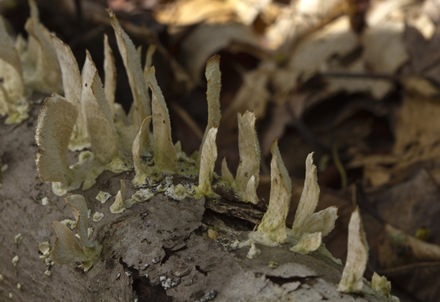
And, I REALLY love my macro lens – here’s a close-up shot of some very interesting lichen on a old limb.Lichen_1 LadySlipper

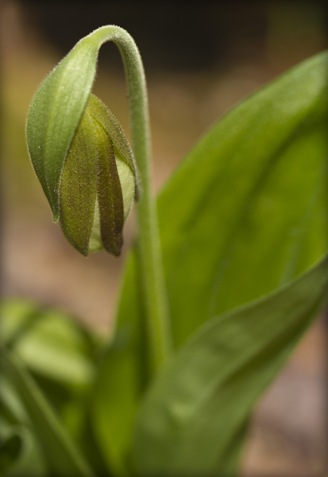
We were a little early for the wildflowers – here’s a Lady Slipper that will be really beautiful in about a week.


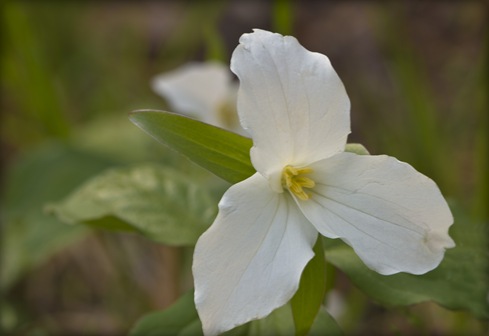
And here’s a trillium that was in already fully in bloom.TrilliumAnd Warmed Up Streamwhat would the Smoky Mountains be without shots of the beautiful rivers.


CoolStream

Hope you enjoyed these peaks into my time at home in Tennessee – I’ll be back next Wednesday with more cards.

Thanks for stopping by!
SIgnature_blue

Wednesday, April 13, 2011

Heartfelt Creations Release: Springtime Cardinal Collection

I’m really excited to help on a brand new release of some really beautiful images from Heartfelt Creations!

The Springtime Cardinal Collection features 8 new Pre Cut sets. These new sets coordinate with existing exclusive Heartfelt Creations dies manufactured by Spellbinders. The images in this collection are very classic and elegant, perfect for your COPIC markers, and you will love the fact that they coordinate with some of the existing Heartfelt Creation dies, so this is an added value for some of the dies you might already own.

Here’s the FUN part! Leave a comment here on my blog post or the Heartfelt Creations blog by April 19 and one lucky person will win the entire release valued at $119.92. The winner will be announced on the HC blog on April 20.

I used the “Magnificent Cardinal Rose” set, although I did turn it into a Blue-Jay!Here's my first creation:

20110413_JayAndRose

Ingredients

Note: Finished card size is 5” x 7”

Paper

Night of Navy - Textured (SU!) 7” x 10”, scored at 5", and
4 1/2” x 5 1/2”
Trvl Stripe (Cloud9Design) 4 1/2” x 6 1/2”
Stamper's Select White (PaperTrey Ink) 4” x 5” - 3 pieces

Inks

Memento Tuxedo Black (Tsukineko)
Night of Navy (SU!)

Stamps

HCPC 3382 Magnificent Cardinal Rose (Heartfelt Creations)

Accessories

HCD 706 Cardinal Family Die (Heartfelt Creations)
Lattice Rectangles Die (Spellbinders)
Grand Calibur (Spellbinders)
COPIC Markers (Imagination International)
Large Oval Punch (SU!)
Decorative Label Punch (SU!)
Corner Rounder Punch (SU!)
Ribbon (Michaels)
Foam Tape
Scissors
ATG 714 (Scotch)
Rotary trimmer with straight blades (Fiskars)

Instructions

Image

Stamp the image in black on two pieces of the white card stock. Stamp just the rose part of the image on the third piece of white cardstock.

Use the large cardinal die and your diecut machine to cut out one of the cardinal images. Using the rose image on the paper you just used to cut out the cardinal, cut out the large center area. Using the third rose image, cut out the small center of the rose. We'll use all these pieces to build the "3-d" image on the front of the card.

Using COPICS, color all the images - the complete image, and the cut out pieces. Here are the colors I used:

  • Bird: B0000, B91, B95, B99, YR65
  • Roses: Y000, Y11, Y13, Y35
  • Leaves: G21, G24, G28, E44

Assembly

Round all corners of the base card with the corner punch, and the four corners of the patterned paper.

My striped paper is two-sided, so I cut the panel at one end, about one inch from the end, and turned it over to mount it on the card. That way I have a matching solid green area at the bottom of the card.

Adhere the ribbon across the straight edge of the striped paper, then mount the striped panel on the front of the card.

Cut the lattice rectangle from the

Cut and emboss the largest lacey square from the dark blue paper, and mount it on the patterned paper.20110413_JayAndRose_Layers


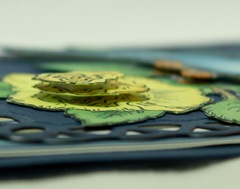
Now, build the image: First mount the full image on the rectangle mat. Using foam tape, mount the cardinal cut out on top of the cardinal on the card. Mount the 2 center rose images using foam tape, as well. Here's a side view, so you can see the layers.


Finish up by stamping the sentiment in blue on the remaining white scrap and punch it out with the decorative punch. Punch an oval from dark blue, and mount these on your card below the rectangle.

Remember to leave a comment today, so you're entered in the drawing for the full release of these stamps, and mark your calendar for next Wednesday to visit the Heartfelt Creations blog to see the winner!

Thanks for stopping by.

SIgnature_blue

Sunday, April 10, 2011

Musical Greeting

Inspiration

Here's a card that could be used for any occasion - for me, I'm headed home to celebrate my Dad's 85th birthday next weekend. This is the card for him.

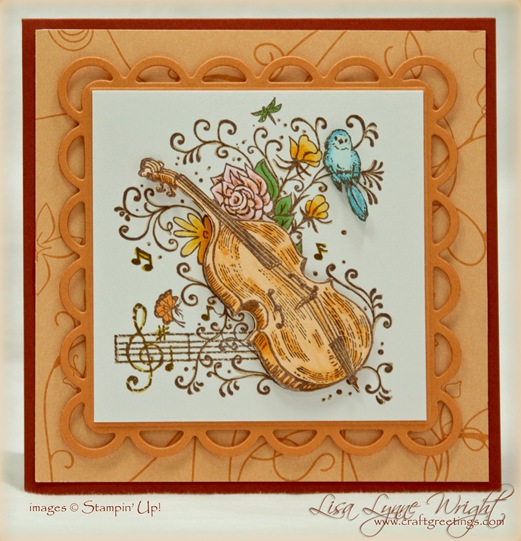
20110410_MusicalGreeting

Ingredients

Note: Finished card size is 5” x 5”

Paper

Cajun Craze (SU!) 5” x 10”, scored at 5"
Sunny Garden DSP (SU!) 4 7/8” x 4 7/8”
Peach Parfait (SU!) 4 1/2” x 4 1/2”
Stamper's Select White (PaperTrey Ink) 3 1/2” x 3 1/2” - 2 pieces

INKS

Memento Rich Cocoa (Tsukineko)

STAMPS

Music Expressions (SU!)

ACCESSORIES

Lacey Squares Dies (Spellbinders)
Grand Calibur (Spellbinders)
COPIC Markers (Imagination International)
SPICA Markers (Imagination International)
Foam Tape
Scissors
Scotch ATG 714 (3M)
Rotary trimmer with straight blades (Fiskars)

Instructions

IMAGE

Stamp the image in brown on each piece of white card stock, and color with COPICs - color one image entirely; color the violin and bird on the second image. Here are the colors I used:

  • Violin: YR000, YR14
  • Bird: B0000, B00, B02
  • Leaves/Dragonfly: G21, G24
  • Flowers/Butterfly: Y32, Y35, Y38, RV0000, RV000, RV32

Then, enhance the colored images with the glitter pens. I used Sand, Peach, Lemon, Orange, Gold, Baby Blue, Melon, and Mint. (Yes, I glittered the WHOLE image!)

Cut out the second violin and bird, and mount them on the base image using foam tape.

ASSEMBLY

Mount the patterned paper with on the base card.

Cut and emboss the largest lacey square, and mount it on the patterned paper

Finish up by mounting image in the ceter of the square die-cut.

Final Notes

Inside I put a white panel, measuring 4 7/8" x 4 7/8", and stamped a birthday greeting.

Thanks for stopping by!

Coral_Purple_Sign

Wednesday, April 6, 2011

CELEBRATE – Great News!


This morning about 4 am found me under the covers with my iPhone and reading glasses checking the Heartfelt Creations blog for the design team announcement, trying to be quiet and not wake up my husband.  Unfortunately, that was impossible once I read the news – I made the design team! 

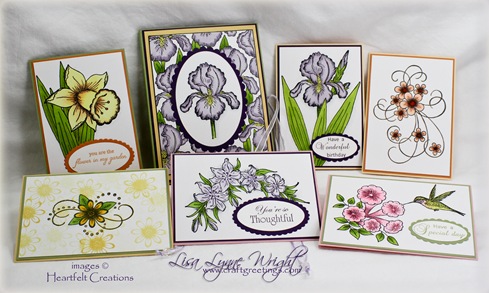
They’ve posted one of the projects I submitted for the final round, with a full set of detailed instructions available in a PDF file – click here.

LisaLynneWright_HFCDesignSubmission_Project1_01GiftcardSet


I am SO excited, and honored – this is my first design team and I’m nervous, too!  Hope you’ll all follow along on my new adventure.

Thanks for stopping by!

Orange_Green_Sign

Sunday, April 3, 2011

Anniversary Song

Inspiration

I have some friends and relatives who just couldn't wait for June to get married - so before the June rush of weddings/anniversaries, I have a couple of spring anniversaries to celebrate. Here's my first spring-themed anniversary for a couple of "love birds".

20110403_AnniversarySong

Ingredients

Note: Finished card size is 5” x 7”

Paper

Always Artichoke (SU!) 7” x 10”, scored at 5"
Rose Red (SU!) 4 7/8” x 6 7/8”
"ancestors.com" patterned paper
(K & Company)
4 3/4" x 6 3/4"
More Mustard (SU!) 2 1/2” x 4” and
2 1/2” x 3 1/2”
Whisper White (SU!) 2 1/2” x 3 1/2”

Inks

More Mustard (SU!) Rose Red (SU!)
Versamark (Tsukineko)

Stamps

Elegant Post (Gina K.)Elegant Verses (Gina K)
Border Builders (SU!)

Accessories

Clear Embossing Powder (Stampendous) Heat Gun
Ink-A-Gold Rose Acrylic Paint Ribbon (Hobby Lobby)
Scor-Pal Bow-Easy
Elegant Posts Dies(Spellbinders)Grand Calibur (Spellbinders)
Labels 4 and Labels 4 Small Dies(Spellbinders) Stamp-A-Ma-Jig(EK Success)
Rotary trimmer with straight blades (Fiskars)

Instructions

Die Cuts

Cut and emboss the post using the mustard paper. Use a sponge to apply the Ink-A-Gold Rose paint before removing the shape from the stencil.

Cut and emboss a label using the mustard paper, and the next smallest label using the white paper.

Ink the sentiment using the Versamark ink, then add the rose colored ink. Stamp it in the center of the white label. Cover the image in clear embossing powder and heat to set.

Use a sponge to apply the Ink-A-Gold Rose paint lightly around the edges of the white label.

Image

The bird and the cage are two different stamps, so I used the Stamp-A-Ma-Jig to place them together.

First, I stamped a cage in black on white paper and cut it out. Then using the post die-cut, and the cage sample, I figured out where on the patterned paper I wanted to place the image. I marked the top of the cage, and the side of the cage with a light pencil mark.

Then, I stamped and heat-embossed the birds (ink with Versamark, then rose ink, and clear embossing powder).

Now, using the stamp positioner, I found exactly where I wanted the cage to be. I inked the stamp with Versamark, and then mustard ink, then embossed with clear powder.

I finished off the love bird image with stamping a small heart in rose ink above the cage - Note, I used the "stamp off" method, stamping the first image on scrap paper, then stamping on the patterned paper until the ink was gone from the stamp.

Assembly

Mount the patterned paper with the bird cage image on the rose panel.

Tie a bow and slip a horizontal ribbon through the back of the bow before pulling it tight. Mount the ribbon with the bow across the lower portion of the stack. Add the sentiment lable to the left of the bow, and mount the whole stack to the front of the card.

Finish up by mounting the decorated post from the edge of the card, just touching the top of the cage.

Final Notes

Inside I put another rose panel, measuring 4 7/8" x 6 7/8", topped with a white panel, measuring 4 3/4" x 6 3/4".

I stamped a Happy Anniversary sentiment, and repeated the heart "stamp-off" technique around the greeting.

Thanks for stopping by!

Orange_Green_Sign

LinkWithin

Blog Widget by LinkWithin