Sunday, January 29, 2012

Imagine With All Your Heart

Inspiration

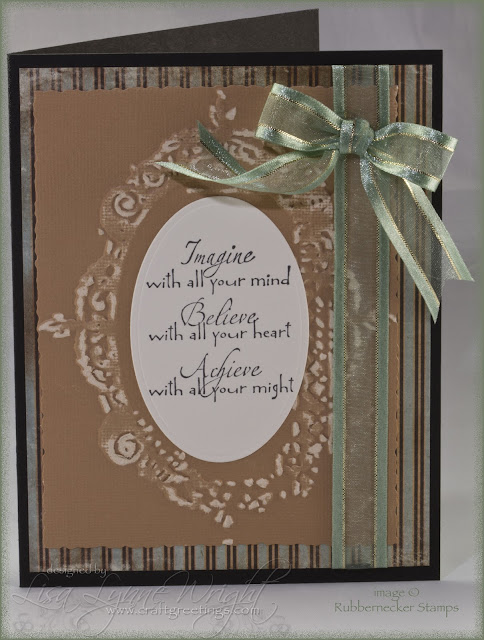
Here's the card I made for a sketch club I belong to - this one went to a friend in Canada.

Imagine

Ingredients

Note: Finished Card Size: 5" x 6 1/4""

Paper

Basic Black (SU!)6 1/4" x 10", score at 5"
Venice designer paper (7 Gypsies)4 3/4" x 6"
Sandy Tan (Core'dinations)4 1/4" x 5 1/2"
Vintage Ivory (Papertrey Ink)3" x 4"

Ink

Basic Black (SU!)

Stamps

Imagine With All (Rubbernecker Stamps)

Accessories

Petite Oval Large Nestabilities (Spellbinders)
Grand Calibur (Spellbinders)
Tim Holtz Embossing Folder Fancy and Floral Frames Set (Sizzix)
Cuttlebug (Provo Craft)
Sanding tool (Ranger)
Ribbon (Michaels)
Peg Bow Maker (Unity Stamps)
ATG
Double-sided tape (PK Glitz)
Zip Dry Glue
Scissors
Scor-Pal
Rotary Trimmer with straight and deckled blades (Fiskars)

Instructions

BASE CARD

The base card is a piece of black card stock measuring 6 1/4" x 10". Score it 5", and fold.

MAT LAYERS

Cut a piece of designer paper measuring 4 3/4" x 6". Cut a piece of sand card stock measuring 4 1/4" x 5 1/2". Emboss the sand card stock with the embossing folder, then sand the surface of the embossed image. Mount the embossed card stock onto the designer paper. Mount a strip of ribbon along the right edge of the mat layers. Mount the mat onto the front of the card. Tie a bow, and mount at the upper right corner of the card front.

SENTIMENT

Cut/emboss an ivory oval, and stamp the sentiment in black ink onto the oval. Mount the oval onto the center of the embossed image.

Thanks for stopping by!

Blue_Orange

Thursday, January 26, 2012

Love Lives Here

Inspiration

Here's my second card this week for Heartfelt Creations. I have several masculine birthdays in January and February, and I love this mountain scene from the Mystic Hideaway set. I picked up this designer paper at the Scrap & Stamp show last week in Mesquite, and I thout it made a perfect pair with the scene. It also is my first use of the Sew Easy tool - that took a bit of effort; I'm not sure twine is the best product for this tool, but I made it work, and I like the final look.

LoveLivesHere

Ingredients

Note: Finished card size: 4 1/4" x 5 1/2"

Paper

Soft Suede (SU!)5 1/2" x 8 1/2", score at 4 1/4"
Huckleberry Pond Distressed (The Paper Loft)3 3/4" x 5"
Huckleberry Pond Patterned (The Paper Loft)3 1/4" x 4 1/2"
Vintage Cream (Papertrey Ink)3 1/4" x 4 1/2"

Ink

Memento Rich Cocoa (Tsukineko)
Soft Suede (SU!)

Stamps

HCPC 3445: Mystic Hideaway PreCut Set (Heartfelt Creations)
HCPC 3449: Door to My Heart PreCut Set (Heartfelt Creations)

Accessories

Deckled Ovals Large (Spellbinders)
Grand Calibur (Spellbinders)
COPIC Markers (Imagination International)
Sew Easy (We R Memeory Keepers)
Baker's Twine (The Twinery)
Needle
Sponge
Scor-Pal
3-D Foam Squares (Scrapbook Adhesives)
ATG (3M)
Rotary trimmer with straight & deckled blades (Fiskars)

Instructions

BASE CARD and MAT LAYERS

Cut a piece of brown card stock measuring 5 1/2" x 8 1/2", score at 4 1/4" and fold. Cut a piece of blue distressed card stock measuring 3 3/4" x 5" and mount on the card front. Cut a piece of forest patterned paper measuring 3 1/4" x 4 1/2" and mount in the center of the blue paper.

STITCHING

Pierce the holes for stitching using the Sew Easy tool along the edge of the mat. If the holes don't go through the card stock, use the needle to open the holes. Cut a length of twine, about 10 inches, and thread the needle. Anchor the twine on the back of the card with a piece of tape, and stitch around the card. Start a new piece of twine when you need to, always anchoring with tape to hold it on the back. When you've stitched all the way around and anchored the last piece of twine, you may want to cover the back of the card front with a piece of card stock to cover all the twine ends and tape.

IMAGE

Cut/emboss a large deckled oval from ivory card stock. Stamp the image and the sentiment in brown ink in the center of the oval. Color the image with COPIC markers. I used these colors: YG91, YG93, YG95, E53, E55, W3, B0000, B91. Use a sponge to apply brown ink around the edge of the oval. Mount the oval on the card front using foam squares.

Thanks for stopping by!

Blue_Orange

Wednesday, January 25, 2012

Mr and Mrs

Inspiration

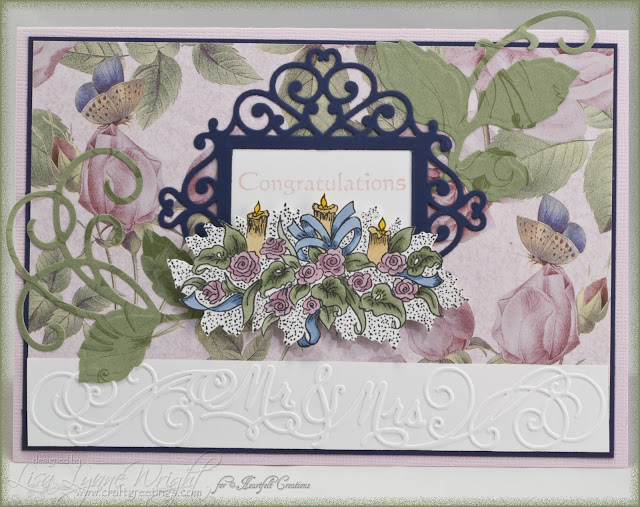
Hello and welcome to another Heartfelt Creations Wednesday! Here's another card created with the Chateau Gate Collection. This wedding card shows you how really versatile these stamps and dies really are - there are no "gates" on this card at all, right? But I used the Chateau Gate Die to create a frame for the sentiment and base for the candles. Hope you like it!

MrAndMrs

Ingredients

Note: Finished card size: 5" x 7"

Paper

Pink Textured (Core'dinations)7" x 10"
Night of Navy (SU!)4 3/4" x 6 3/4", and
3 1/2" x 4"
Vintage Roses (Paper Pizazz)4 5/8" x 6 5/8"
New England Ivy designer paper (CTMH)4 1/4" x 5 1/2"
Stamper's Select White (Papertrey White)1" x 6 3/4", and
1 1/2" x 2 1/4", and
2" x 4"

Ink

Memento Tuxedo Black (Tsukineko)
Blushing Bride (SU!)

Stamps

HCPC 3448: Dainty Blooms and Birdies PreCut Set (Heartfelt Creations)
HCPC 3449: Door to My Heart PreCut Set (Heartfelt Creations)

Accessories

HCD 718: Decorative Chateau Gate Die (Heartfelt Creations)
HCD 712: Bella Rose Die (Heartfelt Creations)
Grand Calibur (Spellbinders)
Wedding Borders Embossing Folders (Provo Craft)
Cuttlebug (Provo Craft)
COPIC Markers (Imagination International)
SPICA Glitter pen (Imagination International)
Scor-Pal
Art Institute Glue - Dries Clear
3-D Foam Squares (Scrapbook Adhesives)
ATG (3M)
Rotary trimmer with straight & deckled blades (Fiskars)

Instructions

BASE CARD and MAT LAYERS

Cut a piece of pink card stock measuring 7" x 10", score at 5" and fold. Cut a piece of navy card stock measuring 4 3/4" x 6 3/4" and mount on the card front. Cut a piece of rose patterned paper measuring 4 5/8" x 6 5/8" and mount onto the navy mat.

EMBOSSED BORDER

Cut a piece of white card stock measuring 1" x 6 3/4". Emboss with the border embossing folder, and mount this across the bottom of the front of the card.

ROSE LEAVES

Cut/emboss a rose leaf spray from the green designer paper. Clip the die cut in half, and trim into your desired shapes and glue at the lower left and upper right areas of the card.

SENTIMENT

Cut/emboss the smaller chateau gate from navy card stock. Cut out the center doors to create a frame. Cut a white card stock rectangle measuring 1 1/2" x 2 1/4", and glue this into the frame. Glue this onto the card front. Stamp the sentiment in pink ink inside the frame.

FLOWERS

Stamp the flower and candle image in black ink on white card stock, and trim it closely. Color with COPIC and SPICA markers. I used these colors: Candles: E53, E55, Y35; Roses: RV93, RV95; Leaves: BG93, BG96, YG000; Ribbons: B93, B97; Baby's Breath: Clear SPICA Glitter Pen. Mount the image at the bottom of the frame using foam squares.

HC Blog

Head over to the Heartfelt Creations blog to see all the beautiful creations by the design team!

Thanks for stopping by!

Blue_Orange

Sunday, January 22, 2012

Children's Birthday Cards

Inspiration

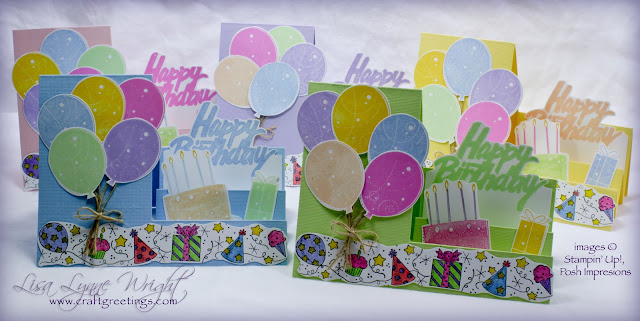
In May last year, I blogged a card I made in response for a request for a child's birthday card that could be used for either a boy or a girl. The order was actually for a set of cards, and I ended up making two designs in a variety of colors. I thought I'd catch up today by showing you both designs. The first is made with the Side-Step design, and the second is called "Make a Wish".

Side Step Balloons

Side-Step Balloons

SideStepBalloons_Group

Ingredients

Note: Finished Card Size: 4 1/4" x 5 1/2"

Paper

Daffodil Yellow (SU!) -or-
Bashful Blue (SU!) -or-
Lavender Lace (SU!) -or-
Pixie Pink (SU!) -or-
Gable Green (SU!)
5 1/2" x 8 1/2"
Whisper White (SU!)5 1/2" x 8 1/2"

Inks

Daffodil Yellow (SU!)
Bashful Blue (SU!)
Lavender Lace (SU!)
Cameo Coral (SU!)
Apricot Appeal (SU!)
Pixie Pink (SU!)
Basic Black (SU!)

Stamps

Birthday Whimsey (SU!)
Party Stampin' Around Wheel (SU!)
Happy Birthday (Posh Impressions)

Accessories

SU! markers
Twine (No Time to Stamp)
Scor-Pal
Zip Dry Glue
ATG (Scotch)
Scissors (Cutter Bee)
Rotary trimmer (Fiskars)

Instructions

BASE CARD

Line up the 5 1/2" side of the colored card stock in your paper cutter at the 3" mark, and cut from 1" in to 6 1/2". You now have 3" on one side of the cut, and 2 1/2" on the other. Score the 3" side at 1", 2", 3 1/4", 4 1/2", and 6 1/2". Score the 2 1/2" side at 4 1/4".

Fold the 4 1/4" score line down (a mountain fold). Starting with the 1" score line, fold down (mountain); 2", fold up (valley); 3 1/4", fold down (mountain); 4 1/2", fold up (valley); and 6 1/2" fold down (mountain).

The base side-step card is now complete.

IMAGES

Stamp 5 balloons in 5 colors of ink on white card stock, and trim closely. Stamp the border using the wheel stamp using black ink on white card stock, color with SU markers, and trim to 5 1/2" in length. Stamp a present on white card stock and trim closely. Color the cake rubber stamp with SU markers, and stamp on white card stock and trim. Stamp the sentiment onto white card stock. When you cut this one out, leave enough white paper below the sentiment to cover the back step - this becomes the space for a signature.

ASSEMBLY

Assembly is simply a matter of gluing the images to the panels of the card. Before you glue the last balloon in place, cut 5 lengths of twine and tie a bow around them. Glue them to the card, and finish with mounting the last balloon to the bunch.

Make A Wish

MakeAWish

MakeAWish_Group

Ingredients

Note: Finished Card Size: 4 1/4" x 5 1/2"

Ingredients

Paper

Daffodil Yellow (SU!) -or-
Bashful Blue (SU!) -or-
Lavender Lace (SU!) -or-
Pixie Pink (SU!) -or-
Gable Green (SU!)
5 1/2" x 8 1/2"
Patterned paper - coordinating colors (Paper Pizzaz)5 1/2" x 8 1/2" (5 pieces)
Whisper White (SU!)5 1/2" x 8 1/2"

Inks

Daffodil Yellow (SU!)
Bashful Blue (SU!)
Lavender Lace (SU!)
Cameo Coral (SU!)
Apricot Appeal (SU!)
Pixie Pink (SU!)
Basic Black (SU!)

Stamps

Big Birthday Calendar (SU!)

Accessories

Fancy Tag Shapeabilities (Spellbinders)
Grand Calibur (Spellbinders)
Sponge
Scor-Pal
ATG 714 (Scotch)
Rotary Trimmer (Fiskars)

Instructions

Images

Stamp the candle outline in black 3 times on white cardstock. Stamp the blue circles decoration in blue on the candles. Cut the 3 candles out. Stamp the solid flame in yellow 3 times on white cardstock. Stamp the flame outline in black over the yellow, and cut the 3 flames out, leaving some at the bottom the adhere to the candle sticks. Attach the flames to the candles.

Sentiment

Cut and emboss a tag from the white paper, using the fancy tag die. Before removing the tag from the die, sponge blue ink on the areas at the ends of the tag. Stamp the sentiment in the center of the tag.

Assembly

Assembly is simple - just layer the colors and designer paper to match the sketch. Add the candles on the center blue mat. Adhere the tag sentiment below the candles.

Inside the Card

Mount the remaining dark blue panel inside the card, followed by the white panel. Stamp the sentiment on the white, and your done!

Thanks for stopping by!

Blue_Orange

Wednesday, January 18, 2012

Secret Garden

Inspiration

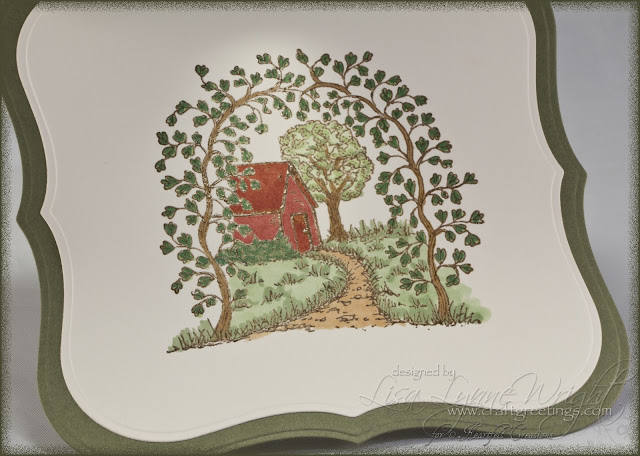
I'm really enjoying the new Chateau Gate Collection from Heartfelt Creations. The image on the inside of this card is from the Mystic Hideaway set, and it reminded me of the Secret Garden book, so it of course needed a gate opening into the garden scene! And on the gate, I started experimenting with a new coloring medium - Faber-Castell's Gelatos - a very creamy, water soluable paint that I think I'm going to love!

Be sure to pop over to the Heartfelt Creations' blog to check in on the winner of the drawing for this new release, and all of this week's designs from the team - they really are beautiful!

SecretGarden

Ingredients

Note: Finished card size: 6" x 6"

PAPER

Almost Artichoke (SU!)6 1/2" x 6 1/2" (2 pieces)
River Rock Scrap Pad (Provo Craft)6" x 6"
Vintage Cream (Papertrey Ink)6" x 6", and 4" x 4"

INK

Versamark (Tsukineko)
Memento Rich Cocoa (Tsukineko)

STAMPS

HCPC 3445: Mystic Hideaway PreCut Set (Heartfelt Creations)
HCPC 3443: Palace Entry PreCut Set (Heartfelt Creations)

ACCESSORIES

Grand Label 1 Nestabilities (Spellbinders)
Grand Calibur (Spellbinders)
Gold embossing powder (Stampendous)
Clear embossing powder (Stampendous)
Heat gun
COPIC markers (Imagination International)
Metallic Gelatos (Faber-Castell)
Watercolor brush
Water
X-Acto knife
Scor-Pal

Instructions

BASE CARD and MAT LAYER

Cut/emboss two 6" label 1 die cuts from dark green card stock. Score one of the die cuts about 1/2" from one edge. Using patterned paper, cut/emboss a label 1 die cut using the die just smaller than the one used to create the base card. Glue this layer to the un-scored green die-cut. Put glue on the portion of the scored die cut above the score-line, and hold the two together to form the base card.

GATE

Stamp the gate on cream card stock using Versamark ink and heat emboss with gold embossing powder. Trim closely. Use the gold Gelato to color over the embossed areas, and then spread the paint with a damp paint brush to create a golden gateway. Using a craft knife, cut straight down the center of the gate and around the top of each door. Score lightly on the "hinge" lines of each door and fold open. Glue the whole image to the center of the card front. Use the craft knife to cut through the base card and mat layer to open the card front to be able to see through to the inside of the card.

SecretGarden2

INSIDE

Using cream card stock, cut/emboss a label 1 die cut using the die just smaller than the one used to create the base card. Ink the garden stamp with Versamark ink, then brown ink and stamp the image on the cream die cut. Heat emboss with clear embossing powder. Color the image with COPIC markers. I used these colors:

  • HOUSE: E07, E09
  • PATH: E33
  • GRASS: G21, G82
  • TREE: E57, E59, G21, G82
  • BUSHES: G29; VINE: E57, E59, G29

Glue the image layer onto the inside of the card so that the image shows through the open gate.

Thanks for stopping by!
Blue_Orange

Sunday, January 15, 2012

Button Anniversary

Inspiration

Here's a whimsical anniversary card I made last fall for a few anniversaries that I never had a chance to post. Hope you enjoy!

ButtonAnniversary

Ingredients

Note: Finished card size: 5" x 7"

Paper

Garden Green (SU!)7" x 10", and
3 1/2" x 3 1/2"
Crystal Blue (CTMH)4" x 5 1/2"
Cafe Mediterranean designer paper(DCWV)3 3/4" x 5"
Very Vanilla (SU!)3 1/4" x 3 1/4"

Stamps

Flowers (Inkadinkado)
Happy Anniversary (Annette Allen Watkins)

Ink

Basic Black (SU!)
Garden Green (SU!)
Marina Mist (SU!)

Accessories

Label 1 Nestabilities (Spellbinders)
Grand Calibur (Spellbinders)
Corner Rounder punch (Fiskars)
Buttons (SU!)
Embroidery floss
Needle
Raffia
Watercolor brush
3-D Foam Squares (Scrapbook Adhesives)
Clear tape (3M)
ATG (3M)
Scor-Pal
Scissors
Rotary Trimmer (Fiskars)

Instructions

BASE CARD

Cut a piece of green card stock measuring 7" x 10", score at 5" and fold. Use the corner rounder punch to round the two outer corners.

MAT LAYERS

Cut a mat of blue card stock measuring 4" x 5 1/2" and mount at the top center of the card front. Cut a mat of designer paper measuring 3 3/4" x 5" and mount on the blue mat.

SENTIMENT

Stamp the sentiment in green ink below the mat layer.

IMAGE

Cut a label 1 die cut from vanilla card stock, and stamp the flower image in black ink on the die cut. Use a watercolor brush to color the flowers and leaves using ink from ink pads. Use a needle and embroidery floss, attach the buttons to the image, fixing the floss on the back with tape. Wrap a piece of orange raffia around the bottom of the die cut and tie a knot.

Cut/emboss a label 1 die cut one size larger than the image die cut using green card stock. Attach it to the card front using foam squares. Add the image panel onto the green die cut using foam squares.

Thanks for stopping by, and again I wish you the very best in the coming new year!

Blue_Orange

Thursday, January 12, 2012

Door to My Heart

Inspiration

Here's my second card this week, made with the new Chateau Gate Collection from Heartfelt Creations. It's not too early to start making Valentine cards, you know, and this collection has some very pretty images and sayings that will be perfect for those "heartfelt" cards! This one features the Grand Portal set, and sentiments from the Door to My Heart sentiment set, and the beautiful new die that creates perfect little doors!

And, by the way, if you're in the Dallas area, Heartfelt Creations has a booth at the Stamp Scrap Art Tour in Mesquite this Saturday & Sunday. I'm doing the make & take at the booth - stop by to see me & pick up the new collection!

DoorToMyHeart

Ingredients

Note: Finished card size: 5" x 7"

Paper

Regal Rose (SU!)7" x 10"
Rose Red (SU!)5" x 5"
Melody Collection (Prima)4 3/4" x 6 3/4"
Elegant Eggplant (SU!)2 1/2" x 4 1/2", and
4" x 4"
Vellum (SU!)2 1'2" x 3 1/2"
Whisper White (SU!)1 1/2" x 2 1/2", and
5" x 5"

Ink

Versamark (Tsukineko)
Rose Red (SU!)

Stamps

HCPC 3442: Grand Portal PreCut Set (Heartfelt Creations)
HCPC 3449: Door to My Heart PreCut Set (Heartfelt Creations)

Accessories

HCD 718: Decorative Chateau Gate Die (Heartfelt Creations)
Scalloped Hearts (Spellbinders)
Fancy Tags 2 Shapeabilties (Spellbinders)
Petite Scalloped Oval Large Nestabilities (Spellbinders)
Grand Calibur (Spellbinders)
Nestabling (Want2Scrap)
White embossing powder (Sweet Stamps)
Heat gun
Scor-Pal
Art Institute Glue - Dries Clear
3-D Foam Squares (Scrapbook Adhesives)
ATG (3M)
Rotary trimmer with straight & deckled blades (Fiskars)

Instructions

BASE CARD and MAT LAYER

Cut a base card from light pink card stock measuring 7" x 10", score at 5", and fold. Using a deckled blade, cut patterned paper measuring 4 3/4" x 6 3/4", and mount to the front of the card.

HEART

Cut/emboss the largest scalloped heart from dark pink card stock, and mount at the top of the card front. Embellish with matching white Nestabling.

SENTIMENT

Cut/emboss a fancy tag from dark purple card stock, and the smallest scalloped petite oval from white card stock. Stamp the sentiment in dark pink ink on the white oval, and mount the sentiment onto the fancy tag. Use dries-clear glue to mount the sentiment tag below the heart on the card front.

DOOR

Stamp the door image on vellum using Versamark, and heat emboss with white embossing powder. Trim this closely. Cut/emboss dark purple card stock using the Chateau Gate die. Glue the trimmed vellum image to the back of the die cut door. Use foam squares to mount the door over the heart image on the front of the card.

DoorToMyHeartInside

INSIDE

Cut/emboss the largest scalloped heart from white card stock, and mount at the top of the card inside. Stamp the sentiment in dark pink ink on the heart.

Comment on the HC Blog!

Remember to leave a comment on the Heartfelt Creations blog by January 17 to be eligible to win the entire Chateau Gate Collection release valued at $174.90. The winner will be announced on January 18!

Stop by the HC Booth in Mesquite!

I'd love to meet you - please come see us at the HC booth at the Stamp Scrap Art Tour in Mesquite this Saturday & Sunday.

Thanks for stopping by!

Blue_Orange

Wednesday, January 11, 2012

A Bright Future

New Heartfelt Creations Release!

Are you ready for a new Heartfelt Creations' release! This new Chateau Gate Collection is magnificent! The intricate detail in each of the designs is absolutely beautiful. This collection features 9 PreCut Stamp Sets and one beautiful new exclusive Spellbinders die designed for Heartfelt Creations. And, of course, be sure to leave a comment on the Heartfelt Creations blog to give some compliments on all the gorgeous designs by the team this week - they have outdone themselves! If you comment on the HC Blog by January 17 you'll be eligible to win the entire Chateau Gate Collection release valued at $174.90. The winner will be announced on January 18! I have a couple of cards on the blog today, so I'll have another post tomorrow with my second card.

And, by the way, if you're in the Dallas area, Heartfelt Creations has a booth at the Stamp Scrap Art Tour in Mesquite this Saturday & Sunday. I'm doing the make & take at the booth - stop by to see me & pick up the new collection!

Inspiration

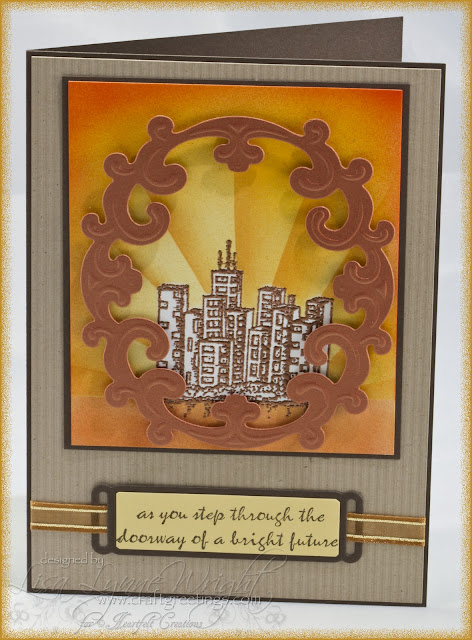
As soon as I saw the New York City stamp in the new Scenic Vista set and the and the "bright future" sentiment in the new Door to My Heart set, I knew exactly what I wanted to create! Designs don't usually pop into my head, but this one did. And it's a pretty easy one - I used my COPIC airbrush, and did some sponging to create the lighting effect - I like the way it turned out.

ABrightFuture

Ingredients

Note: Finished card size: 5" x 7"

Paper

Early Espresso7" x 10", and
4 1/8" x 4 3/4", and
1 1/2" x 3 3/4"
2009 Specialty Designer (SU!)4 7/8" x 6 7/8"
Stamper's Select White (Papertrey Ink)4" x 4 5/8"
Metallic (Wassau)4 1/2" x 5"
So Saffron (SU!)3/8" x 2 1/2"

Ink

Versamark (Tsukinko)
Early Espresso (SU!)
Peach Parfait (SU!)

Stamps

HCPC 3444: Scenic Vista PreCut Set (Heartfelt Creations)
HCPC 3449: Door to My Heart PreCut Set (Heartfelt Creations)

Accessories

HCD 710: Decorative Oval Window Die (Heartfelt Creations)
Ribbon Tag Trio 2 (Spellbinders)
Grand Calibur (Spellbinders)
Copper Tinsel embossing powder (Judikins)
Heat gun
COPIC Markers (Imagination International)
COPIC Airbrush system (Imagination International)
Eclipse Masking Tape (Judikins)
Ribbon (Michaels)
Sponges
3-D Foam Squares (Scrapbook Adhesives)
ATG (3M)
Scor-Pal
Rotary trimmer (Fiskars)

Instructions

BASE CARD

Cut a dark brown card base measuring 7" x 10", score at 5" and fold.

MAT LAYER and SENTIMENT

Cut a patterned mat layer measuring 4 7/8" x 6 7/8". and mount onto the card face. Cut/emboss a ribbon tag from dark brown card stock. Stamp the sentiment in dark brown ink onto yellow card stock measuring 3/8" x 2 1/2", and mount onto the ribbon tag. Thread ribbon through the tag, and mount across the bottom of the mat layer. Mount the mat layer onto the card front.

IMAGE

Cut a piece of white card stock measuring 4" x 4 5/8". Stamp the buildings using Versamark ink, and heat emboss with copper powder. Mask the building and a horizon line. Airbrush a sunrise, working from a light center to an orange/red border. I used these COPIC colors: Y21, YR23, Y38, and R05.

Before unmasking the building, use a straight edge mask, and sponge light orange ink in straight lines out from the buildings to create the sun rays. Now remove the horizon mask from the lower part of the image, and mask the entire upper part of the image. Finish with a darker orange/brown spray with the airbrush. I used E08.

Mount the image onto a piece of dark brown card stock measuring 4 1/8" x 4 3/4", and mount at the top of the card front. Cut/emboss the decorative window die from copper paper, and cut out the inner frame. Use foam squares to mount over the image.

Comment on the HC Blog!

Remember to leave a comment on the Heartfelt Creations blog by January 17 to be eligible to win the entire Chateau Gate Collection release valued at $174.90. The winner will be announced on January 18!

Stop by the HC Booth in Mesquite!

I'd love to meet you - please come see us at the HC booth at the Stamp Scrap Art Tour in Mesquite this Saturday & Sunday.

Thanks for stopping by!
Blue_Orange

Sunday, January 8, 2012

Wish Big

Inspiration

Wow! I know a LOT of people born in January - both genders and all age ranges! Here's a card that will work for most of them - at least teens and older. It's based on a sketch from Splitcoast (sketch 364), it's easy to make, and it's nice a sparkly for the new year!

WishBig

Ingredients

Note: Finished card size: 5" x 7"

Paper

Early Espresso (SU!)7" x 10", scored at 5", and
1" x 7", and
3 1/2" x 3 1/4", and
4 1/2" x 4 1/2"
Natural Stack (DCWV)4 7/8" x 6 7/8"
Castle Copper (Wassau Royal Metallics)3 3/8" x 3 3/8", and
4 1/2" x 4 1/2"
Vintage Cream (Papertrey Ink)3 1/4" x 3 1/4", and
2" x 3"

Stamps

Pendant Park (SU!)
Wish Big (Papertrey Ink)

Ink

Early Espresso (SU!)

Accessories

Essential Glue Pad (Tsukineko)
Metal Leafing
Plain Circle Large Nestabilities (Spellbinders)
Pinking Circle Nestabilities (Spellbinders)
Petite Oval Large Nestabilities (Spellbinders)
Grand Calibur (Spellbinders)
Stencil Brush
Ribbon (Michaels)
3-D Foam Squares (Scrapbook Adhesives)
ATG (3M)
Scor-Pal
Rotary Trimmer (Fiskars)

Instructions

BASE CARD and MAT LAYER

Cut a piece of dark brown card stock measuring 7" x 10", score at 5" and fold. Cut the designer paper to 4 7/8" x 6 7/8" and mount on the card front.

CIRCLE CORNER

Cut/emboss a large plain circle from the dark brown card stock, and a large pinking circle from copper card stock. Mount the copper circle onto the brown circle. Mount the stacked circles onto the lower left corner of the card so that the edge of the circle aligns with the corner of the card. This causes some of the circle to hang over the 2 sides of the card. Flip the card over, and trim the excess circle, using the card as your guidelines.

RIBBON

Cut a strip of brown card stock measuring 1" x 7", and mount the ribbon onto the card stock strip, then mount the strip across the card front.

TREE IMAGE

Using the glue stamp pad, stamp the tree image onto an ivory card stock panel measuring 3 1/4" x 3 1/4". Cover with Metal Leaf flakes, and press, then brush off excess with a stencil brush. Mount the burnished image onto mats of copper card stock (3 3/8" x 3 3/8") and brown card stock (3 1/2" x 3 1/2"). Mount the image onto the card front.

SENTIMENT

Cut/emboss an ivory card stock oval, and stamp the Wish Big sentiment in dark brown ink onto the oval. Mount the sentiment onto the card front using foam squares.

Thanks for stopping by!

Blue_Orange

Wednesday, January 4, 2012

Decorated Jar

Inspiration

Welcome to a new year and another Heartfelt Creations Wednesday! Remember, we are back to our regular schedule of a NEW RELEASE on the second Wednesday of the month, so there's a sneak peek of the January release on the Heartfelt Creations blog today! I think you will LOVE it. Be sure to head over there to check out the inspiring creations of the design team, too.

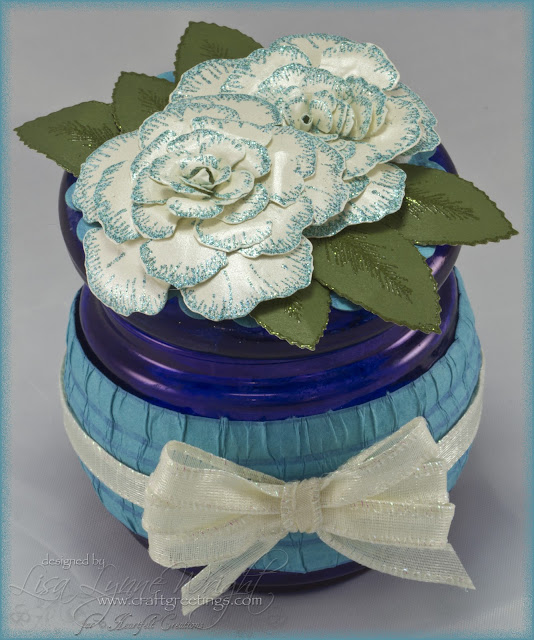
My contribution this week is a decorated jar - alcohol inks are so easy to use to color glass, and the Heartfelt Creations' flower stamps make beautiful decorations. Together, creating gifts like this is a snap!

DecoratedJar

Ingredients

Note: Finished card size: 5" x 7"

Paper

Seersucker Stipe on Aegean (ANW Crestwood)2" x 12", and
4" x 4"
White Gold Metallic (Wassau)6" x 12"
New England Ivy (CTMH)4" x 6"

Ink

Versamark (Tsukineko)

Stamps

HCPC 3406 Botanical Floral 1 PreCut Set (Heartfelt Creations)
HCPC 3407 Botanical Floral 2 PreCut Set (Heartfelt Creations)

Accessories

Rose Creations Shapeabilities (Spellbinders)
Scalloped Circle Nestabilities Large (Spellbinders)
Grand Calibur (Spellbinders)
Squash Blossom Opaque embossing glitter (PK Glitz)
Moss Tinsel embossing powder (Creations Unlimited)
Heat gun
Paper Blossoms Tool Kit (MacGill)
Glass Jar
Alcohol inks (Ranger)
Felt Applicator (Ranger)
Wired-edge ribbon (Hobby Lobby)
Peg bow maker (Unity Stamp company)
Modge Podge glue (Plaid)
Dries clear Glue (Art Institute)
3-D Foam Squares (Scrapbook Adhesives)
Zip Dry Paper Glue (Beacon)
Scissors
Rotary Trimmer (Fiskars)

Instructions

JAR

My jar started out clear glass - apply a combination of alcohol inks to the glass using a felt applicator to completed color the jar and lid. I used Stream, Wild Plum, and Pearl Additive. I will tell you that this can be messy! Wear rubber gloves if you have them. I made this jar on Saturday (12/31), and went back to work on 1/3 with blue under my fingernails... LOL!

PAPER TRIM

Cut a 2" x 12" strip of paper (or any length you need to fit around your jar). Using Modge Podge glue, attach the paper strip around the middle of the jar and set aside to dry. Cut a scalloped circle from matching paper and mount on the jar lid, and set aside to dry.

ROSES and LEAVES

Using Versamark ink, stamp 2 of each rose image size on the white metallic paper, and heat emboss with the embossing glitter. Stamp 6 leaves with Versamark on green paper, and heat emboss with green embossing powder. Using the matching dies, cut all of the stamped images out. Shape the petals with the blossom tool kit, then carefully roll the petals and glue the layers together to form 2 roses. Using foam squares and Zip Dry glue, attach the roses to the jar lid. Shape the leaves and attach under the rose petals with foam squares and Zip Dry glue.

BOW

I'm loving my peg-bow maker - it's really great for tying bows! I saw Becca Feeken's great tutorial on making peg bows, and really got hooked. Tie a triple bow, and string a 12" ribbon into back of the bow (or the length you need to fit around your jar). Using the double-sided sticky tape, mount the ribbon and bow around the paper trim on the jar.

Thanks for stopping by!

Blue_Orange

Sunday, January 1, 2012

Happy New Year

Inspiration

Happy New Year to everyone! Thanks for stopping by - Hope everyone had a safe, happy, fun celebration of the start of 2012!!!

HappyNewYear

This is the card I made for the sketch club I play along with, and sent to a few folks here in Texas and across the country, and even to Austrailia and Canada! Here's the sketch:

DecSketch

Ingredients

Note: Finished card size: 4 1/4" x 5 1/2"

Paper

Basic Black (SU!)5 1/2" x 8 1/2", scored at 4 1/4", and
2" x 5 1/2", and
2 1/8" x 3 1/8"
Tempting Turquoise (SU!), or
Certainly Celery (SU!)
1 1/2" x 5 1/4"
All Dressed Up designer paper (DCWV)2 3/4" x 5 1/4"
Whisper White (SU!)2" x 3" (2 pieces)

Stamps

A Brand New Year (SU!)
Holidays & Wishes (SU!)

Ink

Basic Black (SU!)
Versamark (Tsukineko)

Accessories

Fleur De Lis Accents (Spellbinders)
Cuttlebug (Provo Craft)
Round Tab Punch (SU!)
Silver embossing powder (Sweet Stamps)
Silver metallic pen (UniBall)
Marker (SU!)
3-D Foam Squares (Scrapbook Adhesives)
Zip Dry Glue
ATG (3M)
Scor-Pal
Rotary Trimmer (Fiskars)

Instructions

BASE CARD

Cut a piece of black card stock measuring 5 1/2" x 8 1/2", score at 4 1/4" and fold.

MAT LAYER

Cut a mat of turquoise or green card stock measuring 1 1/2" x 5 1/4" and mount on the left side of the card front. Cut a mat of designer paper measuring 2 3/4" x 5 1/4" and mount on the right side of the card front. Cut/emboss a fleur de lis border from black card stock, and mount over the seam between the two pieces of the mat layer on the card front.

CELEBRATE IMAGE

Stamp the celebrate image on a piece of white card stock measuring 2" x 3". Use the silver pen to fill in the champagne bubbles, and fill in the letters of the word "FIRST" with a SU! marker that matches the paper of the left side mat layer (green or turquoise). Mount the image on a black mat, measuring 2 1/8" x 3 1/8", and mount on the designer paper area of the card front.

SENTIMENT

Stamp the sentiment in Versamark ink on white paper, and emboss with silver embossing powder. Punch out with the Round Tab punch, and mount in the upper left corner with foam squares.

Thanks for stopping by, and again I wish you the very best in the coming new year!

Blue_Orange

LinkWithin

Blog Widget by LinkWithin