Sunday, May 29, 2011

Bella Diploma

Inspiration

It's right in the middle of "graduation season", and this year I only had a couple to make. This image from Stamping Bella is so perfect for those lovely female graduates - I've used it for a couple of years now. I always try to pick paper to match school colors - JJ Pearce in Richardson, TX, is easy - they are RED, WHITE, and BLUE!

Also, I got a COPIC airbrush system Friday night, and started playing with it on Saturday. I have to say, I think I'm going to love it, but it is really going to take some practice! This card has just a touch - red airbrush highlight on the sentiment.

Bella Diploma

Ingredients

Note: Finished card size is 6" x 6"

Paper

Brilliant Blue 5 1/2" X 8 1/2", scored at 4 1/4"
Real Red 4 1/4" x 5 1/2"
Stamper's Select White (PTI) 4 1/4" x 5 1/2"

Inks

Memento Tuxedo Black (Tsukineko)
Brilliant Blue (SU!)

Stamps

DiplomaBella (Stamping Bella)
Congratulations (Hero Arts)

Accessories

Fancy Tags Shapeabilities (Spellbinders)
Classic Rectangle Nestabilities - Large (Spellbinders)
Classic Rectangle Nestabilities - Small (Spellbinders)
Grand Calibur (Spellbinders)
COPIC markers (Imagination International)
COPIC airbrush system (Imagination International)
Scor-Pal
ATG 714
Scissors
Rotary Trimmer

Instructions

Image

Stamp the figure on white paper in black ink, and cut it out with the largest die from the SMALL rectangle Nestie set. Cut and emboss red rectangle, using the largest die from the LARGE Nestie set. Color with COPIC markers. I used these colors:

  • Face/Legs: E000, E00, R11, RV11
  • Shirt/Shoes: B21, B23
  • Flower/Tassel: Y35, R29
  • Robe/Cap: C5, C7, C9, 100, R29
  • Background: B0000, B000

Sentiment

Cut and emboss a fancy label from white paper, and stamp the sentiment in blue centered on the label. Before removing the paper from the die, lightly spray the label using the airbrush, and the R29 COPIC marker. Note - you can create an effect very much like this using a sponge, and red dye ink.

Assembly

Mount the image on the red rectangle, and mount it on the card front. Add the sentiment label below the red rectangle.

Have a wonderful Memorial Day holiday, and thanks for stopping by!

Blue_Orange

Thursday, May 26, 2011

Just For You

Inspiration

I have many, many supplies in my craft room that I bought on a whim, and haven't used. I spent Saturday morning at a garage sale, letting some of the stuff go, but the good thing was as I dug through drawers and boxes to decide what to sell, I found some things I really wanted to use!

For this card, I used "Wonder Film" from PK Glitz and glass beads to enhance the vase in the Heartfelt Creations image from the Bella Rose Vase stamp set.

Just For You

Ingredients

Note: Finished card size is 6" x 6"

Paper

Olive textured paper (Core'dinations) 6" x 12"; scored at 6", and
4" x 5 1/2", and
3" x 4"
Concerto textured paper (Core'dinations) 4" x 5 1/2", and
2" x 6", and
1" x 3"
Designer Paper (Pink Paisley) 6" x 6"
Stamper's Select White (PTI) 6" x 6"
Very Vanilla (SU!) 1" x 3"

Inks

Memento Tuxedo Black (Tsukineko)
Old Olive (SU!)

Stamps

HCPC 3395 Bella Rose Vase PreCut Set
HCPC 3394 Classic Bella Rose PreCut Set (Heartfelt Creations)
HCPC 3354 Classic Message PreCut Set (Heartfelt Creations)

Accessories

HCD 712: Bella Rose Die (Heartfelt Creations)
Grand Calibur (Spellbinders)
Labels 4 Grand Nestabilities (Spellbinders)
Labels 4 Nestabilities (Spellbinders)
Corner rounder punch (SU!)
COPIC Markers (Imagination International)
Wonder Film (PK Glitz)
Glass Beads (Creative Images)
Paper sanding block
Distressing tool (Tim Holtz)
Ribbon (Hobby Lobby)
Foam dots
Scor-Pal
ATG 714
Scissors
Rotary Trimmer

Instructions

Vase

Stamp the bottom half of the image on white, and color with COPIC markers. I used these colors:Just For You Sideview

  • vase: YR0000, YR000, YR00
  • flower on vase: RV34, YG95

Peel the paper from one side of the film, and press onto the colored image. Carefully cut out the vase, trimming very closely. Peel the remaining paper off the film, and cover in glass beads, pressing until the beads are completely adhered to the image.

Images

Stamp the complete image, and color the roses and leaves with COPIC markers. Here are my colors:

  • roses: RV10, RV32, RV24
  • leaves: YG93, YG95, YG97

Since the vase will be covered with your glass beaded vase, there is no need to color that part. Cut out the entire image. Stamp the top of the vase image twice more, and color. Cut out the entire set of roses from one image, and cut out the leftmost two roses and leaves from the third. Stamp the thorny branch three times on green paper, and cut out using the matching Bella Rose die.

Sentiment

Stamp the sentiment in green on ivory paper. Corner round the sentiment with the corner punch. Cut a pink panel, slightly larger than the sentiment, and round the corners. Sand the pink panel lightly, then mount the sentiment on it.

Assembly

Cut and emboss a large green Label 4, and smaller pink Label 4, and a pink decorative border. Sand these with a sanding block. Cut a patterned panel 5 3/4" x 5 3/4" and distress the edges.

Mount the pink border die cut on the distressed paper, about 1/3 of the way down, and add the ribbon on top. Then mount the green label vertically in the middle of the card, and center the pink label on it.

Glue the thorny branches onto the label stack. Mount the full vase image, then adhere the glass beaded vase over the uncolored vase. Using foam dots, mount the rose images on the full vase image.

Mount the sentiment in the lower right corner of the card.

Thanks for stopping by!

Blue_Orange

Wednesday, May 25, 2011

Yellow Rose Lattice

Inspiration

Happy HC Day! LOL!! It's Wednesday and this week there are more creative inspirations on the Heartfelt Creations blog, featuring this month's release - the Bella Rose Collection, as well as cards made from other HC sets. My card features the HCPC 3396 Bella Rose Lattice Background PreCut Set, another stamp that can be the spark for so many possible designs.

I pulled out my watercolor crayons for this one - I like the "uneven" shading you get with these. I lightly colored the image with crayons before wetting the color. If you get too much water, you can dab it with a paper towel, and touch up the area with a little bit of color on the brush.

Yellow Rose Lattice

Ingredients

Note: Finished card size is 4 1/4" x 5 1/2"

Paper

Daffodil Delight (SU!) 5 1/2" x 8 1/2", scored at 4 1/4"
Old Olive (SU!) 2" x 2"
Very Vanilla (SU!) 2" x 2"
Watercolor paper (Strathmore) 4 1/4" x 5 1/2"
Classic K McKenna paper pack (K & Co.) 4" x 5 1/4"

Inks

Versamark (Tsukineko)
Soft Suede (SU!)
Old Olive (SU!)

Stamps

HCPC 3396 Bella Rose Lattice Background PreCut Set
HCPC 3354 Classic Message PreCut Set

Accessories

Grand Calibur (Spellbinders)
Big Scalloped Circles LG Nestabilities (Spellbinders)
1 3/8" Circle Punch (SU!)
Distressing tool (Tim Holtz)
Clear embossing powder (Stampendous)
Heat gun
Watercolor crayons (SU!)
Watercolor brushes
Ribbon (Hobby Lobby)
Bow-Easy
Foam dots
Scor-Pal
ATG 714
Craft knife (Xacto)
Scissors
Rotary Trimmer

Instructions

Image

Ink the background stamp with Versamark, then with brown ink. Emboss with clear embossing powder and the heat gun.

Color the image lightly with the watercolor crayons, starting with the roses. After coloring each area of the image, use a watercolor brush dipped in water to smooth the colors.

Once the entire image is dry, carefully cut it out - use a craft knife to cut out the inner spaces.

Assembly

Cut the patterned paper, and distress the edges of the paper. Mount a strip of ribbon around the lower area of the patterned paper, and tie a green bow and attach it very near the right side of the patterned panel. Mount this on the front of the card.

Stamp the sentiment in green on the vanilla paper and punch out with the circle punch. Cut and emboss a green scalloped circle. Mount the sentiment circle onto the green scalloped die cut. Using foam dots, mount the lattice on the patterned paper, with the lower part of the lattice around the bow.

Mount the sentiment using foam dots close to the right edge of the lattice image.

Thanks for stopping by!

Blue_Orange

Sunday, May 22, 2011

Pink Pony Birthday

Inspiration

This card was made for a special girl turning six - she is celebrating with a "painted pony party" with REAL ponies! This party service has white ponies, and they've dyed the manes pink and blue and rainbow colors - it's really quite cute! So, I just HAD to find an image of a little girl with a pony. I found this image at Karen's Doodles, and it fits the big event just perfectly!Painted Pink Pony

Ingredients

Note: Finished card size is 6" x 6"

Paper

Pink Textured Paper (Core'dinations) 6" x 12", score at 6"
Whisper White (SU!) 2 1/4" x 6"
Green & Pink Flowers (Kaleidoscope) 2" x 6"
Rose Red (SU!) 5" x 5"
Stamper's Select White (PTI) 3 1/2" x 3 1/2"

Inks

N/A - Image was printed on an EPSON RX620 printer

Stamps

Pony Love (Karen's Doodles)

Accessories

Grand Calibur (Spellbinders)
Lacey Squares Nestabilities (Spellbinders)
Edge Punch (Martha Stewart)
COPIC markers (Imagination International)
SPICA Glitter pens (Imagination International)
Adhesive Gems/Pearls (Recollections)
Scor-Pal
ATG 714
Scissors
Rotary Trimmer

Instructions

Image

Print the digital image on the white cardstock. I print it on the same paper I stamp on for COPICS (Stamper's Select), and usually let it sit for a while before I start coloring.

Color with COPIC markers. I used these colors:

  • Pony's mane, tail, hooves: RV10, RV32, RV34, RV55
  • Pony shadows: C00, C1, C3
  • Girl's dress, vest, and boots: RV10, RV32, RV34
  • Girl's hair: YR30, YR31, E37
  • Girl's skin: E000, E00, RV10
  • Girl's panties: BG000, BG01, BG02, BG05
  • Grass: YG00, YG01, YG03
  • Background: BG0000, BG000

Embellish the image with SPICA pens - Blossom and Clear on the mane, tail and hooves; Pitch Black on the pony's eyes. Add adhesive rhinestones on the boots, and pearls on the flowers.

Assembly

Punch the bottom edge of the front of the card using the edge punch. Mount the strip of white paper just above the punched border, and mount the patterned paper strip centered on the white.

Cut and emboss a dark pink lacey square, and mount the finished image on the die cut. Mount this centered on the front of the card.

Finish off with some adhesive pearl flourishes around the image.

Thanks for stopping by!
Blue_Orange

Friday, May 20, 2011

Garden Bookmark Card

Inspiration

This is a card and a gift all in one - it has a detachable bookmark, created by using a perforating blade on your paper trimmer. The stamps are all Heartfelt Creations – from the Posy Patch Collection. The sketch for the card front is from CPS Sketch Challenge 217.

Bookmark Card

Ingredients

Note: Finished card size is 4 1/4" x 5 1/2"

Paper

Soft Sky (SU!) 5 1/2" x 11"; score at 4 1/4", and perforate at 8 1/2", and
2" x 3 1/2", and
3/4" x 3 1/4", and
2" x 4"
Blue Bayou (SU!)/td> 4 1/8" x 5 3/8", and
2 3/8" x 4 3/4", and
2 3/8" x 5 3/8"
SW Nature Paper (K & Company) 4" x 5 1/4", and
2 1/4" x 4 5/8", and
2 1/3" x 5 1/4"
Whisper White (SU!) 4 1/4" x 5 1/2"
Stamper's Select White (PTI) 4 1/4" x 5 1/2"

Inks

Memento London Fog (Tsukineko)
Blue Bayou (SU!)

Stamps

HCPC 3324 Daisy Patch Swirls PreCut Set
HCPC 3306 Posy Patch Garden Delights PreCut Set
HCPC 3304 Posy Patch Swirls PreCut set
HCPC 3363 Inspire Me Sentiments PreCut Set

Accessories

COPIC markers (Imagination International)
SPICA Glitter pens (Imagination International)
Adhesive Pearls (Recollections)
Satin Ribbon (American Crafts)
Crop-A-Dile and large eyelet (We R Memory Keepers)
Zip Dry
Scor-Pal
ATG 714
Scissors
Rotary Trimmer with straight and perforating blades

Instructions

Card Base

Creating a card with a detachable bookmark is really easy if you have a perforating blade! All you have to do is cut your 8 1/2" x 11" cardstock sheet in half lengthwise. Then line the paper up at 8 1/2" and run the perforating blade across the paper. Then score the sheet at 4 1/4", and you're all set to decorate the card.

Images

Stamp the watering can image and small posy swirl image on white paper, and trim both closely. Color with COPIC and SPICA markers. Here are the colors I used:
  • Flowers: BG72, BG75, turquoise SPICA
  • Leaves & Stems: Y21, Y26, gold SPICA
  • Watering Can: C00, C1, C3, clear SPICA

Decorate the Card

On the front of the card, mount the following: a dark blue mat, a patterned paper mat, a dark blue strip, a patterned strip, and a light blue strip. Mount the watering can image over the light blue mat. Add a pearl in the center of each flower, and three large pearls in the upper left of the card. For the sentiment cut a dark blue strip, and clip a notch in each end to create a ribbon-like appearance. Stamp the sentiment in blue on white, and mount it on the blue "ribbon". Mount this below the light blue panel.

Decorate the Bookmark

For the bookmark, mount the following: a dark blue mat, a patterned paper mat, and a light blue strip. Stamp the special day sentiment in blue at the top of the light blue panel. Mount the posy swirl image on the lower part of the light blue panel. Add a pearl in the center of each flower. Punch a hole at the top of the bookmark, and add an eyelet to secure the hole. Fold the ribbon in half, and thread it through the hole and put the ends through the loop. Pull it tight to secure it in place.

Thanks for stopping by!

Blue_Orange

Thursday, May 19, 2011

Cup of Thanks

Inspiration

The teacup from the Tea With Bella stamp set (part of the new Bella Rose Collection at Heartfelt Creations) is so fun - it can fit lots of occasions! And the swirly leaves from the Bella Rose Leaves set can be used with the new matching dies, that really make it a snap to cut out their intricate design! There are lots of creative examples for using all the new sets of stamps on the Heartfelt Creations blog - be sure to visit to see all the beautiful work from the design team.

I made this card for the woman at work that is officially an "admin", but in reality does anything and everything to help things run smoothly. She just finished up two weeks of playing hostess to customers visiting in our office, making sure all were kept comfortable and well fed, and is now headed on a well-deserved vacation!

Cup of Thanks

Ingredients

Note: Finished card size is 5 1/2" x 5 1/2"

Paper

Pear Pizzazz (SU!) 5 1/2" x 11", scored at 5 1/2"
Rich Razzleberry (SU!) 5" x 5"
Patterned paper (Pink Paisley) 4 7/8" x 4 7/8"
Stamper's Select White (PTI) 8 1/2" x 5 1/2"

Inks

Memento Rich Cocoa (Tsukineko)
Rich Razzleberry (SU!)

Stamps

HCPC 3390 Bella Rose Leaves Precut Set (Heartfelt Creations)
HCPC 3393 Tea with Bella Precut Set (Heartfelt Creations)
HCPC 3328 Swirly Autumn Leaves Precut Set (Heartfelt Creations)

Accessories

HCD 712 Bella Rose Dies (Heartfelt Creations)
Fancy Tags Shapeabilities (Spellbinders)
Grand Calibur (Spellbinders)
Deco Shells Punch Around The Page Combo (Martha Stewart)
Medium Oval Punch (SU!)
Foam Dots
Zip Dry
Scor-Pal
ATG 714
Scissors
Rotary Trimmer

Instructions

Images

Stamp the teacup image on white paper, and stamp the bottom of the cup with the rose again. Stamp the leaf swirl in brown on white paper, and cut it out using the matching "Leafy Spray" die.

Trim the cup and rose image closely, then cut out just the roses from the bottom of the partial image. Color all with COPIC markers:

  • Cup: C00, C1, 0
  • Flowers on cup: RV66, YG05
  • Leaves: YG21, YG23
  • Roses: RV63, RV69
  • Stems: E87, YG21, YG23

Sentiment

Stamp the sentiment in purple ink on white, and punch out the image with the oval punch. Cut and emboss the tag with the die cut machine, and mount the white sentiment on the tag.

Assembly

Punch the pattern around the purple square, and mount it on the front of the card. Then add the patterned paper on the punched square.

Glue the leafy spray image onto the card, then mount the sentiment tag at the bottom of the square.

Mount the teacup to the card using foam dots, and the rose cut out on top of the roses at the bottom of the cup, also using foam dots.

Thanks for stopping by!
Blue_Orange

Wednesday, May 18, 2011

Cheery Day for Mom

Inspiration

Today's blog post at Heartfelt Creations features more samples made with the new Bella Rose Collection - the design team has outdone themselves!

The solid stamps found in the Bold Bella Rose set offer lots of possibilities for beautiful creations. This card is a monochromatic treatment used on a tri-fold window card, using varying shades of peach.

Cheery Day One


Ingredients

Note: Finished card size is 4" x 6"

Paper

Taffy (CTMH) 6" x 12", scored at 4" and 8"
Dusty Durango (SU!) 5 1/2" x 8 1/2"
Whisper White (SU!) 4 1/4" x 5 1/2"

Inks

Groovy Guava (SU!)
Dusty Durango (SU!)

Stamps

HCPC 3391 Bold Bella Rose Precut Set
HCPC 3389 Sentiments for Mom Precut Set
HCPC 3386 Cheery Cardinal Precut Set

Accessories

Labels 9 Nestabilities (Spellbinders)
Petite Oval Small Nestabilities (Spellbinders)
Petite Scallop Oval Large Nestabilities (Spellbinders)
Fancy Tags Shapeabilities (Spellbinders)
Grand Calibur (Spellbinders)
Stamp-A-Ma-Jig
Post-It Note
Zip Dry
Scor-Pal
ATG 714
Scissors
Rotary Trimmer

Instructions

Prepping the PiecesWindow

Use light orange paper cut to 12" x 6", score it at 4" and 8". Cut a window in the front panel using the middle sized Label 9 die.

Using the dark orange paper, cut and emboss a large scalloped oval, a tag, and a Label 9 frame. You can create the frame by placing the middle die inside the next largest die and run the set through the machine. Hint - I use plain tape to hold the dies in place.

Die Cuts

Also, cut a plain white oval to fit inside the scalloped oval.

Outside of Card

Glue the dark orange frame around the window on the front of the card.

Stamp a border across the bottom of the card using the small solid rose stamp, rotating it slightly for each image. The border is stamped on the front panel, all three inside panels, and the back of the left panel.

Stamp the "Mom" sentiment under the window on the front of the card.

Through the Window

Stamp the large solid rose image in light orange on the white oval, and the top half of the "cheery" message in dark orange under the rose. I used my Stamp-A-Ma-Jig to get the saying right where I wanted it. Mount the white oval on the dark orange scalloped oval. Adhere the image on the back of the left-most panel so that the rose will show through the window when the card is closed.

Cheery Day Two

Inside of Card

Create a mask by stamping the large rose image on a Post-It, and trimming it closely. Stamp the large rose in dark orange ink inside the card in the middle panel. Mask it, and stamp the leaf spray, and individual rose buds over and around the masked image using light orange ink.

Stamp the bottom half of the "cheery" image in dark orange on white paper, and cut it out. Mount it on top of the tag die cut, and mount it on the left-most panel.

Cheery Day Three

Thanks for stopping by!

Blue_Orange

Sunday, May 15, 2011

Lighthouse Beacon

Inspiration

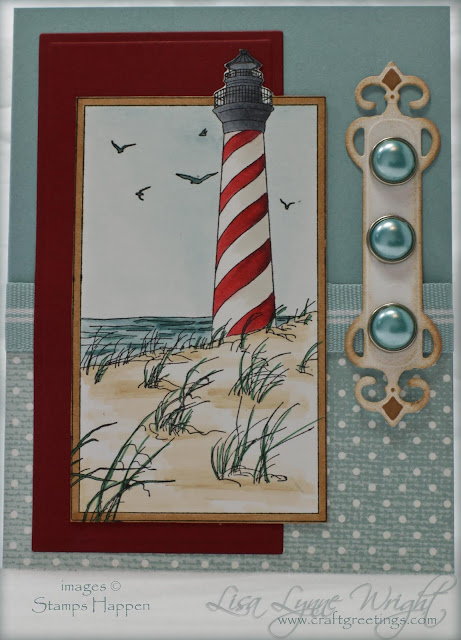
I always struggle a little in coming up with cards with a masculine theme. I've had this lighthouse stamp for years, and use it a lot. I made this for a coworker's birthday, and expect it'll be a Father's Day card in a few weeks, too! The sketch is from the Splitcoast challenge SC330.

Lighthouse

Ingredients

Note: Finished card size is 4 1/4" x 5 1/2"

Paper

Baja Breeze (SU!) 5 1/2" x 8 1/2", scored at 4 1/4"
To the Nines DSP (SU!) 2 1/2" x 5 1/2"
Cherry Cobbler (SU!) 3" x 5 1/2"
Stamper's Select White (PTI) 4 1/4" x 5 1/2"

Inks

Memento Tuxedo Black (Tsukineko)
Creamy Caramel (SU!)

Stamps

Lighthouse Beacon (Stamps Happen)

Accessories

Fancy Tags Shapeabilities (Spellbinders)
Long Rectangle Large Nestabilities (Spellbinders)
Grand Calibur (Spellbinders)
COPIC Markers (Imagination International)
Baja Breeze Ribbon (SU!)
Large pearl brads (Spare Parts)
Sponge
Scor-Pal
ATG 714
Scissors
Rotary Trimmer

Instructions

Image

Stamp the lighthouse image on white paper, and trim it around the frame (the actual image goes outside the frame). Color with COPIC markers:

  • Lighthouse: R35, R59, C3, C5, C7, W2
  • Sky: BG70
  • Water: BG70, BG72, BG75
  • Grass: G29
  • Sand: E30, E33
  • Frame: E33

Tag

Cut and emboss the tag from white paper with the die cut machine, and sponge with caramel ink before removing the paper from the die. After removing the die cut, sponge some more ink around the edges of the die cut. Punch 3 holes in the tag, and add the brads.

Assembly

Cut and emboss a long rectangle from red paper.

Mount the patterned paper at the bottom of the card, followed by a strip of ribbon to cover the edge of the paper. Add the red rectangle, followed by the image. Add the tag to the right of the image.

Thanks for stopping by!
Blue_Orange

Saturday, May 14, 2011

Special Tea Sharing

Inspiration


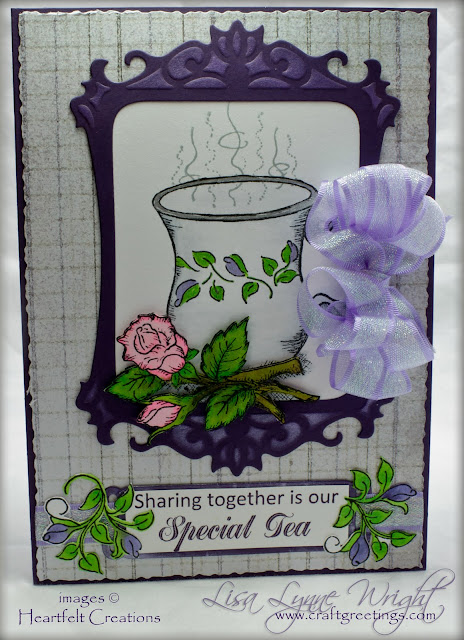
The new Bella Rose Special TeaCollection from Heartfelt Creations is just beautiful – so many stamps to inspire your creativity.  Here’s a card made with the teacup image, with a sweet friendly sentiment!   


As a REMINDER, to celebrate the release, Heartfelt Creations is giving away one entire release set, valued at $149.99 to one lucky person!!! To enter, just leave a comment on my blog post on Wednesday (5/11) or the Heartfelt Creations blog by May 17. The winner will be announced on the HC blog on next Wednesday, May 18.


Ingredients

Note: finished card size: 5" x 7"

Paper

Elegant Eggplant (SU!) 7" x 10", scored at 5", and
4" x 6", and
2" x 3"
Patterned paper (GCD Studios -
                       Donna Salazar Antiquities)
4 7/8" x 6 7/8"
Stamper's Select White (PTI) 4" x 6"

Inks

Memento Tuxedo Black (Tsukineko)
Memento London Fog (Tsukineko)
Elegant Eggplant (SU!)

Stamps

Tea With Bella Precut Set (Heartfelt Creations)
Classic Bella Rose Precut Set (Heartfelt Creations)

Accessories

Classic Frame Frameabilities (Spellbinders)
Ribbon Tag Trio Two Shapeabilities (Spellbinders)
Grand Calibur (Spellbinders)
Violet shimmer Acrylic Paint (Ink-A-Gold )
Sponge dauber
COPIC markers (Imagination International)
SPICA pens (Imagination International)
Gel pen in silver metallic (Pentel)
Bow-Easy
Zip-Dry Glue
Holiday Ribbon (Michaels)
3-D Foam dots
Glue dots
Scor-Pal
ATG 714
Scissors
Rotary Trimmer with deckle and straight blades

Instructions

Teacup Image

Cut and emboss a classic frame from the dark purple paper. Before removing the frame diecut from the die, use a sponge dauber, and apply the violet ink-a-gold paint to the exposed pattern.

Stamp the teacup in black, and overlay the steam image in gray. Color the image with COPIC markers. Here's the colors I used:

  • flowers on teacup: BV02, BV04
  • leaves on teacup and roses: YG03, YG05, YG09
  • teacup: C1, C3, 0
  • roses: RV00, RV02, RV04
  • stems: E11, E15, E87


Enhance with melon and lilac SPICA pens (Melon, Lilac).

Fill in the edge of the cup with the silver pen. Trim the image to fit inside the frame, and mount the frame over the image - some of the handle and the rose at the bottom will be covered by the frame.

Stamp the bottom of the cup image again, and cut out the rose image, and color with COPICs, using the same colors.

Sentiment Image

Cut and emboss a ribbon tag from dark purple paper. Stamp the sentiment in purple on a white rectangle and mount it on the ribbon tag diecut.

Stamp the embellishment flower spray, and carefully trim it. Snip it in half. Color these images using COPIC markers, as above.

Assembly

Cut a mat from the patterned paper using a deckle blade, 1/8" smaller than the base card.

Thread a strip of ribbon through the tag and mount it on the patterned paper mat. Mount the mat on the card front.

Glue the flower embellishments at each end of the tag, and mount the framed teacup above the tag.

Mount the trimmed rose image over the rose at the bottom of the cup using foam dots.

Tie a bow with several loops and mount it to the right of the frame.

Thanks for stopping by!

Blue_Orange

Friday, May 13, 2011

Chalkboard Rose

Inspiration

Here's another card created with the new Heartfelt Creations Bella Rose release. The solid images in the "Bold Bella Rose" set are perfect for the chalkboard technique. I learned this one on Splitcoast Stampers - in fact the first card I ever posted on SCS was a chalkboard card! Check out the tutorial for the technique.

Here's my card.

Chalkboard Rose

Ingredients

Paper

Pink Pirouette 5 1/2" x 8 1/2", scored at 4 1/4"
Whisper White 4" x 5 1/4"
Basic Black 3 1/2" x 5 1/2"

Inks

Brilliance Moonlight White (Tsukineko)

Stamps

HCPC 3391 Bold Bella Rose Precut Set (Heartfelt Creations)

Accessories

Label 10 Nestabilities (Spellbinders)
Grand Calibur (Spellbinders)
Post-it Note
Chalks
Cotton swabs
Bow-Easy
Flourish Embossing plate (SU!)
Corner rounder punch
Art Glitter Adhesive
Dazzling Diamonds glitter (SU!)
Holiday Ribbon (Michaels)
Scor-Pal
ATG 714
Scissors
Rotary Trimmer

Instructions

Image

Cut and emboss a Label 10 die from black paper. Create a mask for the rose image using the Post-it Note. Stamp the rose image in white ink on the black label, mask it, then stamp the leaf spray in white ink overlapping the rose image. Using cotton swabs, color the white images with the chalks. Spread glue around the edge of the black label diecut, and apply glitter.

Assembly

Cut a white panel, and emboss it with the flourish embossing plate. Round the corners of the card, and the embossed white panel. Adhere a strip of ribbon around the center of the white panel, and mount it on the card front. Mount the image near the top of the white panel. Tie a bow, and mount it at the bottom of the image.

Reminder

To be entered in the drawing for the Bella Rose collection give-away, just leave a comment on my blog post on Wednesday (5/11) or the Heartfelt Creations blog by May 17. The winner will be announced on the HC blog on next Wednesday, May 18.

Thanks for stopping by!

Blue_Orange

Wednesday, May 11, 2011

Heartfelt Creations May Release - Bella Rose

InspirationRose Tag

It's the 2nd Wednesday of May, so that means it NEW RELEASE DAY at Heartfelt Creations! Yea!! This month features the Bella Rose Collection, which contains 8 new Pre-Cut sets that coordinate with a new exclusive Heartfelt Creations die, manufactured by Spellbinders.

To celebrate the release, Heartfelt Creations is giving away one entire release set, valued at $149.99 to one lucky person!!! To enter, just leave a comment on this post or the Heartfelt Creations blog by May 17. The winner will be announced on the HC blog on next Wednesday, May 18.

I really love the rose vase image in the Bella Rose Vase set - there are SO many ways to use it - my head is full of ideas! My first project shown here is a decorated tag - another new creative venture for me, but really a lot of fun.

Ingredients

Paper

Tag
Patterned paper (Pink Paisley)
Core'dinations paper
Vellum
Stamper's Select White (PTI)

Inks

Memento Tuxedo Black (Tsukineko)
Versamark (Tsukineko)

Stamps

HCPC 3395 Bella Rose Vase Precut Set (Heartfelt Creations)
HCPC 3394 Classic Bella Rose Precut Set (Heartfelt Creations)

Accessories

HCD 712 Bella Rose Die (Heartfelt Creations)
HCD 711 Decorative Dutch Iris Die (Heartfelt Creations)
Grand Calibur (Spellbinders)
Sanding block
Fiber
Moss Tinsel embossing powder (Creations Unlimited)
Heat gun
COPIC markers (Imagination International)
SPICA glitter pens (Imagination International)
Gel pen in silver metallic (Pentel)
Gelly Roll star pens (Sakura)
Crystal Lacquer
3-D Foam Dots
Zip Dry glue
ATG 714
Scissors
Rotary Trimmer

Instructions

Rose Vase Image

Stamp the vase image twice, and additional rose images on white using black ink.

For one full vase image, cut out the entire image, and color the roses and leaves with COPIC markers. I used these colors:

  • Roses: R81, R83, R85
  • Leaves: G94, G99
  • Stems: E87
  • Vase: BG70, BG72

Enhance the roses and leaves with Spica pens (Melon, Lilac). Use Gelly Roll pens (Green star, Pink star) on the vase decoration. Color the lip of the vase with the gold pen. Cover the vase with crystal laquer, and let it dry.

Remaining Images

On the second vase image, cut out the roses and leaves at the lip of the vase, and color with COPIC markers, as above.

Stamp the fern image on Vellum using the embossing ink, and emboss with the green embossing powder.

Assemble the Tag

Cut the patterned paper to fit the tag, and glue it to the tag. Trim the corners, and punch a hole through the original hole in the tag. Use the sanding block to smooth the edges and corners.

Cut and emboss the flourish die from the Core’dinations paper. Remove the diecut from the die, and sand it with the sanding block. Cut it in half, and glue the pieces to the tag. String the fiber through the hole at the top of the tag.

Mount the fernRose Tag Side image vellum to the tag. To create the multi-layer rose vase, attach the background roses with small foam dots, then add the full vase image with large foam dots. Finally, add the front rose images with small foam dots.

Reminder

To be entered in the drawing for the Bella Rose collection give away, leave a comment on this post, and for lots of inspiration using this new release, be sure to visit the Heartfelt Creations blog to see the all the beautiful creations by the design team.

Thanks for stopping by!

Blue_Orange

Sunday, May 8, 2011

Make A Wish

Inspiration

I got a request for a child's birthday card that could be used for girls or boys - I thought the design of this one could be reused with different colors for girls or boys - here's a blue one. The layout is from the Splitcoast Sketch challenge SC331.

Make A Wish

Ingredients

Note: Finished Card Size: 4 1/4" x 5 1/2"


Paper

Brocade Blue (SU!) 5 1/2" x 8 1/2"
Brilliant Blue (SU!) 3 1/2" x 4 3/4", and
2 1/4" x 3" (2 pieces), and
1 2/3" x 3", and
4" x 5 1/4" (for inside the card)
Brocade Blue DSP (SU!) 3 3/8" x 4 5/8", and
2 1/8" x 2 7/8" (2 pieces), and
1 2/3" x 3"
Whisper White (SU!) 4 1/4" x 5 1/2", and
3 7/8" x 5 1/8" (for inside the card)

Inks

Basic Black (SU!)
Brocade Blue (SU!)
Brilliant Blue (SU!)
Summer Sun (SU!)

Stamps

Big Birthday Calendar (SU!)

Accessories

Fancy Tag Shapeabilities (Spellbinders)
Grand Calibur (Spellbinders)
Sponge
Scor-Pal
ATG 714 (Scotch)
Rotary Trimmer (Fiskars)

Instructions

Images

Stamp the candle outline in black 3 times on white cardstock. Stamp the blue circles decoration in blue on the candles. Cut the 3 candles out. Stamp the solid flame in yellow 3 times on white cardstock. Stamp the flame outline in black over the yellow, and cut the 3 flames out, leaving some at the bottom the adhere to the candle sticks. Attach the flames to the candles.

Sentiment

Cut and emboss a tag from the white paper, using the fancy tag die. Before removing the tag from the die, sponge blue ink on the areas at the ends of the tag. Stamp the sentiment in the center of the tag.

Assembly

Assembly is simple - just layer the colors and designer paper to match the sketch. Add the candles on the center blue mat. Adhere the tag sentiment below the candles.

Inside the Card

Mount the remaining dark blue panel inside the card, followed by the white panel. Stamp the sentiment on the white, and your done!

Thanks for stopping by!

Blue_Orange

Saturday, May 7, 2011

Bluebird Family

Inspiration

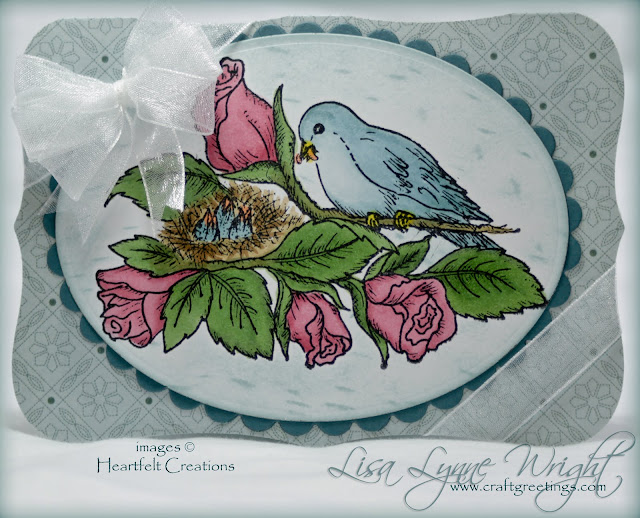
The "other bird" in the Heartfelt Creations Springtime Cardinals release is the one on this card - a mother bird feeding her chicks.  You could color this one almost any color! When I am choosing colors, I often start with the paper on hand.  For this one, I started with a patterned paper I liked from the Linen Closet pack from DCWV. I found a solid blue cardstock that was a close match, then chose my COPIC colors to go with it.  Here is the result, which was featured on the HC Blog on 5/4/2011.

Bluebird_Family

Ingredients

Note: Finished Card Size: 4” x 5 1/2”

Paper

Linen Closet (DCWV) 5 1/2” x 8 1/2”, scored at 4 1/4”
Blue Bayou (SU!) 4 1/4” x 5 1/2”
Soft Sky (SU!) 5 1/2” x 8 1/2”
Stamper's Select White (PTI) 4 1/4” x 5 1/2”; plus a small scrap

Inks

Memento Tuxedo Black (Tsukineko)
Soft Sky (SU!)
Blue Bayou (SU!)

Stamps

HCPC 3385 Spring Birdies and Roses Precut Set (Heartfelt Creations)
HCPC 3384 Cardinal Posy Wreath Precut Set (Heartfelt Creations)

Accessories

Label 8 Nestabilities (Spellbinders)
Scalloped Oval Nestabilities (Spellbinders)
Plain Oval Nestabilities (Spellbinders)
Grand Calibur (Spellbinders)
COPIC Markers (Imagination International)
Bow-Easy
White gauze ribbon
Scalloped oval punch (SU!)
Scor-Pal
ATG 714 (Scotch)
Rotary Trimmer (Fiskars)

Instructions

Base Card

Use the patterned paper for the base card - score and fold.  Place the Label 8 Nestabilities die just below the fold, and cut out the card with the die cut machine.

Image

Stamp the bluebird family image on white. Color with COPIC markers. Here are the colors I used:

  • Birds: BG70, BG72, BG75, Y15
  • Worm/Baby Bird Mouths: YR02
  • Roses: R81, R83, R85
  • Leaves: G82, G85
  • Branch: E55, E57

Cut and emboss the image using a plain oval Nestabilities die. I thought the white cardstock was kind of stark, so I used a sponge and the light blue ink to shade the background of the oval, but I didn't want to sponge over the image, so I used the masking technique. To do this:

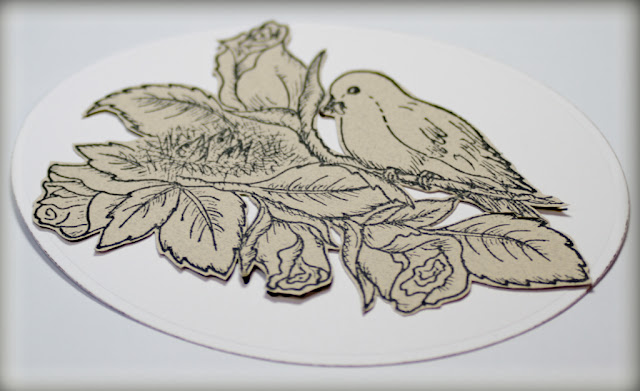
  • Stamp the image on a scrap of cardstock, and carefully cut it out, including the spaces between the leaves. Create the Mask 
  • Cover the image with the mask. Sponge the Color
  • Sponge light blue ink around the image.

    Tea Party Invite

Assembly

Cut and emboss a scalloped circle from the dark blue paper. Mount the image oval on the scalloped oval, and add it to the front of the card.Secure the Ribbon

Since the card has an opening at the top, wrap the ribbon around opposite corners of the card front and taped it in the back.


To cover the taped ribbon and create the inside greeting, cut and emboss two smaller Label 8 dies - mount one on each of the inside surfaces.

Tea Party Invite

Stamp the sentiment in dark blue on white paper, and punch it out with the scalloped oval punch.  Mount the sentiment on the light blue surface inside the card. Tea Party Invite

To finish it off, tie a bow (mine has multiple loops), and add it to the card front.

Thanks for stopping by!

Blue_Orange

Friday, May 6, 2011

Elegant Bluejay

Inspiration

Here is an elegant card - very formal in its color, embellishments, and design, and a coordinated image inside.  It was featured on the HC Blog on Wednesday, 5/4/2011.

HCDT_ElegantBluejay

Ingredients

Note: Finished Card Size: 5" x 7"


Paper

New England Ivy (CTMH) 7” x 10”, scored at 5”, and
4" x 5"
Champagne Pearl Metallics (Wassau) 4 7/8" x 6 7/8", and
3 7/8" x 4 7/8"
Victorian Patterned Paper in New England Ivy (CTMH) 4 3/4" x 6 3/4", and
3 3/4" x 4 3/4"
Ivory Pure Luxury (GinaK) 3" x 3", and
4 7/8" x 6 7/8"
Stamper's Select White (PTI) 4 1/4" x 5 1/2"

Inks

Memento Tuxedo Black (Tsukineko)
Always Artichoke (SU!)

Stamps

HCPC 3382 Magnificent Cardinal Rose PreCut Set (Heartfelt Creations)
HCPC 3385 Spring Birdies Precut Set (Heartfelt Creations)
HCPC 3389 Sentiments for Mom PreCut Set (Heartfelt Creations)

Accessories

Pearls from Pretties set (SU!)
Glue (Scotch)
COPIC Markers (Imagination International)
Medium Oval Punch (SU!)
Holiday Ribbon (Jo-Anns)
Glue Dots
Scor-Pal
ATG 714 (Scotch)
Rotary Trimmer (Fiskars)

Instructions

Base Card & Ribbon

Score and fold the base card.  Add the champagne and patterned layers.

Cut a length of ribbon about 8" long.  Apply adhesive from the center of the front of the card to the edge on one side.  Adhere one end to the back of the card and around to the top of the card, about 1/2" in.  Now, place a glue dot on the ribbon, and fold the ribbon back toward the edge of the card, sticking it to the glue dot. Create a small loop by folding the ribbon back toward the center of the card and pressing it to the adhesive already on the card.  Place a glue dot, and fold the ribbon back. Create another loop. Repeat this until you have 4 or 5 loops of ribbon, finishing with the tail of the ribbon attached along the remaining adhesive on the card.  Repeat this process on the other side of the card, so you have matching ribbon loops on each side.

Images

Stamp the cardinal on the branch on white. Color with COPIC markers. Here are the colors I used:

  • Bluejay: B41, B45, B37, YR15, 100
  • Flowers: R21, R24, R29
  • Leaves: G94, G99
  • Branch: E27

Carefully trim the entire image.

Assembly

Create another mat stack, using the smaller solid green, champagne, and patterned panels.  Mount this stack over the ribbon on the front of the card.  Glue a pearl embellishment in each corner of the patterned paper, 8 in all.

Stamp the sentiment on the vanilla paper, and punch it out using the oval punch.

Adhere the image and the sentiment to the front of the smaller mat stack on the front of the card.LLW_LargeCardinalGatefold_inside

Inside the Card

Use the large vanilla panel, and stamp the small cardinal/rose image in black.  Color with COPICs, matching the colors you use on the front image.  Stamp your sentiment in green next to the image.  Mount the finished panel inside the card.

Thanks for stopping by!

Blue_Orange

Thursday, May 5, 2011

Gatefold Cardinal


Inspiration

One of my favorite card designs in the gatefold - one of my cards featured on the Heartfelt Creations blog Wednesday is a large gatefold, that measures 5" x 7" when finished instead of the usual 4 1/4" x 5 1/2".  The drawback is that you only get one card from a sheet of cardstock, but I think the result is really nice.

LLW_LargeCardinalGatefold


Ingredients

Note: Finished Card Size: 5" x 7"


Paper

Garden Green (SU!) 7” x 10”, scored at 2 1/2” and 7 1/2"
So Saffron (SU!) 5 1/2" x 8 1/2"
Certainly Celery (SU!) 5 1/2" x 8 1/2"
Stamper's Select White (PTI) 5 1/2" x 8 1/2"

Inks

Memento Tuxedo Black (Tsukineko)
Garden Green (SU!)
Certainly Celery (SU!)
So Saffron (SU!)

Stamps

HCPC 3386 Cheery Cardinal Precut Set (Heartfelt Creations)
HCPC 3387 Luscious Cherry Swirls PreCut Set (Heartfelt Creations)
HCPC 3389 Sentiments for Mom PreCut Set (Heartfelt Creations)

Accessories

Classic Frame Shapeabilities (Spellbinders)
Labels 10 Nestabilities (Spellbinders)
Grand Calibur (Spellbinders)
COPIC Markers (Imagination International)
SPICA glitter pens (Imagination International)
Corner Rounder Punch (SU!)
Sponges
Scor-Pal
Foam Tape
ATG 714 (Scotch)
Rotary Trimmer (Fiskars)

Instructions

Base Card

Score and fold the base card.  Use the solid cherries stamp and green ink to randomly stamp a background on the card.  I actually stamped the cherry background all over the outside of the card, including the back.

Use the corner-rounder punch to round the four corners on the front panels of the card.

Cut and emboss a large label 10 die in yellow, and a classic frame in light green.  On the frame die cut, sponge light green ink in the open areas of the die before removing the paper from die.  For the yellow label die cut, sponge yellow ink around the edges.

Images

Stamp the cardinal on the branch on white. Color with COPIC markers, and enhance with SPICAs. Here are the colors I used:

  • Cardinal: R02, R08, E08, Y15
  • Flowers: R21, R22, Blossom SPICA
  • Leaves: YG16, YG63, YG67, Olive SPICA
  • Branch: E37
  • Cherries:  R20, R24, R27, YG91, YG93, Garnet SPICA

Carefully trim the entire image.  For those areas that are background, but just too delicate to cut out, such as the space between the cherry stems, color with a yellow that will closely match the yellow paper.  I used COPIC Y21.

Assembly

LLW_LargeCardinalGatefold_inside

Attach the yellow label die cut to the left front opening panel of the card, followed by the green frame.  Add the image on top, using foam tape.

Inside the Card

For the inside, I cut a light green panel, measuring 4 7/8" x 6 7/8", and stamped the cherry background in light green ink.  Then I created another yellow label die cut, and sponged the edges.  I stamped a sentiment from the Sentiments for Mom set in dark green and mounted the layers into the card.

Thanks for stopping by!

Blue_Orange

This card has been submitted to these challenges:

Wednesday, May 4, 2011

Monochrome Posies

Inspiration

It's Wednesday! So lots of new inspirational examples are featured on the Heartfelt Creations blog today - be sure to hop over to see all the beautiful work by the HC design team.  PLUS, today there is a sneak peak of next week’s new release – one you are really going to love!

I just got the Grand Scalloped Circle dies and had to try them out to make a circle-shaped card, and I thought the Heartfelt Creations posies were the perfect images to enhance the scalloped circle.  Here's the card.

HCDT_MonochromePosies

Ingredients

Note: Finished Card Size: 5 1/2" Circle

Paper

Marina Mist (SU!) 6" x 6" - 2 pieces, and
3" x 4"
Bashful Blue (SU!) 5" x 5" - 2 pieces
Vellum 5 1/2" x 8 1/2"

Inks

Versamark (Tsukineko)
Marina Mist (SU!)
Bashful Blue (SU!)

Stamps

HCPC 3303 Posy Patch Flowers PreCut Set (Heartfelt Creations)
HCPC 3305 Posy Patch Clusters Precut Set (Heartfelt Creations)
HCPC 3363 Inspire Me Sentiments Precut Set (Heartfelt Creations)

Accessories

HCD701 Posy Patch Dies (Heartfelt Creations)
Grand Calibur (Spellbinders)
Ribbon Tag Trio 2 Shapeabilities (Spellbinders)
Scalloped Circle Grand Nestabilities (Spellbinders)
Classic Scallop Circle Large Nestabilities (Spellbinders)
Classic Oval Large Nestabilities (Spellbinders)
Clear embossing powder
Heat gun
Bashful Blue ribbon (SU!)
Chunky silver glitter
Clear glue (Scotch)
Scor-Pal
ATG 714 (Scotch)
Rotary Trimmer (Fiskars)

Instructions

Base Card

Cut and emboss two large scalloped circles from dark blue cardstock.  Score one of the circles about 1" in from one edge. Put adhesive in the small area above the score line, and place the two circles together, lining up the scallops. Fold the scored circle along the score line. I found this idea in a video tutorial on the A New Design blog.

Images

Ink the large posy cluster with Versamark, then blue ink, and stamp on vellum. Emboss with clear powder. Trim the image closely.

Ink, stamp, and emboss individual posies on vellum, too. Use the Posy Patch dies to cut out the individual posies.

Cut and emboss the ribbon tag die from dark blue cardstock, and a plain oval from vellum. Stamp the sentiment in blue on the vellum oval, and mount in the center of the ribbon tag die cut.

Assembly

Cut and emboss two smaller scalloped circles from light blue cardstock.

Thread the ribbon through the tag, and mount at the bottom of the light blue circle. Mount this circle on the front of the card.

Mount the posy cluster above the tag. Curl the edges Monochrome_Posies_Insideof the individual posies, then mount them onto the base image, using clear glue. Finish the center of the inner-most flowers with glue and glitter.

Mount the remaining light blue circle on the other dark blue circle, and stamp another greeting.

Thanks for stopping by!

Blue_Orange

This card has been submitted to these challenges:

Sunday, May 1, 2011

Invitation to High Tea

Something New

I’ve had a few requests to see a gallery of my cards, so I’ve added a gallery page here on my blog with a slideshow of card photos.  I’ll be added to the gallery over time, including some cards I made a long time ago, but have never blogged.  Hope you’ll check it out, and let me know what you think.  Now for today’s card.

Inspiration

It seems tea parties are the theme of choice for wedding showers – I’ve had two orders for wedding shower invites this year – both were for tea parties.  This one is a little more formal than the first – the shower is a small gathering for High Tea.  Here’s the design.

Tea Party Invite

Ingredients

Note: Finished Card Size: 4 1/4" x 5 1/2" (A2 size)

Paper

Blush Blossom (SU!) 4 1/4” x 11”, scored at 5 1/2”
I Do Hydrangeas
Patterned Paper (American Crafts)
4 1/4” x 5”
Sage Shadow (SU!) 1/2” x 3 5/8”, and
4" x 4 1/4"
Whisper White (SU!) 3/8” x  3 1/2”

Inks

Memento London Fog (Tsukineko)
Sage Shadow (SU!)

Stamps

Floral Tea (Mark's Finest Papers)
Tea for Two Additions (Papertrey Ink)

Accessories

Edge punch (EK Success)
Glossy White Acrylic Paint (PLAID)
Small paint brush
Labels 10 Nestabilities (Spellbinders)
Grand Calibur (Spellbinders)
Ribbon (Mark's Finest Papers)
Bow-Easy
Markers – Sage Shadow, Blush Blossom (SU!)
Corner Rounder Punch (SU!)
Glue dots
Scissors
Scor-Pal
ATG 714 (Scotch)
Craft knife (Xacto)
Rotary Trimmer (Fiskars)

Instructions

Base Card

Score and fold the base card.  Use the corner-rounder punch to round the two corners on the folded edge of the card.

Use the edge punch to punch across both the front and back of the open end of the card.  I punched both at the same time so the edges line up.  Using the white acrylic paint and paint brush, paint the edge of the card just to where the embossed pattern from the punch starts.  Paint the edge on the inside of the card, too.  Set aside to dry.

Images & Sentiment

Stamp the teapot and the cup on white paper, using the gray ink.  Use the SU markers in matching colors to color the flower and leaves on the stamped images.  Carefully cut out both images. While I always use scissors to do the majority of detailed cutting, I used a craft knife to get the open space started inside the handles of both images, and finished up with tiny snips of the scissors.

Assembly

Cut a "placemat" from the patterned paper, using the Label 10 die. Mount it on the upper portion of the card front.  Add the teapot and cup, leaving space in the upper left corner of the mat.

Tie a bow and attach it using glue dots.

Add the sentiment below the mat.

Final Notes

Inside the card, I created another mat, using the solid sage-colored cardstock.  I punched the four corners of the mat to continue the theme, and mounted it inside.

Then, I printed the details in gray for the invitation on white cardstock, and cut it to fit.  I rounded the corners on this piece, as well and added it on top of the green mat.

Thanks for stopping by!

Blue_Orange

LinkWithin

Blog Widget by LinkWithin