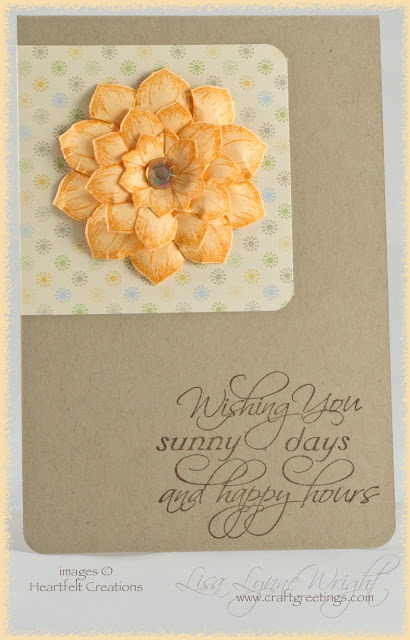
Sunday, July 31, 2011

Airbrushed Lake Scene

Inspiration

Here's another airbrushed sunset - I love using this method for quick backgrounds! And the sunset theme is perfect for the summery lake images. This treeline image (an old one from CC Rubber Stamps) is especially good for this technique, since it is solidly black, and there is no extra coloring to do.

Lakeview Sunset

Ingredients


Note: Finished card size is 4 1/2" x 6"


Paper

Not Quite Navy (SU!)6" x 9"; scored at 4 1/2"
Neenah Solar Crest4" x 6"
Whisper White (SU!)3" x 3"

Inks

Not Quite Navy (SU!)
Basic Black (SU!)
Versamark (Tsukineko)

Stamps

Treeline (CC Rubber Stamps)
Dream a Little (SU!)

Accessories

COPIC markers (Imagination International)
COPIC Airbrush System (Imagination International)
Eclipse Art Masking Tape (www.eclipsetape.com)
Big Shot Pro (Sizzix)
Grand Labels 11 Nestabilities (Spellbinders)
Clear Embossing Powder (Stampendous)
Heat Gun
Modern Label Punch (SU!)
Sponge
Foam dots
Stamp-A-Ma-Jig
ATG (Scotch)
Scor-Pal
Rotary Trimmer

Instructions

BASE CARD

Score and fold the blue cardstock; then align the Grand Label 11 die just above the fold and cut/emboss the card. By positioning the die above the fold, the fold remains intact, and you create a shaped base card.

IMAGE

Stamp the treeline image on the eclipse tape, and carefully cut it out - splitting it into two masks at the shoreline of the image.

Ink the treeline stamp with Versamark ink, followed by the black ink. Stamp the image in the lower center of the white cardstock panel. Heat emboss the image with clear embossing powder. Position the Labels 11 die around the stamped image, and cut/emboss it. Leave the image in the die for airbrushing - this will create the white frame around the finished image.
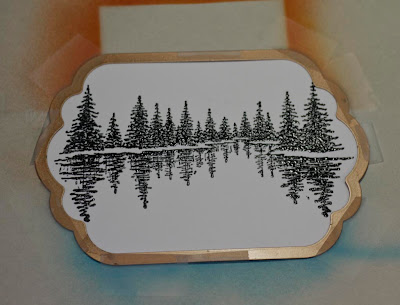
Lake Sunset Scene

Stamp the treeline image on the eclipse tape, and carefully cut it out - splitting it into two masks at the shoreline of the image.

Put the mask over the lower half of the image, and use a post-it note to cover any remaining open area in the bottom half of the card front. The sunset is created by airbrushing 3 colors of COPIC markers, starting with the lightest color. Airbrush the yellow (Y15) right around the one area of trees. Then, airbrush the (YR16) marker on the outer edges of the yellow, all the way to the outer edge of the panel. Finish up with the YR18 marker, around the outer edges of the card.
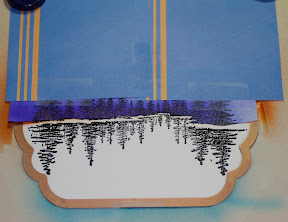

Lakeview Sunset

To do the water, take the masking material off the lower half of the card, and place the mask for the top of the treeline image onto the top half of the card. Add any post-it notes you need to cover the remaining area of the sky. I used 3 colors of blue, and painted lightest to darkest. Starting with the B93 marker, airbrush the center of the lake area, then use the B95 marker just outside the light blue, and then add the B99 marker to the the outer edges of the card. I finished the water by adding a little bit of extra dark color around the edge, using the C10 marker.

Remove the mask, then use E35 and E39 markers to darken the shoreline.

Remove the image from the die - you can clean the ink from the die with hand sanitizer. I found some sanitizer hand wipes at Target that work for this just great.


SENTIMENT

Stamp the sentiment with blue ink on white cardstock. Punch out the sentiment, using the label punch and sponge some blue ink around the edges.


ASSEMBLY

Adhere the image onto the front of the card. Mount the sentiment label with foam dots.


Thanks for stopping by!

Blue_Orange

Thursday, July 28, 2011

Glittering Botanicals

Inspiration

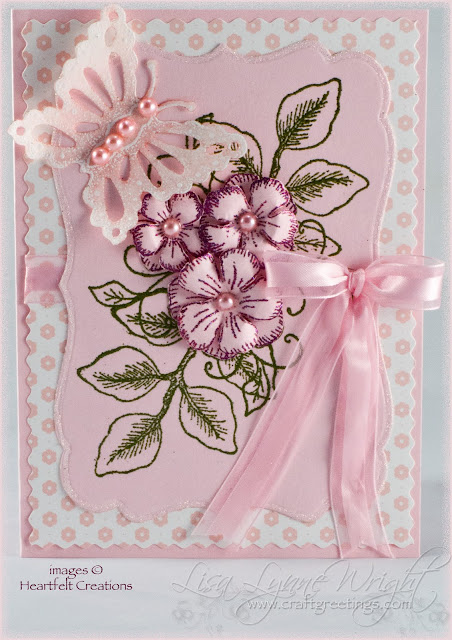
This is the second card I have on the Heartfelt Creations blog this week. It features stamps from the July release - the Botanical Garden Collection. My favorite colors are pink and purple - you see a LOT of pink cards on my blog, you know! And this one has heat-embossed images with lots of sparkle.


Glittering Botanicals


Ingredients


Note: Finished card size is 4 1/2" x 6"


Paper

Pink Pirouette (SU!)6" x 9", scored at 4 1/2", and
4" x 6" (2 peices)
Pink Pirouette patterned paper (SU!)4 1/4" x 5 3/4"
Vellum3" x 3"

Inks

Versamark (Tsukineko)

Stamps

HCPC 3405: Leaf Medley PreCut Set (Heartfelt Creations)
HCPC 3409: Tropical Floral Swirls PreCut Set (Heartfelt Creations)
HCPC 3306: Posy Patch Garden Delights PreCut Set

Accessories

HCD 702: Decorative Butterfly-Border Die (Heartfelt Creations)
Grand Calibur (Spellbinders)
Label 17 Nestabilities (Spellbinders)
Paper Blossoms Tool Kit (McGill)
Shell White Microfine Glitter (Heartfelt Creations)
Burgundy embossing powder (PK Glitz)
Moss Tinsel embossing powder (Creations Unlimited)
White embossing powder (Sweet Stamps)
Heat gun
Quicky glue pen
Adhesive Pearls (Paper Studio)
Ribbon (Michaels)
Bow-Easy
Glue dots
Zip Dry
ATG
Scor-Pal
Rotary trimmer with straight and pinking blades

Instructions

BASE CARD

Cut a piece of solid pink paper, measuring 6" x 9", and score it at 4 1/2" and fold. Cut a piece of patterned paper, measuring 4 1/4" x 5 3/4" using the pinking blade. Mount a strip of pink ribbon across the patterned paper, then mount the patterned paper onto the front of the card.

IMAGE

Cut/emboss a label from solid pink paper, using the second-largest Label 17 die. Use the glue pen to put glue around the embossed edge of the label. Dip it into the microfine glitter and shake off the excess. Stamp the flower image in the middle of the image using embossing ink, and stamp a group of leaves on each side of the flowers. Use the green embossing powder on the entire set of images and heat. Stamp the flower image twice on another piece of pink paper in embossing ink, and heat emboss with burgundy powder. Cut out the 3 flowers from both of the images. Mount one set of the burgundy flowers flat onto matching shapes on the green-embossed image. Mount the image label onto the front of the card.

FINISHING TOUCHES

Use the blossoms tool to distress the other 3 flowers and mount them onto the flowers on the card. Adhere a pink pearl in the middle of each flower. Stamp the butterfly in embossing ink on vellum, and heat emboss with white powder. Use the matching HC die to cut out the butterfly. Mount the center of the butterly (no adhesive on the wings) above the flower. Add more pink pearls on the butterly body. Tie a bow in pink ribbon and adhere it to the right of the flowers.


Thanks for stopping by!


Blue_Orange

Wednesday, July 27, 2011

Wonderful Birthday

Inspiration

It's another Heartfelt Creations Wednesday, and over at the blog you'll find SO many awesome creations by the design team - be sure to visit there to see all the beautiful projects.

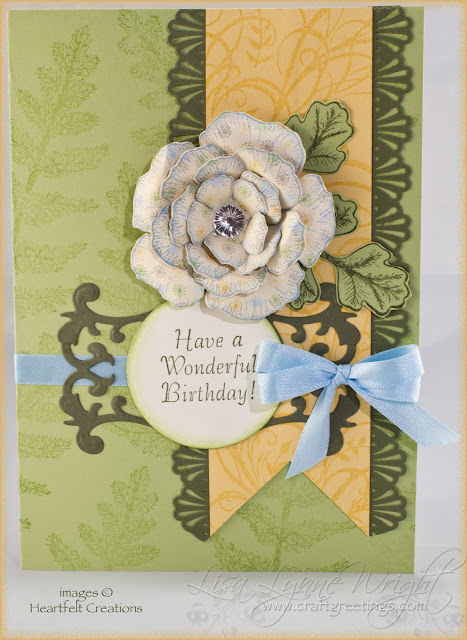
I have 2 cards on the blog today; here's my first one - I'll post the second one tomorrow. This one uses several stamp sets, but features stamps from the July release - the Botanical Garden Collection. It's one of my favorites because the flowers are so versatile.

Wonderful Birthday


Ingredients


Note: Finished card size is 5" x 7"


Paper

Certainly Celery (SU!)7" x 10", score at 5"
Always Artichoke (SU!)1" x 6 1/2" (2 pieces), and
3" x 4"
So Saffron (SU!)2" x 6 1/2"
Very Vanilla (SU!)3" x 4"
Delicate Dots DSP (SU!)4" x 6"

Inks

Certainly Celery (SU!)
Always Artichoke (SU!)
Bashful Blue (SU!)

Stamps

HCPC 3405 Leaf Medley PreCut Set
HCPC 3406 Botanical Floral 1 PreCut Set
HCPC 3407 Botanical Floral 2 PreCut Set
HCPC 3408 Woodland Fern PreCut Set
HCPC 1494 Mini Message 4
HCPC 2255 Large Fancy Flourish PreCut Set

Accessories

Grand Calibur (Spellbinders)
Rose Creations Shapeabilities (Spellbinders)
Foliage Shapeabilities (Spellbinders)
Fancy Tags 3 Shapeabilities (Spellbinders)
Deco Shells Punch (Martha Stewart)
Sponge
Adhesive Rhinestones (Recollections)
Ribbon (Michaels)
Bow-Easy
Zip Dry
ATG
Scor-Pal
Rotary trimmer

Instructions

BASE CARD

Cut a piece of light green paper, measuring 7" x 10", and score it at 5" and fold. Use the Woodland Fern stamp with light green ink to stamp randomly all over the front of the card to create the background.

TRIMMED BANNER

Cut a piece of yellow paper sized 2" x 6 1/2". Use the flourish stamp and yellow ink to stamp the background images on the yellow paper. Cut a triangle notch at one end of the strip. Cut 2 pieces of dark green paper sized 1" x 6 1/2". Punch one edge of each of these with the Deco Shells punch. Attach the punched paper to the outside edges of the yellow banner. Mount this on the right of the card front.

SENTIMENT

Cut and emboss the fancy tag from dark green paper. Cut/emboss another tag from the vanilla paper. Trim the circle from the center of the vanilla tag, and sponge light green ink around the edges of the vanilla circle. Stampt the sentiment on the vanilla circle in dark green ink. Tie a bow using blue ribbon. Mount a strip of ribbon across the lower area of the card, adhere the sentiment tag over the ribbon, then glue the bow on the right of the tag.

FLOWER

Stamp 4 flowers in blue on the designer paper. Cut these out with the matching Rose Creations dies. Stamp the leaf image twice in dark green on light green paper, and cut them out using the matching Foliage die. Adhere the leaves above the tag, then distress the flowers to shape them. Mount the flowers in a stack above the tag, and slightly over the the leaf images. Finish with an sparkly rhinestone sticker in the center of the flower.


Thanks for stopping by!


Blue_Orange

Sunday, July 24, 2011

Memories of an Old Truck

Inspiration

This image always reminds me of my grandfather's old blue truck that always sat in the driveway at his house. Now, his truck was operational - we used it for trips to the store or bank when I was visiting. But it seemed old and rusty, and he would let us climb up in it and pretend to drive when we wanted an adventure. With this card, I was trying to capture the feeling of the old rusty blue truck looms large in my memory.

Old Car

Ingredients


Note: Finished card size is 4 1/4" x 5 1/2"

Paper

Bordering Blue (SU!)4 1/4" x 11"; scored at 5 1/2"
Close to Cocoa (SU!)3" x 4"
Very Vanilla (SU!)3" x 4", and
2" x 3"

Inks

Tim Holtz Distress Ink - Crushed Olive(Ranger)
Tim Holtz Distress Ink - Wild Honey (Ranger)
Tim Holtz Distress Ink - Barn Door (Ranger)
Tim Holtz Distress Ink - Chipped Sapphire (Ranger)
Tim Holtz Distress Ink - Walnut Stain (Ranger)

Stamps

Thoughts of Father (SU!)
Congrats (SU!)

Accessories

Water color brush
Grand Calibur (Spellbinders)
Deckled Rectangle Nestabilities (Spellbinders)
Raffia
Hodgepodge Hardware-Aged Copper (SU!)
ATG (Scotch)
Scor-Pal
Scissors
Rotary Trimmer

Instructions

IMAGE

Cut and emboss a vanilla rectangle, and stamp the car image in brown ink, centered in the rectangle. Using the distress ink pads and the water color brush, paint the image. It doesn't take much water - just touch your damp damp brush onto the ink pad. If you get too much water, just use a paper towel to absorb any extra.

ASSEMBLY

Cut and emboss a brown rectangle - one size larger than the vanilla image panel. Adhere the image panel to the brown rectangle and mount them in the center of the front of the card.
Stamp the sentiment in brown on the small piece of vanilla card stock. Thread a buckle onto a strip of brown raffia and mount this across the bottom of the card. Adnere the sentiment on top of the raffia.


Thanks for stopping by!
Blue_Orange

Thursday, July 21, 2011

Special Day Greeting

Inspiration

Here's a card with minimal stamping, but lots of layers that create a really nice layered effect. And it's really easy to make! The leaf sprig image is from the Heartfelt Creations Leaf Medley stamp set, part of the July release Botanical Garden Collection.


special day


Ingredients


Note: Finished card size is 5" x 5"


Paper

Wild Wasabi (SU!)5" x 10", scored at 5", and
1 1/4" x 1 1/4" (4 pieces)
Soft Suede (SU!)2" x 2", and
3" x 4 1/4" (2 pieces), and
1 3/8" x 1 3/8" (4 pieces)
Very Vanilla (SU!)3" x 3", and
1 7/8" x 1 7/8", and
2" x 2" (4 pieces)
Adhesive Vellum (Generations)3" x 5 1/5"

Inks

Wild Wasabi (SU!)
Soft Suede (SU!)

Stamps

HCPC 3405 Leaf Medley PreCut Set (Heartfelt Creations)
HCPC 3363 Inspire Me Sentiments PreCut Set (Heartfelt Creations)

Accessories

HCD 708: Decorative Window Scene Die (Heartfelt Creations)
Grand Calibur (Spellbinders)
Lacy Squares Nestabilities (Spellbinders)
Stamp-A-Ma-Jig
Ribbon (SU!)
Zip Dry
Foam squares
ATG (Scotch)
Scor-Pal
Rotary Trimmer

Instructions

BASE CARD

Cut a piece of green paper, measuring 5" x 10", and score it at 5" and fold. Cut/emboss the large end of the Decorative die twice, using brown paper. Trim each resulting die cut to keep just the complete curly corner piece - the final result will be 4 decorative flourishes - one for each corner, all the same size. Glue these into the 4 corners of the base card.

LEAF SQUARES

Cut/emboss 4 lacy squares using the smallest die cut and 2" squares of vanilla paper. Cut 4 brown paper squares, measuring 1 3/8" x 1 3/8". Cut 4 green squares measuring 1 1/4" x 1 1/4". Stamp the leaf sprig image in green on each of the green squares. Mount the green squares onto the brown ones, then onto the vanilla lacy squares. Then glue these 4 squares onto the base card, lining them up to form a square about 1" from each side.
Mount a ribbon horzontally across the card, with a knot tied on the right side of the card.

SENTIMENT

Cut a vanilla square measuring 1 7/8" x 1 7/8", and stamp the leaf sprig image in green, positioning it on the left of the square. Cut a square of the same size (1 7/8" x 1 7/8") from the adhesive vellum. Stamp the sentiment in brown ink in the lower left corner of the vellum square. When the ink is dry mount the vellum exactly on top of the vanilla square with the stamped image. Cut/emboss a lacy square using the 3" die and vanilla paper. Mount a brown square (2" x 2") on to the lacy die cut. Mount image/sentiment square onto the brown mat. Add this stack to your card front using foam squares, directly in the center of the card.


Thanks for stopping by!


Blue_Orange

Wednesday, July 20, 2011

Thinking About You

Inspiration

It's Heartfelt Creations Wednesday, and here's a simple card using a couple of sets from the Botanical Garden Collection. The whole collection has so many possibilities for creating beautiful flowers, for any season! Be sure to visit the HC blog - the design team has created some real beauties this week!


Thinking About You


Ingredients


Note: 4 1/2" x 5 3/4"


Paper

Very Vanilla (SU!)4 1/4" x 11, scored at 5 1/5"
Rich Razzleberry (SU!)4 1/2" x 5 3/4"
Old Olive (SU!)3" x 3"
Razzleberry Lemonade DSP (SU!)2" x 2"

Inks

Rich Razzleberry (SU!)
Old Olive (SU!)

Stamps

HCPC 3406 Botanical Floral 1 PreCut Set (Heartfelt Creations)HCPC 3405 Leaf Medley PreCut Set (Heartfelt Creations)HCPC 3383 Cardinal Posy Branch PreCut Set (Heartfelt Creations)

Accessories

Grand Calibur (Spellbinders)
Petite Scalloped Circle - Large Nestabilities (Spellbinders)
SPICA glitter pen (Imagination International)
Adhesive Pearl (Recollections)
Ribbon (Hobby Lobby)
Bow-Easy
Glue Dots
Zip Dry
Scissors
ATG (Scotch)
Scor-Pal
Rotary Trimmer with straight and scalloped blades

Instructions

WINDOW

Cut a sheet of vanilla paper in half length-wise, so your card stock is 4 1/4" x 11". Score at 5 1/2". Fold the card along the scored line. Trim the three open edges of the card with a scalloped blade on the rotary trimmer. Use the second-largest scalloped circle Nestabilities die to cut and emboss a window about an inch below the scored line on one side of the card.

Thinking About You

IMAGE

Stamp the sentiment (from the Cardinal Posy Branch set) in dark pink ink on the inside of the card, so that it shows through the open window. Stamp the flower in dark pink ink on the designer paper, and trim it out closely. Stamp the leaf branch in green ink on green paper and trim it out closely. Mount the branch and the flower inside the card, around the sentiment, again so most of it shows through the window.

ASSEMBLY

Cut a single rectangle from the dark pink cardstock measuring 4 1/2" x 5 3/4". Mount the vanilla card onto this rectangle to create a mat for the scalloped edges of the card, and make the card a bit sturdier. Tie a ribbon around the card front, going through the window at the lower end. Finish up by adding sparkles on the leaves and flower using the clear SPICA pen, and an adhesive pearl in the center of the flower.


Thanks for stopping by!

Blue_Orange

Sunday, July 17, 2011

A Special Birthday & Learning to Airbrush

Inspiration

Today I am in my hometown in Tennessee (a small town near Knoxville), celebrating my Uncle Mark's 90th birthday! He is a thoroughly amazing man - still works out at the local health club daily, researches our family's geneaology, works in his garden, and stays active in the community. We are having a simple family reunion to celebrate this momentus occassion, and I thought I'd share the card I made for this dear uncle of mine!

I am learning to use the COPIC Airbrush System - nothing fancy yet, but I'm really enjoying this new way to "paint". I decided to try something easy - duplicating the brayered or sponged effect of creating a sunset. I saw this card in the gallery of "suen" that inspired me, especially since I have the heron stamp in my stash! Here's the result:


Heron At Sunset

Ingredients


Note: Finished card size is 5" x 7"

Paper

More Mustard (SU!)7" x 10"; scored at 5"
Basic Black (SU!) 4 7/8" x 6 7/8", and
3 1/8" x 5 3/8", and
3 1/8" x 3 1/8"
So Saffron DSP (SU!)4 3/4" x 6 3/4"
Not Quite Navy DSP (SU!)3" x 3"
Not Quite Navy (SU!)2 1/2" x 4"
Stamper's Select White (Paper Trey Ink)3" x 5 1/5"

Inks

Basic Black (SU!)
Versamark (Tsukineko)

Stamps

Heron (Repeat Impressions)
Congrats (SU!)

Accessories

COPIC markers (Imagination International)
COPIC Airbrush System (Imagination International)
Eclipse Art Masking Tape (www.eclipsetape.com)
Grand Calibur (Spellbinders)
Fancy Tags 3 Shapeabilities (Spellbinders)
Clear Embossing Powder (Stampendous)
Heat Gun
Stamp-A-Ma-Jig
ATG (Scotch)
Scor-Pal
Rotary Trimmer

embossed heron

Instructions

IMAGE


Stamp the heron on the eclipse tape, and carefully cut it out. Ink the heron stamp with Versamark ink, followed by the black ink. Stamp the image in the lower center of the white cardstock panel. Heat emboss the image with clear embossing powder.


embossed heron


Put the mask over the image. The cool thing about the Eclipe "tape" is that you can use the masks over & over - you can see I've already used this mask during my practice sessions.


embossed heron


Use a post-it note in a straight line to mask the lower half of the image (this creates the horizon).


embossed heron
My work area looks like this before I start airbrushing. I have a magnetic cutting mat, covered by a teflon craft sheet. Then scrap paper held down with magnets. I use removable adhesive on the back of my image panel to hold it lightly in place, and the post-it notes over the image. In this case, I've even used a little bit of clear tape to hold the post-its together - remember everything blows in the wind of the airbrush. You'll enjoy the whole thing more if you're not worried about losing your work!


embossed heron
The sunset is created by airbrushing 3 colors of COPIC markers, starting with the lightest color. Airbrush the yellow (Y04) right around the heron's head and body - since it is masked, you don't have to worry about messing up the image.

embossed heron


Then, airbrush the YR02 marker on the outer edges of the yellow, all the way to the outer edge of the panel.


embossed heron

Finish up with the YR09 marker, around the outer edges of the card.


embossed heron


To do the water, reverse the post-it note mask - put it over the sky you just created, right along the line created by the sky airbrushing.

embossed heron


I used 3 colors again, and painted lightest to darkest. Starting with the B02 marker, airbrush around the heron's body, then use the B05 marker just outside the light blue, and finish with the B06 marker to the the outer edges of the card. I'm only showing you one round of blue - I think you get the idea!


embossed heron


The final airbrushing is to create the "mountains" on the horizon. To do this, re-mask the water with a post-it note just below the original line. Now, tear a post-it to create a "mountain-shaped" mask, and place it above the water-line mask.


embossed heronUse the E09 marker to heavily color the narrow strip that is uncovered.
embossed heron


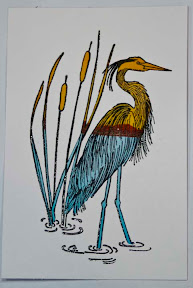
That's it! Remove all the masks and you will see a beautiful scene. Now you can color the heron and the cattails. I used these colors:
  • Heron: C03, C05, YR17
  • Leaves: YG93
  • Cattails: E37

SENTIMENT

Cut and emboss the tag from the solid blue cardstock. Using the stamp positioner, stamp the sentiment across the tag, using the versamark-black ink combination. Heat emboss with clear embossing powder.

ASSEMBLY

Now it's just a matter of mounting all the layers:
  • Black mat layer (4 7/8" x 6 7/8") - mounted on the front of the base card
  • Yellow patterned background layer : 4 3/4" x 6 3/4" - mounted on the black mat
  • Horizontal black mat: 3 1/8" x 3 1/8" - mounted 1 1/2" from the top, and 3/8 from the left
  • Blue patterned mat: 3" x 3" - mounted onto the black horizontal mat
  • Image black mat: 3 1/8" x 5 3/8" - mounted 1/2" from the top, and 4" from the right
  • Image: mounted on the image black mat
  • Sentiment: mounted at the bottom of the card front, centered

Final Thoughts

So, I hope you are all having a good Sunday, and give airbrushing a try if you get the chance! And, of course, if you have a minute, say a happy 90th birthday to my Uncle Mark!


Thanks for stopping by!
Blue_Orange

Thursday, July 14, 2011

Summer Botanicals

Inspiration

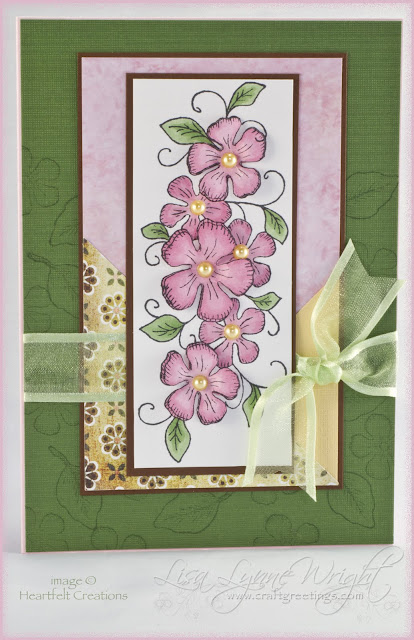
Here's another creation using the new Heartfelt Creations release, the Botanical Garden Collection. This one is part of yesterday's feature on the blog at Heartfelt Creations. Remember, too, that HC is giving away one whole collection of the Botanical Garden Collection - just leave a comment on my post yesterday, or the Heartfelt Creations blog by July 19. The winner will be announced next Wednesday, July 20, on the blog.
The layout for this card is based on the Splitcoast Sketch Challenge #335.


Summer Botanical

Ingredients

Paper

Pink Pirouette (SU!)7" x 10"; scored at 5"
Green Textured Cardstock (DCWV)4 7/8" x 6 7/8"
Brown cardstock (Kaiser Craft)2 1/8" x 5 1/8", and
3 1/2" x 5 3/4"
Barely Banana Textured Cardstock (SU!)3" x 3"
Pink Sponged designer paper (Paper Pizzazz)3 3/8" x 5 5/8"
Flower print designer paper (Kaiser Craft)3 3/8" x 3 3/8"
Stamper's Select White (Paper Trey Ink)2" x 5" (2 pieces)

Inks

Memento Tuxedo Black (Tsukineko)
Garden Green (SU!)

Stamps

Leaf Medley PreCut Set (Heartfelt Creations)
Botanical Floral 2 PreCut Set (Heartfelt Creations)
Tropical Flower Swirls (Heartfelt Creations)

Accessories

Paper Blossoms Tool Kit (McGill)
COPIC markers (Imagination International)
Adhesive Brads (Recollections)
Ribbon (Hobby Lobby)
Zip Dry
ATG (Scotch)
Scissors
Scor-Pal
Rotary Trimmer

Instructions

IMAGE

Stamp the floral image in black ink on a white panel measuring 2" x 5". Stamp it again on additional white paper, and trim out the 3 largest blooms. Color with COPIC markers: Petals (R81, R83), Leaves (G21, G24). Mount the white panel onto a brown panel measuring 2 1/8" x 5 1/8".

BACKGROUND MAT

Cut a piece of green textured cardstock measuring 4 7/8" x 6 7/8", and stamp the smallest single flower stamp from the Botanical Floral set, and a leaf from the Leaf Medley set randomly over the bottom 3/4 of the panel using green ink.

ASSEMBLY

In the center of the green panel, mount a brown panel measuring 3 1/2" x 5 3/4". Top that brown panel with the pink "sponged" paper, measuring 3 3/8" x 5 5/8". Cut a 3" square from the light yellow paper, and cut it in half diagonally. Mount one triangle of yellow in the lower right corner of the brown panel. Cut a 3 3/8" square from the flower print paper, cut it diagonally, and mount a triangle in the lower left corner of the brown panel. Wrap a ribbon around the green cardstock and tie a knot on the right side just over the yellow triangle. Cut your base card from the pink cardstock, measuring 7" x 10", score it at 5", and fold on the score. Mount the green "stack" to the front of your card. Add the brown matted image in the center of the card front over the ribbon. Distress the individual flower cut-outs using a stylus from the Paper Blossom toolkit, and mount them onto the matching flowers using Zip-Dry. Finish the card by adding an adhesive pearl in the center of all 5 flowers.


Thanks for stopping by!Blue_Orange

Wednesday, July 13, 2011

Heartfelt Creations New Release - Botanical Garden

NEW RELEASE!

YEA! A new release from Heartfelt Creations, and it is a BEAUTY and you're going to have lots to do with this one! The Botanical Garden Collection features 5 new precut stamp sets that coordinate with existing Spellbinder Rose Creations and Spellbinder Foliage Shapeabilities sets.
AND, to celebrate the release, Heartfelt Creations is giving away one entire release set, valued at $75.00 to one lucky person!!! To enter, just leave a comment on this post or the Heartfelt Creations blog by July 19. The winner will be announced on the HC blog on next Wednesday, July 20. Be sure to visit the HC blog to see ALL the creations from the design team - so many great ideas!

Inspiration

I'm a cardmaker - everything else I do with paper is a venture into unusual territory for me. I've found one of the best ways to try something out is to use a template - I spend a good bit of time searching for templates I like, then for samples of the template being used. Here's a paper basket I created using a template from Lauren Meader at Paper Trey Ink, called "Pretty Petal Pocket". It is VERY easy to use, and produces a really pretty result, and of course, even prettier with the flowers from Heartfelt Creations.


Botanical Basket

Ingredients

Paper

Solid green Paper (American Crafts)12" X 12"
Green/Blue plaid paper (American Crafts)12" X 12"
Stamper's Select White (Paper Trey)4 1/4" x 5 1/2"

Inks

Marina Mist (SU!)
Old Olive (SU!)

Stamps

Botanical Floral 1 PreCut Set (Heartfelt Creations)
Botanical Floral 2 PreCut Set (Heartfelt Creations)

Accessories

Grand Calibur(Spellbinders)
Rose Creations Shapeabilities(Spellbinders)
Paper Blossoms Tool Kit (McGill)
Pretty Petal Pocket template (My Timeless Templates at Paper Trey Ink)
SPICA Glitter Pens (Imagination International)
Gold brad (Paper Studio)
Ribbon (Hobby Lobby)
Bow-Easy
Glue Dots
Zip Dry
ATG
Scissors
Paper Piercer
Scor-Pal

Instructions

FLOWER

Stamp the 3 large flowers from the floral set 1, and the largest flower from floral set 2 in blue on the white paper. Stamp 4 copies of the largest leaf, and 2 copies of the medium leaf in green on the white paper. Cut out the four flowers and all the leaves using the matching dies from the Rose Creations die set. Using the largest stylus from the tool kit, distress the back of the flower petals on all 4 flowers. Add a little sparkle to the flower with blue SPICA pen, and to the leaves with a green SPICA.

BASKET

Cut the basket from green paper using the template, including the "tulip panel" and handles. It simplifies matters to attach the template to the paper using temporary adhesive, then just cut through both layers - no pencil marks to erase, and a perfect cut! Cut out the decorative mat layers from the patterned paper using the template pieces.
Assemble using the ATG or your favorite adhesive. Before attaching the tulip panel on the front, use the paper piercer to punch a hole in the middle of the front panel. Adhere the leaves in groups of 3 on two sides of the center hole. Stack the flowers, and put the brad through the center hole, then through your punched hole in the basket. Attach the panel to the front of the basket. Finish with a bow tied from green ribbon attached to the middle of the handle over the flower.

Reminder

Remember to get your chance to win the whole collection of Botanical Garden stamps - just leave a comment on this post or the Heartfelt Creations blog by July 19.


Thanks for stopping by!Blue_Orange

Sunday, July 10, 2011

Extreme Surfer Birthday

Inspiration

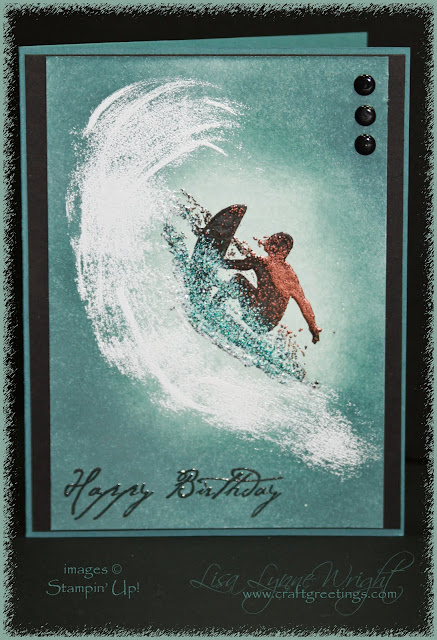
I CASEd this last year from a card by "peggy-sue" on Splitcoast Stampers. It's a masculine birthday card, perfect for summer birthdays, and I've sent this one in other seasons too - I keep coming back to it and making another one!

Extreme Surfer Birthday

Ingredients

Note: Finished card size is 4 1/4" x 5 1/2"

Paper

Baja Breeze (SU!)5 1/2" x 8 1/2", scored at 4 1/4"
Basic Black (SU!)4 1/8" x 5 3/8"
Whisper White (SU!)3 3/4" x 5 3/8"

Inks

Black pigment ink (Color Box)
Versamark (Tsukineko)
Sky Blue (SU!)
Baja Breeze (SU!)

Stamps

Extreme Surfer (SU!)
Birthday Greetings (SU!)

Accessories

Clear embossing powder (Stampendous)
Turquoise embossing powder (PSX)
Copper embossing powder (PSX)
White embossing powder (Sweet Stamps)
Heat gun
Sponges
Small black brads
Scor-Pal
ATG 714 (Scotch)
Rotary Trimmer

Instructions

Surfer Image

Stamp the surfer in the center of the white cardstock using the black pigment ink. Sprinkle copper powder on the right side of the image, turquoise powder across the bottom of the image, and clear powder overall to cover any remaining areas. Emboss it with the heat gun. Using a sponge, apply Sky Blue ink all over the white card stock. Now, sponge in some Baja Breeze in to create some dimension in the colors. To create the water, sponge Versamark ink in a "wave" shape around the surfer. Apply white embossing powder, and heat.

Sentiment

Stamp the sentiment in the lower left corner, using black pigment ink, and heat emboss with clear powder.

Assembly

Place 3 black brads vertically aligned in the upper right corner of the image panel. Adhere the image panel to the black mat - I cut this one a little differently; instead of a centered image with black all the way around, I made the image panel and the mat the same length, and left wider margins on the left and right. Mount the matted image on the card.

Thanks for stopping by!

Blue_Orange

Friday, July 8, 2011

Cheery Cherries

Inspiration

Here's a "get well soon" card featured on the Heartfelt Creations blog. It uses stamps from the Springtime Cardinal Collection, but no birds in this one! Just some "cheery cherries"...

Cheery Cherries

Ingredients

Note: Finished card size is 4 1/4" x 5 1/2"

Paper

Dotted Swiss green (Bazzil Basics)4 1/4" x 11"; score it at 5 1/2"; and
3" x 4 1/4"
Cranberry plaid (CTMH)3 3/4" x 5"
Real Red (SU!)4" x 5 1/4"
X-Press It Blending Card (Imagination International)3" x 4"

Inks

Memento Tuxedo Black (Tsukineko)

Stamps

HCPC 3387 Luscious Cherry Swirls PreCut Set

Accessories

Grand Calibur (Spellbinders)
Beaded Ovals Nestabilities (Spellbinders)
COPIC Markers (Imagination International)
Sponge
Scor-Pal
ATG 714
Rotary Trimmer

Instructions

Image

Cut and emboss a white oval using the second-largest Beaded Oval Nestabilities die. Lightly sponge red ink around the edges of the oval. Stamp the cherries image in black in the middle of the oval. Color the cherries with COPICs (R21, R24, R29, YG91, YG93, YG95).

Image Mat and Sentiment

Cut a solid red rectangle (4" x 5 1/4"), a plaid rectangle (3 3/4" x 5"), and a green rectangle (3" x 4 1/4"). Adhere them together to form the mat. Stamp the sentiment in black in the center of the bottom area of the green rectangle. Tie a red ribbon around the stack, using the single knot as decoration. Mount the image oval over the ribbon.

Assembly

Cut the base card from the green card stock, measuring 4 1/4" x 11", and score it at 5 1/2". Mount the image stack centered on the front of the card.

Thanks for stopping by!
Blue_Orange

Thursday, July 7, 2011

Sunshine Wishes

Inspiration

Here's a quick and easy card that works for a birthday or a "hi" for a friend. It's featured on the Heartfelt Creations blog.

Sunshine Wishes

Ingredients

Note: Finished card size is 3 3/4" x 5 1/2"

Paper

Kraft (SU!)3 3/4" x 11"; score it at 5 1/2"
Apricot Appeal (SU!)4 1/4" x 5 1/2"
Delicate Dots DSP (SU!)2" x 2 1/2"

Inks

Peach Parfait (SU!)
Chocolate Chip (SU!)

Stamps

HCPC 2242: Innoscents Flowers 2 PreCut Set
HCPC 2241: Innoscents Flowers 1 PreCut Set
HCPC 3319 Simple Filler Stems PreCut Set

Accessories

Grand Calibur (Spellbinders)
Blossom 2 Nestabilities (Spellbinders)
Paper Blossoms Tool Kit (McGill)
Corner rounder punch (SU!)
Adhesive gems (Recollections)
Scor-Pal
ATG 714
Zip Dry
Scissors
Rotary Trimmer

Instructions

Flower

Stamp 3 flowers in dark orange ink on the light orange paper. Cut these out using the matching Blossom 2 Nestabilities dies. Clip between the petals. Use the largest stylus from the Paper Blossoms toolkit to distress and curl the petals, rolling the tool on the back of the flowers on a soft surface. Adhere the flowers into a stack using glue. Finish up the flower with a matching adhesive gem in the center.

Assembly

Start the Kraft card stock, measuring 3 3/4" x 11", and score it at 5 1/2". Fold the card along the score line, and use a punch to round the lower corners. Stamp the sentiment in the lower right corner using brown ink. Cut a piece of designer paper measuring 2" x 2 1/2", and round 2 corners. Mount the designer paper in the upper left area of the card, leaving a margin at the top. Mount the flower in the center of the designer paper.

Thanks for stopping by!

Blue_Orange

Wednesday, July 6, 2011

Tri-Shutter Wedding Card

Inspiration

It's "Heartfelt Wednesday", and I have a wedding card and some fun summery cards on today's blog post at Heartfelt Creations. Today, I'll show you the wedding card, and the details for the additional cards will be posted tomorrow and Friday. Be sure to visit the HC blog for lots of beautiful creations by our design team members - they are such a talented group!

The wedding card uses several stamps from the Heartfelt Wedding Collection, including the HCPC 3403 Shabby Chic Lace stamp, which when embossed creates a beautiful delicate pattern. This is a tri-shutter card - a fun card to make with a very impressive result. I have a template below, or you can check out the tutorial at Splitcoast Stampers. TriShutter Wedding

Ingredients

Note: Finished card size is 4 1/4" x 5 1/2"

Paper

Sparkling Merlot Metallic (Wassau)5 1/2" x 12"
Vellum8 1/2" x 11"
Pink Pirouette (SU!)5 1/2" x 8 1/2"
Stamper's Select White (Paper Trey Ink)2" x 4"

Inks

White Dye Ink for Parchment Crafting (Sweet Stamps)
Purely Pomegranate (SU!)

Stamps

HCPC 3400 Bella Rosebuds PreCut Set
HCPC 3403 Shabby Chic Lace PreCut Set
HCPC 3404 Wedding Sentiment PreCut Set

Accessories

Grand Calibur (Spellbinders)
Labels 4 Nestabilities (Spellbinders)
Labels 4 Small Nestabilities (Spellbinders)
Fancy Tags Nestabilities (Spellbinders)
White embossing powder (Sweet Stamps)
Heat gun
Gelly Roll pens (Sakura)
Adhesive gems (Recollections)
Scor-Pal
ATG 714
Scissors
Rotary Trimmer

Instructions

Base Card

Trishutter Template

Start with a piece of metallic card stock, measuring 5 1/2" x 12". Using a scoring tool, line up the long side of the paper at the top of the scoring board, and score at 2", 4", 8", and 10". Now, measure in 1 1/2" along the score lines, and cut from the 2" score line to the 10" score line. Repeat this cut on the other side of the base card.

Trishutter Top View

To create the trishutter fold, the top and bottom strips are folded differently than the center strip of the card. For the top and bottom strips, the 2" and 8" scores are "mountain" folds, and the 4" and 10" scores are "valley" folds. For the center strip, leave the 2" and 10" scores flat, do a mountain fold on the 4" score, a valley fold on the 8" score. Here's a top view of the card that should help all this make sense.

Lace Trim

Stamp and emboss the lace stamp on vellum paper using white ink and white embossing powder. You will need 3 copies of the lace image. From the bottom edge of the lace images, measure up 1 1/2" , and cut straight across the lace. Trim these pieces to match the upper panels of the card (2 pieces 2" long, and 1 piece 4" long). Cut the upper edge of the lace around the points, and through the curves below each point, creating a "swag" effect. Trim these pieces to match the upper panels of the card (2 pieces 2" long, and 1 piece 4" long). Mount the lace images on the upper and lower panels of the card.

Images

Cut and emboss 2 labels from pink paper using the largest standard Label 4 Nestabilities die from pink paper. Cut and emboss a single label from pink paper using the largest Label 4 Small Nestabilities die. On each of the two larger labels, stamp the rose bud image in the dark pink ink. Color with Gelly Roll pens (I used Green, Rose Star, and Clear Star). Add gems in the center of the small flowers. On the smaller label, stamp the sentiment in the dark pink ink.

ASSEMBLY

Mount the rose bud labels on the first and third panels of the center strip, and the sentiment on the middle panel. Stamp the "special couple" sentiment in dark pink on white cardstock, and cut and emboss it with the Fancy Tag Nestabilities, and adhere it to the lower portion of the front image label.

Thanks for stopping by!
Blue_Orange

Sunday, July 3, 2011

Strawberry Summer

Inspiration

Hello, and happy Independence Day one day early! What says "summer" and "celebration" and "picnic" better than some yummy strawberries? Here is a "yummy" image to keep you in that summer holiday state of mind.

Summer Strawberries

Ingredients

Note: Finished card size is 4 1/4" x 5 1/2"

Paper

Handsome Hunter (SU!) 5 1/2" x 8 1/2", scored at 4 1/4"
Real Red (SU!) 2" x 3" (2 pieces)
Stamper's Select White (Paper Trey Ink) 4 1/4" x 5 1/2"

Inks

Tuxedo Black (Memento)
Handsome Hunter (SU!)
Real Red (SU!)

Stamps

Strawberries Stamp Set (Flourishes)
Short & Sweet (SU!)

Accessories

COPIC Markers (Imagination International)
Grand Calibur (Spellbinders)
Deckled Rectangle Nestabilities (Spellbinders)
Sponge
Ribbon (Hobby Lobby)
Bow-Easy
Scor-Pal
ATG 714 (Scotch)
Rotary Trimmer with straight and deckled blades


Instructions

Image

Cut and emboss a white deckled rectangle using the Nestabilities die, and your die cut machine. Stamp the image in black, centered in the rectangle. Sponge green ink around the edges of the rectangle.

Stamp the image again on the remaining white paper. Carefully cut out the 3 large strawberries, the 3 large leaves, and 3 flowers.

Color the image and the individual elements with COPIC markers. Here are the colors I used:

  • Leaves: G21, G34
  • Berries: R21, R24
  • Flowers: Y11, Y17

Assembly

Using the deckle blade on the paper trimmer, cut two red rectangles. Sponge red ink around the edges of both rectangles. Stamp the sentiment in black in the lower portion of one of the rectangles.

Cut, score, and fold the green base card. Mount the red rectangle with no sentiment in the upper left corner, and the red rectangle with the sentiment in the lower right corner. Add a strip of ribbon vertically across the left rectangle, and tie a matching bow.

Mount the image centered on the front of the card, above the sentiment. Adhere the bow just below the image.

Have a safe, happy holiday weekend and remember to take a few minutes to express your gratitude for all the privileges of living in a free country like no other on earth. And thanks for stopping by!

Blue_Orange

LinkWithin

Blog Widget by LinkWithin