Showing posts with label Paper Trey Ink. Show all posts

Sunday, April 1, 2012

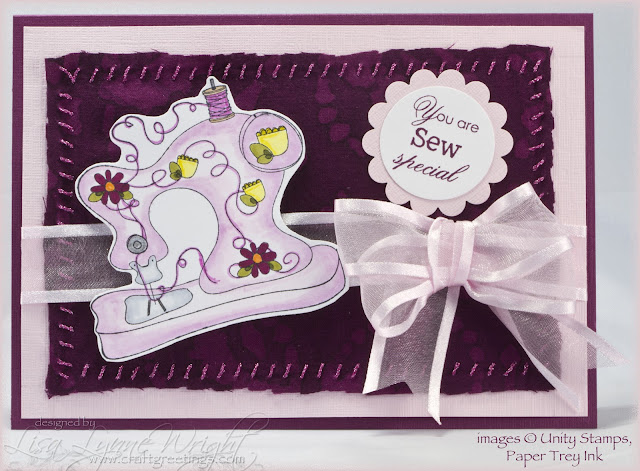
Sew Special

Inspiration

Happy April Fool's Day! The only joke here is that this card is the closest I ever get to sewing (My friend, Helen, can attest...). I made this card for the March birthday of my cousin who is a wonderful seamstress, and such a very special person.

SewSpecial

Ingredients

Note: Finished card size: 5" x 7"

Paper

Rich Razzleberry (SU!)7" x 10", scored at 5"
Pink Pirouette textured (SU!)4 7/8" x 6 7/8", and
2" x 2"
Stamper's Select White (Paper Trey Ink)4" x 4", and
2" x 2"

Ink

Memento Tuxedo Black (Tsukineko)
Rich Razzleberry (SU!)

Stamps

Sew Cute (Unity)
Heartfelt Basics (Paper Trey Ink)

Accessories

COPIC markers (Imagination International)
SPICA (Imagination International)
Fabric (Joann)
SewEasy (We R Memory Keepers)
Sew Easy Fancy Floss (We R Memory Keepers)
Ribbon (Hobby Lobby)
Peg Bow Maker (UNITY)
1 3/8" Circle Punch (SU!)
Scalloped Circle Punch (SU!)
3-D Foam Squares (Scrapbook Adhesives)
Clear tape (3M)
ATG (3M)
Rotary Trimmer (Fiskars)

Ingredients

BASE CARD

Cut a piece of dark purple card stock measuring 7" x 10", score it at 5", and fold.

MATS

Cut a piece of pink card stock measuring 4 7/8" x 6 7/8". Cut a piece of fabric about 4 1/4" x 6 1/4". Use the Sew Easy tool to punch holes through the paper about a 1/2" from the edge. Attach the fabric to the pink mat stitching through the holes in the pink mat, and using tape to anchor the thread to the back of the mat. Tie a double-loop bow onto a strip of ribbon, and mount it around the mat. Mount the mat onto the front of the card.

IMAGE

Stamp the sewing machine using black ink on white paper. Color with COPICS and SPICA pens. I used these colors:

  • Sewing Machine: RV0000, RV63, RV66
  • Presser Foot: C00, C3
  • Spool: E33
  • Thread: SPICA Pink
  • Daisies: RV69, SPICA Orange
  • Tulips: Y02
  • Leaves: YG95, 99

Mount on the front of the card using foam squares.

SENTIMENT

Stamp the sentiment on white paper using dark purple ink. Punch out with a 1 3/8" circle punch. Punch a scalloped circle from pink card stock. Glue the sentiment onto the scalloped circle. Mount on the front of the card using foam squares.

Thanks for stopping by!

Orange_Green

Wednesday, July 13, 2011

Heartfelt Creations New Release - Botanical Garden

NEW RELEASE!

YEA! A new release from Heartfelt Creations, and it is a BEAUTY and you're going to have lots to do with this one! The Botanical Garden Collection features 5 new precut stamp sets that coordinate with existing Spellbinder Rose Creations and Spellbinder Foliage Shapeabilities sets.
AND, to celebrate the release, Heartfelt Creations is giving away one entire release set, valued at $75.00 to one lucky person!!! To enter, just leave a comment on this post or the Heartfelt Creations blog by July 19. The winner will be announced on the HC blog on next Wednesday, July 20. Be sure to visit the HC blog to see ALL the creations from the design team - so many great ideas!

Inspiration

I'm a cardmaker - everything else I do with paper is a venture into unusual territory for me. I've found one of the best ways to try something out is to use a template - I spend a good bit of time searching for templates I like, then for samples of the template being used. Here's a paper basket I created using a template from Lauren Meader at Paper Trey Ink, called "Pretty Petal Pocket". It is VERY easy to use, and produces a really pretty result, and of course, even prettier with the flowers from Heartfelt Creations.


Botanical Basket

Ingredients

Paper

Solid green Paper (American Crafts)12" X 12"
Green/Blue plaid paper (American Crafts)12" X 12"
Stamper's Select White (Paper Trey)4 1/4" x 5 1/2"

Inks

Marina Mist (SU!)
Old Olive (SU!)

Stamps

Botanical Floral 1 PreCut Set (Heartfelt Creations)
Botanical Floral 2 PreCut Set (Heartfelt Creations)

Accessories

Grand Calibur(Spellbinders)
Rose Creations Shapeabilities(Spellbinders)
Paper Blossoms Tool Kit (McGill)
Pretty Petal Pocket template (My Timeless Templates at Paper Trey Ink)
SPICA Glitter Pens (Imagination International)
Gold brad (Paper Studio)
Ribbon (Hobby Lobby)
Bow-Easy
Glue Dots
Zip Dry
ATG
Scissors
Paper Piercer
Scor-Pal

Instructions

FLOWER

Stamp the 3 large flowers from the floral set 1, and the largest flower from floral set 2 in blue on the white paper. Stamp 4 copies of the largest leaf, and 2 copies of the medium leaf in green on the white paper. Cut out the four flowers and all the leaves using the matching dies from the Rose Creations die set. Using the largest stylus from the tool kit, distress the back of the flower petals on all 4 flowers. Add a little sparkle to the flower with blue SPICA pen, and to the leaves with a green SPICA.

BASKET

Cut the basket from green paper using the template, including the "tulip panel" and handles. It simplifies matters to attach the template to the paper using temporary adhesive, then just cut through both layers - no pencil marks to erase, and a perfect cut! Cut out the decorative mat layers from the patterned paper using the template pieces.
Assemble using the ATG or your favorite adhesive. Before attaching the tulip panel on the front, use the paper piercer to punch a hole in the middle of the front panel. Adhere the leaves in groups of 3 on two sides of the center hole. Stack the flowers, and put the brad through the center hole, then through your punched hole in the basket. Attach the panel to the front of the basket. Finish with a bow tied from green ribbon attached to the middle of the handle over the flower.

Reminder

Remember to get your chance to win the whole collection of Botanical Garden stamps - just leave a comment on this post or the Heartfelt Creations blog by July 19.


Thanks for stopping by!Blue_Orange

Sunday, May 1, 2011

Invitation to High Tea

Something New

I’ve had a few requests to see a gallery of my cards, so I’ve added a gallery page here on my blog with a slideshow of card photos.  I’ll be added to the gallery over time, including some cards I made a long time ago, but have never blogged.  Hope you’ll check it out, and let me know what you think.  Now for today’s card.

Inspiration

It seems tea parties are the theme of choice for wedding showers – I’ve had two orders for wedding shower invites this year – both were for tea parties.  This one is a little more formal than the first – the shower is a small gathering for High Tea.  Here’s the design.

Tea Party Invite

Ingredients

Note: Finished Card Size: 4 1/4" x 5 1/2" (A2 size)

Paper

Blush Blossom (SU!) 4 1/4” x 11”, scored at 5 1/2”
I Do Hydrangeas
Patterned Paper (American Crafts)
4 1/4” x 5”
Sage Shadow (SU!) 1/2” x 3 5/8”, and
4" x 4 1/4"
Whisper White (SU!) 3/8” x  3 1/2”

Inks

Memento London Fog (Tsukineko)
Sage Shadow (SU!)

Stamps

Floral Tea (Mark's Finest Papers)
Tea for Two Additions (Papertrey Ink)

Accessories

Edge punch (EK Success)
Glossy White Acrylic Paint (PLAID)
Small paint brush
Labels 10 Nestabilities (Spellbinders)
Grand Calibur (Spellbinders)
Ribbon (Mark's Finest Papers)
Bow-Easy
Markers – Sage Shadow, Blush Blossom (SU!)
Corner Rounder Punch (SU!)
Glue dots
Scissors
Scor-Pal
ATG 714 (Scotch)
Craft knife (Xacto)
Rotary Trimmer (Fiskars)

Instructions

Base Card

Score and fold the base card.  Use the corner-rounder punch to round the two corners on the folded edge of the card.

Use the edge punch to punch across both the front and back of the open end of the card.  I punched both at the same time so the edges line up.  Using the white acrylic paint and paint brush, paint the edge of the card just to where the embossed pattern from the punch starts.  Paint the edge on the inside of the card, too.  Set aside to dry.

Images & Sentiment

Stamp the teapot and the cup on white paper, using the gray ink.  Use the SU markers in matching colors to color the flower and leaves on the stamped images.  Carefully cut out both images. While I always use scissors to do the majority of detailed cutting, I used a craft knife to get the open space started inside the handles of both images, and finished up with tiny snips of the scissors.

Assembly

Cut a "placemat" from the patterned paper, using the Label 10 die. Mount it on the upper portion of the card front.  Add the teapot and cup, leaving space in the upper left corner of the mat.

Tie a bow and attach it using glue dots.

Add the sentiment below the mat.

Final Notes

Inside the card, I created another mat, using the solid sage-colored cardstock.  I punched the four corners of the mat to continue the theme, and mounted it inside.

Then, I printed the details in gray for the invitation on white cardstock, and cut it to fit.  I rounded the corners on this piece, as well and added it on top of the green mat.

Thanks for stopping by!

Blue_Orange

Sunday, March 27, 2011

Tea Party Invite “Reject”

Inspiration

Another late night post, but still on Sunday!  In my last post, I told you about the tea party invitation order I was working on – I’ve spent most of the last 24 hours completing those 57 cards, and I’m finally done (yea!).  The post last Wednesday was the card design that was chosen by the shower hostess.  Here’s the other design I did in the same paper that I will use in different colors for some other occasion.  It uses a new dies I picked up at a stamp show in January – they are called “Geo-Dies”.  They are really intricate dies that, after cutting out the pattern, you fold part of the die cut to create a really beautiful result.

20110327_TeaPartyInviteReject_Outside

Remember, I also needed to create a pocket on the inside for a recipe card.  Here’s the inside, which also uses a Geo-Die.

20110327_TeaPartyInviteReject_Inside 

Ingredients

Note: Finished card size is 4 1/4” x 5 1/2”

Paper

Green #3 Textured Cardstock(DCWV):  12” x 12”, cut and scored to pattern below
Lavender Lace (SU!):  1” x 3 1/2”, and 3 1/2” x 3 1/2” (for inside)
Playful Heart Shimmer Glitter paper (Heidi Grace):  4” x 4”, cut with scallop blade
White Silver Metallics (Wausau):  4” x 4”, and 3” x 6” (for inside)
Stamper's Select White (PaperTrey Ink):  4” x 4”, and 3/4” x 3 3/4”

Inks

Lavender Lace (SU!) Versamark (Tsukineko)

Stamps

Tea for Two (Paper Trey Ink) Floral Tea (Mark's Finest Papers)

Accessories

COPIC Markers (Imagination International) Bow-Easy
Geo Dies(Pop-Ups, Etc.) Grand Calibur (Spellbinders)
Dandelion Green Ribbon (Lasting Impressions) Heat Gun
Silver embossing powder (Sweet Stamps) Glue Dots
Geo-Dies((POP-UPs, Etc.) Scissors
Adhesive Transfer Gun 714 (Scotch) Scor-Pal
Rotary trimmer with scallop and straight blades (Fiskars)

Instructions Pattern

Base Card

Since the cardstock is 12" x 12", I was able to get 2 cards out of each sheet. However, cutting it out was a little tricky – I needed to create the inside pocket.  Here’s the pattern I used.  

To create the pocket, simply put adhesive along the left edge of the triangle, and fold the triangle up along the score line.  This will adhere the pocket along the outside edge of the card.

Images

Stamp the tea pot and tea cup images with embossing ink on the white card stock, and emboss with silver powder. Color the images with COPIC markers. I kept it very simple, and only used V20, YG25, and E31.

Cut a small strip of white paper using the scalloped blade, measuring 3/4” x 3 1/4”, and stamp the sentiment in lavender on it.

Assembly

Cut a circular pattern in silver using the Geo-Die, and fold per the directions.  Cut the long patterned paper in silver, and fold.

Mount the scalloped patterned paper square on the front of the card, followed by the circular die cut.  Mount the trimmed tea pot in the center of the silver die cut. Tie a pretty green bow, and add it using a glue dot.

Mount a solid lavender panel below the bow, and add the white sentiment strip on it.

Mount a lavender triangle on the pocket, and then add the long silver die cut so that it covers both the edge of the triangle and the edge of the pocket.  Add the teacup image on top.

Invitation 

For the invitation text, I again printed the information in purple ink using the computer and mounted it facing the pocket.

Thanks for stopping by!

Coral_Purple_Sign

Thursday, March 24, 2011

Tea Party Shower Invitation

Inspiration

Well it is technically Thursday morning, but this is my Wednesday post, since I’ve been awake since about 5 AM Wednesday morning.  This is a project I've been working on for a friend whose niece is getting married. My friend is hosting the bridal shower for almost 60 people(!!!!) and she asked me to make the invitations. I'm posting this before I get them all made - they are due 3/28, so you know what I'll be doing the next few days (LOL!)

Here are the parameters she gave me for the project:

  • The bride's colors are lavender, citron green, and silver
  • The shower theme is a tea party
  • They wanted to enclose a blank recipe card so each guest could bring it to the shower filled out with a favorite recipe

In choosing my materials, oddly enough I started with the ribbon! I found the silky citron green ribbon half price at the Stamp Scrap Art Tour in Mesquite, TX, in January. From there I found paper at Joann's that was as close a match to the ribbon as I would EVER thought I could find. The lavender paper is also from Joann's - it has shiny little hearts in the pattern that make it perfect for a bridal shower. I did two different card designs - I'll post the "reject" some other time. Here's the design that the hostess chose.

20110323_TeaPartyInvite_Outside

Ingredients

Note: Finished card size is 4 1/4” x 5 1/2”

Paper

Green #3 Textured Cardstock(DCWV):  5 1/2” x 11”, scored at 1”, 5 1/8”, and 9 3/8”
Green #3 Textured Cardstock(DCWV):  3 5/8” x 3/4”
Whisper White (SU!):  3” x 3”
Playful Heart Shimmer Glitter paper (Heidi Grace):  5 3/8” x 4”
Playful Heart Shimmer Glitter paper (Heidi Grace):  5 3/8” x 1 1/2”
Playful Heart Shimmer Glitter paper (Heidi Grace):  5 3/8” x 3/4”
Champagne Pearl Mettalics (Wausau):  3” x 3”
White Silver Mettalics (Wausau):  5 3/8” x 1 1/4”

Inks

Basic Gray (SU!) Lavender Lace (SU!)
Versamark (Tsukineko)

Stamps

Tea for Two (Paper Trey Ink) Tea for Two Additions(Paper Trey Ink)
Basket Full of Fun (SU!)  

Accessories

Dandelion Green Ribbon (Lasting Impressions) Bow-Easy
Tea for Two dies (Paper Trey Ink) Cuttlebug (Provo Craft)
Silver embossing powder (Sweet Stamps) Heat Gun
Edge punch (Martha Stewart) Foam Tape
Glue dots Scissors
Scor-Pal Adhesive Transfer Gun 714 (Scotch)
Markers: Lavender Lace, Sunshine Yellow, Pink Pirouette, Certainly Celery (SU!)
Rotary trimmer with deckle and straight blades (Fiskars)

Instructions

Base Card

Since the cardstock is 12" x 12", I was able to get 2 cards out of each sheet, 20110323_TeaPartyInvite_Trimmedjpgwith a 1" strip for extra use - like the mat for the sentiment.

After cutting and scoring the base green card, mount the purple pieces onto the three sections of the card, leaving the back panel open.

Punch the strip of silver paper along one edge, and adhere it to the underside of the the top panel.

20110323_TeaPartyInvite_InsideFold the card along the score lines. Add adhesive on the outer edges of the narrow front panel, and fold it inward. This forms the pocket to hold the recipe card.


Images

Stamp the tea party images with embossing ink on the Champagne card stock, and emboss with silver powder. Stamp the flowers in the middle of the teapot image in gray, and color the flowers with markers. Using the matching dies, cut out the teapot and teacup using the die cut machine; cut the remaining images out by hand.

Stamp sentiment for the front of the card in purple on the small white strip, and mount it on the small green paper mat.

Assembly

The assembly goes quickly at this point - arrange the tea party images on the front (except the sugar bowl), and attach with foam tape. Adhere the sugar bowl on the pocket inside the card, slightly to the right. Mount the matted sentiment on the upper flap on the front of the card. Tie a pretty green bow, and add it using a glue dot.20110323_TeaPartyInvite_Inside2

Final Notes

Inside

Now, I like to do custom greetings inside using my computer - after getting the details on the shower, I used PhotoShop to create a text box with shaded border, picked a pretty font - trying to match the purple color of course! Print/trim/paste and you're done!

Thanks for stopping by!

Coral_Purple_Sign

LinkWithin

Blog Widget by LinkWithin