Inspiration
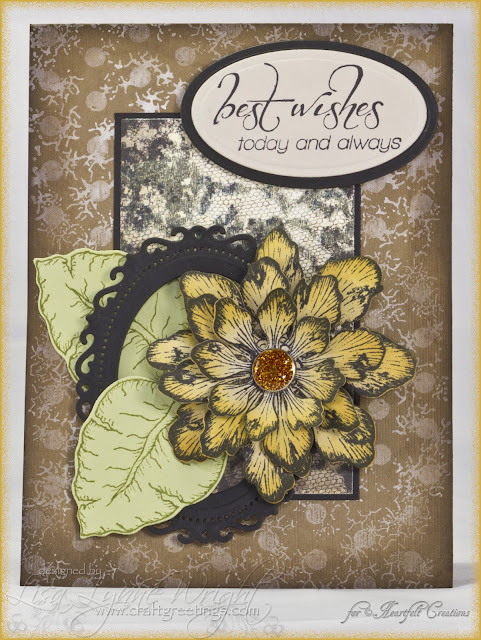
Here's my last card this week for the Heartfelt Creations' May release - the Old English Garden Collection. These are the type of Heartfelt Creations designs that I originally fell in love with - beautiful floral images to easily create 3-D effects! On this card, I incorporated a frame using the new Spellbinders' Floral Oval die with an oval die inside it.
Remember to head over to the HC blog to see all the beautiful DT creations - they are gorgeous!! Leave a comment there by May 15th and you will be eligible to win the entire release valued at $141.99.
Ingredients
Note: finished card size is 4 1/2" x 6"
Heartfelt Creations Products
Paper
| Soft Suede (SU!) | 4 1/2" x 12", scored at 6" |
| Basic Black (SU!) | 2 5/8" x 4 1/8", and 3" x 4", and 2" x 3" |
| Certainly Celery (SU!) | 2 1/2" x 4 1/4" |
| Sahara Sand (SU!) | 4" x 8 1/2" |
| Classic Black Lace DSP (FabScraps) | 2 1/2" x 4" |
Ink
| Jet Black Archival Ink (Ranger) |
| Distress Inks (Ranger): Peeled Paint, Scattered Straw, Wild Honey, Walnut Stain |
| Distress Stains (Ranger): Picket Fence |
Accessories
| Other Products Available at Heartfelt Creations |
|---|
|
|
| Additional Accessories |
| Floral Ovals Nestabilities (Spellbinders) |
| Petite Oval Nestabilities - Small (Spellbinders) |
| Petite Oval Nestabilities - Large (Spellbinders) |
| Ink Blending Tool (Ranger) |
| Brad (Paper Studio) |
| 3-D Foam Squares (Scrapbook Adhesives) |
| Rotary Trimmer (Fiskars) |
Instructions
BASE CARD
Start with a piece of brown card stock measuring 4 1/2" x 6". Score it at 6", and fold. Ink the background stamp with Picket Fence stain, and stamp the card front. Repeat until the entire front is covered. Set aside to let it dry (if you dry with a heat gun, the white will be more intense than in my sample). When dry, use an ink blending tool and Walnut Stain ink to distress the edges of the card.
MAT
Cut black card stock to measure 2 5/8" x 4 1/8", and patterned paper to measure 2 1/2" x 4". Mount in the center of the card front.
SENTIMENT
Stamp the sentiment in black ink on sand card stock. Cut/emboss with the 2 1/2" petite oval die. Cut/emboss black card stock using the 2 3/4" petite oval die. Adhere the sentiment to the black oval mat.
IMAGE
Stamp the 3 largest blossom images on sand card stock in waterproof black ink, and cut out using the matching dies. Blend yellow inks onto the petals. Stack the flowers, and punch a small hole through the center. Fasten the images together with a brad. Stamp the leaf twice using green ink on green card stock, and cut out using the matching die.
ASSEMBLY
Place a plain oval die inside the 4-inch Floral Oval die, and cut/emboss black card stock to create the oval frame. Adhere one leaf image to the card front, then mount the oval frame using foam squares. Add the next leaf using foam squares over the edge of the frame. Then use a foam square to mount the flower, positioning it to cover part of both leaves. Finish my mounting the sentiment with foam squares on the upper right corner of the mat.
Thanks for stopping by!


3 comments:
Lisa, your card is beautiful! Your flower shows all the wonderful detail of the stamp. I love the way you showcased it with the dies. Just gorgeous!
Really like this card!
This is just beautiful and that flower is to die for Luv Sue x
Post a Comment
Your kind comments make my day!